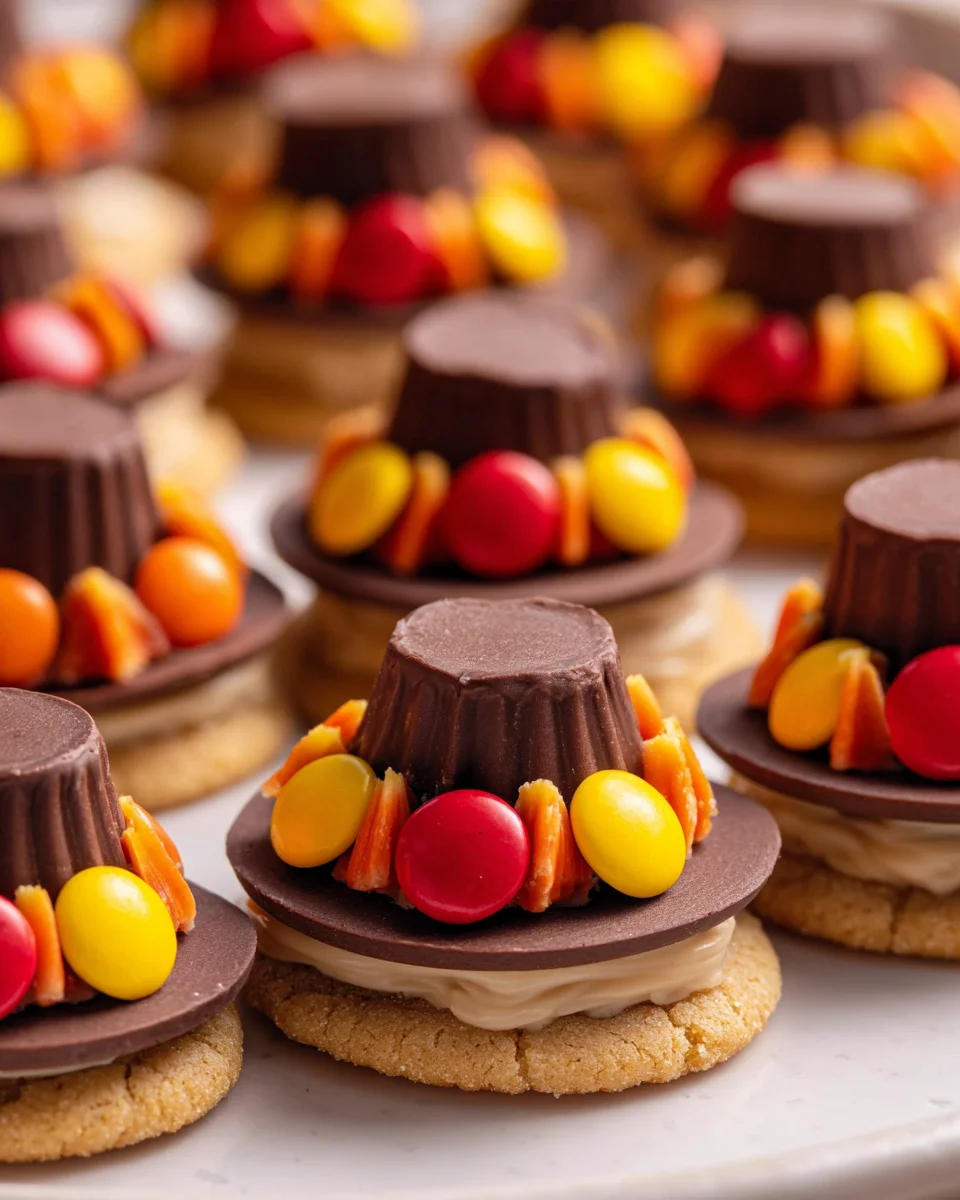
Pilgrim Hat Cookies are not just any treat; they are a delightful, edible symbol of autumn’s bounty and the cherished traditions of Thanksgiving. As the leaves begin to turn and the air grows crisp, I often find myself looking forward to crafting these charming cookies, transforming simple ingredients into a festive masterpiece that never fails to bring smiles. These adorable Pilgrim Hat Cookies perfectly capture the spirit of the season, making them an absolute must-have for any fall gathering or holiday dessert table.
Their cultural significance lies in their playful nod to the iconic imagery of the Pilgrims, instantly connecting them to the historical roots of our Thanksgiving celebrations. What makes this dish so universally adored? It’s a harmonious blend of crisp chocolate cookies, rich peanut butter cups, and a touch of decorative flair that makes them as fun to look at as they are to eat. They offer a fantastic combination of textures and flavors – the crunchy cookie base, the smooth, sweet peanut butter, and the delightful chocolate coating – all in one bite. Plus, they are incredibly easy to assemble, making them a wonderful project for bakers of all ages, especially when little hands want to help create some holiday magic. Get ready to impress your guests with these charming and delicious treats that are sure to become a cherished part of your holiday baking repertoire.

Ingredients:
-
For the Chocolate Cookie Brims:
- 2 ½ cups (300g) all-purpose flour, spooned and leveled
- ¾ cup (75g) unsweetened cocoa powder, Dutch-processed preferred for a darker color and richer flavor
- 1 teaspoon baking soda
- ½ teaspoon salt
- 1 cup (226g) unsalted butter, softened to room temperature (it should yield slightly to a gentle press)
- 1 ¾ cups (350g) granulated sugar
- 2 large eggs, also at room temperature
- 2 teaspoons pure vanilla extract
- 2 tablespoons milk (any kind works, whole milk gives a slightly richer texture), at room temperature
-
For the Royal Icing (our edible “glue” and buckle decoration):
- 4 cups (450g) confectioners’ sugar (powdered sugar), sifted to remove any lumps
- 3 tablespoons meringue powder (this is crucial for stability and quick drying)
- ¼ teaspoon cream of tartar (helps stabilize the egg whites/meringue powder)
- ½ cup (120ml) warm water, plus more as needed (start with less and add slowly)
- ½ teaspoon pure vanilla extract or clear vanilla extract (to keep colors vibrant)
- Yellow or gold gel food coloring (for the buckles)
-
For Assembly:
- Approx. 24-30 mini Reese’s Peanut Butter Cups, unwrapped (one for each Pilgrim Hat Cookie you plan to make)
Baking the Chocolate Cookie Brims:
Creating the perfect chocolate cookie base for our Pilgrim Hat Cookies is the first and most crucial step. These cookies will serve as the broad, sturdy brim of our edible hats. I always take my time with this stage to ensure they are flavorful and have the right texture to hold up to the assembly process.
-
Preparing the Dough:
Before you even think about mixing, make sure all your cold ingredients, especially the butter and eggs, have had ample time to come to room temperature. This seemingly small detail makes a huge difference in the final texture of your Pilgrim Hat Cookies, ensuring a smooth, emulsified dough.
- In a medium bowl, whisk together your all-purpose flour, cocoa powder, baking soda, and salt. Make sure these dry ingredients are thoroughly combined; this prevents pockets of unmixed leavening or salt in your finished cookies. Set this aside for a moment.
- In a large mixing bowl, using an electric mixer fitted with the paddle attachment (or a sturdy hand mixer), cream together the softened unsalted butter and granulated sugar on medium speed. You’ll want to beat this mixture until it’s light and fluffy, which usually takes about 3 to 5 minutes. This creaming action incorporates air into the butter and sugar, contributing to a tender cookie. Scrape down the sides of the bowl often to ensure everything is evenly mixed.
- Beat in the room temperature eggs, one at a time, mixing well after each addition. It’s important to add them individually to allow each egg to fully incorporate into the butter mixture, preventing a curdled appearance. After the eggs are mixed in, stir in the vanilla extract until just combined.
- Reduce your mixer speed to low. Gradually add the dry ingredient mixture to the wet ingredients, mixing only until just combined. Be careful not to overmix here; overmixing can develop the gluten in the flour too much, leading to tough cookies. As soon as you see no more streaks of flour, stop the mixer.
- Finally, add the milk and mix on low speed until just incorporated. The dough for our Pilgrim Hat Cookies should be firm but pliable.
-
Chilling and Rolling:
Chilling the dough is an absolutely vital step for cut-out cookies like these. It allows the butter to firm up, which prevents the cookies from spreading too much in the oven, ensuring your brims maintain their perfect round shape for the Pilgrim Hat Cookies.
- Divide the dough into two equal portions. Flatten each portion into a disk, wrap it tightly in plastic wrap, and refrigerate for at least 1 hour. For best results and easier handling, I often chill mine for 2 hours, or even overnight. This chilling time is non-negotiable for perfectly shaped Pilgrim Hat Cookies.
- Once chilled, preheat your oven to 350°F (175°C). Line several baking sheets with parchment paper or silicone baking mats. This ensures even baking and prevents sticking, making cleanup a breeze.
- Lightly flour a clean work surface and your rolling pin. Take one disk of chilled dough from the refrigerator. Roll out the dough to a thickness of about ¼ inch. Aim for an even thickness across the entire sheet of dough for consistent baking. If the dough starts to get too sticky or warm, pop it back into the fridge for 10-15 minutes.
- Using a 2-inch round cookie cutter, cut out as many circles as you can from the rolled dough. Carefully transfer the cut-out cookies to your prepared baking sheets, leaving about 1 inch between each cookie to allow for slight spreading.
- Gather the dough scraps, gently re-roll them, and cut out more circles until all the dough is used. Try to re-roll the dough as few times as possible to prevent it from becoming tough.
-
Baking the Cookies:
Baking these cookie brims to perfection is key. We want them firm enough to handle, but still deliciously tender. Overbaking can make them hard and dry, which isn’t ideal for our delightful Pilgrim Hat Cookies.
- Bake the cookies for 8-10 minutes. The exact time will depend on your oven and the thickness of your cookies. You’ll know they’re done when the edges are set and appear slightly firm, but the centers still look a little soft. They will continue to set as they cool.
- For even baking, rotate your baking sheets halfway through the baking time. This helps ensure that all your cookie brims for the Pilgrim Hat Cookies bake uniformly.
-
Cooling:
Patience is a virtue, especially when cooling cookies! Rushing this step can lead to breakage.
- Once baked, remove the baking sheets from the oven and let the cookies cool on the sheets for about 5 minutes. They are quite delicate when hot.
- After 5 minutes, carefully transfer the cookies to a wire rack to cool completely. They must be completely cool before you even think about assembling your Pilgrim Hat Cookies with icing, otherwise, the icing will melt.
Preparing the Royal Icing:
Our royal icing serves two crucial purposes for these Pilgrim Hat Cookies: it’s the strong adhesive that holds the “hat” to the “brim,” and it’s the medium for creating our iconic gold buckles. The key to royal icing is consistency and proper mixing.
-
Mixing the Icing:
Getting the base icing right is fundamental. I always start with sifting to avoid any pesky lumps that can clog my piping bag later.
- In a large, clean mixing bowl, combine the sifted confectioners’ sugar, meringue powder, and cream of tartar. Whisk these dry ingredients together thoroughly. Meringue powder is essential for creating a stable icing that dries hard, which is exactly what we need for our Pilgrim Hat Cookies.
- Using your electric mixer (stand mixer with whisk attachment or hand mixer), slowly add the warm water, about ¼ cup at a time, along with the vanilla extract. Beat on low speed until combined, then increase the speed to medium-high.
- Continue to beat for 5 to 7 minutes, or until the icing is very thick, glossy, and holds stiff peaks. When you lift the whisk, the peaks should stand upright without drooping. This stiff consistency is perfect for creating a strong bond for our Pilgrim Hat Cookies.
-
Achieving the Right Consistency:
We’ll need two slightly different consistencies of royal icing for our Pilgrim Hat Cookies: a thicker one for gluing and a slightly thinner one for piping the buckle. Flexibility is key here.
- For Gluing the Hats: Take about two-thirds of the stiff royal icing and transfer it to a separate bowl. This will be your “glue.” It should be thick enough to hold its shape when piped, but not so stiff that it’s difficult to work with. If it’s too stiff, add a tiny drop of water (literally a drop or two) and mix until it reaches a thick, pipeable consistency. It should resemble thick toothpaste.
- For the Buckles: To the remaining one-third of the stiff royal icing, add a few drops of warm water (maybe ½ to 1 teaspoon) and mix thoroughly. You want this icing to be slightly thinner than the “glue” icing – think honey consistency. When you lift a spoon, the icing should flow off it slowly and smoothly, but not run like water. This smoother consistency is ideal for piping neat, clean buckle shapes for our Pilgrim Hat Cookies. If it’s too thin, add a tiny bit more sifted powdered sugar.
-
Coloring the Buckle Icing:
A vibrant gold buckle truly makes these Pilgrim Hat Cookies pop! Gel food coloring is my go-to for rich, concentrated color without adding too much liquid.
- Add a small amount of yellow or gold gel food coloring to the slightly thinner royal icing designated for buckles. Start with just a tiny dab on a toothpick, mix it in thoroughly, and then add more if needed to achieve your desired shade of gold or vibrant yellow. Remember, gel colors are highly concentrated, so a little goes a long way.
- Transfer the “glue” icing to a piping bag fitted with a round tip (like Wilton 1A or a plain coupler, or even just a snip off the end of the bag for a small opening).
- Transfer the gold/yellow buckle icing to a separate piping bag fitted with a very small round tip (like Wilton #2 or #3) for fine detail work.
Assembling Your Pilgrim Hat Cookies:
Now for the fun part – bringing our Pilgrim Hat Cookies to life! This stage is all about careful placement and a steady hand. Make sure you have a clear, clean workspace.
-
Preparing the Components:
Organization makes assembly a breeze. Have everything ready before you start.
- Ensure all your chocolate cookie brims are completely cool. If they are even slightly warm, the royal icing will melt or not set properly.
- Unwrap all your mini Reese’s Peanut Butter Cups. This is best done beforehand to avoid sticky fingers and interruptions during the assembly process. You want them ready to go when you are.
-
Attaching the Hats:
This is where our royal icing glue comes into play. Precision here ensures sturdy and good-looking Pilgrim Hat Cookies.
- Pick up one of your cooled chocolate cookie brims.
- Take your piping bag with the thicker royal icing (the “glue”). Pipe a generous dollop or a small circle of icing directly in the center of the cookie brim. The size of the dollop should be slightly smaller than the base of a mini Reese’s Peanut Butter Cup. We need enough to create a good seal, but not so much that it oozes out excessively.
- Carefully take an unwrapped mini Reese’s Peanut Butter Cup. Invert it so the wider, flat side is facing up and the narrower, bottom side is placed onto the dollop of royal icing on the chocolate cookie. This creates the classic “hat” shape.
- Gently press down on the peanut butter cup for a few seconds to ensure it adheres well to the cookie and the icing spreads slightly to create a strong bond. Don’t press too hard, or you risk cracking the cookie or squishing the peanut butter cup.
- Set the assembled Pilgrim Hat Cookie aside on a clean tray or parchment paper. Repeat this process for all your cookies. Allow the icing to set for at least 15-20 minutes before moving on to adding the buckles. This initial setting time helps prevent the hats from shifting while you’re piping.
-
Creating the Buckles:
The buckle is the signature detail of our Pilgrim Hat Cookies. A steady hand and patience will give you beautifully defined buckles.
- Once the hats are reasonably stable on their brims, pick up one of your Pilgrim Hat Cookies.
- Take your piping bag with the gold or yellow royal icing (the slightly thinner consistency for details). Position the piping tip on the side of the inverted Reese’s Peanut Butter Cup, about halfway up.
- Carefully pipe a small square or rectangle shape to represent the buckle. I find it easiest to pipe one side, then the opposite side, and then connect them with two smaller lines. Aim for a neat, distinct shape. You can also pipe a solid square if you prefer.
- Pro Tip: If your hand isn’t super steady, you can practice piping squares on a piece of parchment paper first to get the hang of it. Also, try to keep consistent pressure on the piping bag for uniform lines.
- Repeat this buckling process for all your Pilgrim Hat Cookies.
-
Setting and Storing:
Proper drying time ensures your Pilgrim Hat Cookies are sturdy and beautiful for serving or gifting.
- Once all the buckles are piped, allow the Pilgrim Hat Cookies to sit undisturbed at room temperature for several hours, or preferably overnight. This gives the royal icing ample time to fully harden. If the icing isn’t completely dry, your buckles might smudge, or the hats might detach.
- Store your finished Pilgrim Hat Cookies in an airtight container at room temperature. They will stay fresh for up to 5-7 days. Because of the royal icing, these cookies do not need to be refrigerated, and refrigeration can actually cause the royal icing to weep or become sticky due to condensation.
- These delightful treats are perfect for Thanksgiving gatherings, fall festivals, or simply as a fun, themed snack. Enjoy sharing your homemade Pilgrim Hat Cookies with friends and family!
Conclusion:
Well, my friends, we’ve reached the sweet finale of our culinary journey, and I genuinely hope you’re feeling as excited as I am about the prospect of bringing this delightful treat into your own kitchen! What truly makes this recipe an absolute must-try, in my humble opinion, is its wonderful blend of simplicity and sheer charm. You don’t need to be a seasoned baker to achieve spectacular results; the steps are straightforward, the ingredients are accessible, and the payoff is a dessert that looks like it took hours of intricate work, when in reality, it’s a breeze. Beyond the ease, there’s the undeniable joy that comes from creating something so visually appealing and incredibly tasty. It’s a recipe that sparks creativity, allowing you to personalize it to your heart’s content, and it brings a smile to everyone who takes a bite. Whether you’re a baking novice looking for a confidence boost or a seasoned pro seeking a fun, festive project, this recipe truly delivers on all fronts.
The beauty of these confections doesn’t stop at their creation; it extends to how wonderfully versatile they are for serving. Imagine them as the star of your dessert table, artfully arranged on a festive platter, perhaps alongside a bowl of freshly whipped cream or a scattering of toasted nuts for added texture. They pair absolutely divinely with a warm mug of apple cider or a robust cup of coffee on a chilly afternoon, offering that perfect comforting sweetness. For a special occasion, consider serving them with a scoop of vanilla bean ice cream, allowing the slight warmth of the cookie to soften the ice cream into a delightful puddle of pure bliss. Don’t be afraid to experiment with variations either! While the core recipe is fantastic, you could easily swap out the cookie base for a different flavor – perhaps a chocolate wafer for a darker, richer experience, or a gingerbread snap for a more spiced profile during the holiday season. The possibilities for the “hat” component are endless too; try using different types of chocolate candies, from peanut butter cups to peppermint patties, creating entirely new flavor combinations and visual aesthetics for your Pilgrim Hat Cookies. You could even drizzle a contrasting color of melted chocolate over the finished hats for an extra touch of elegance or whimsy.
Get Creative with Your Pilgrim Hat Cookies!
Another fantastic variation involves playing with the frosting. Instead of traditional vanilla, imagine a maple-flavored buttercream for an autumnal touch, or a rich cream cheese frosting that adds a lovely tang. You could also tint the frosting different colors to match a specific theme or holiday, making these cookies adaptable far beyond just a single season. Think about adding a sprinkle of edible glitter or some festive sprinkles before the frosting sets for an extra sparkle. For those looking for a slightly healthier twist (if that’s even possible with cookies!), consider incorporating some finely chopped dried fruit like cranberries or apricots into the cookie dough itself, adding bursts of chewy texture and natural sweetness. The core design of the Pilgrim hat is so iconic and charming, and with just a few tweaks, you can make these cookies uniquely your own, reflecting your personality and taste.
So, what are you waiting for? I wholeheartedly encourage you to roll up your sleeves, gather your ingredients, and dive into making this wonderfully rewarding recipe. Trust me, the sheer delight on the faces of your family and friends when they see and taste these will be more than worth the minimal effort. This isn’t just about baking; it’s about creating memories, sharing joy, and indulging in a little bit of homemade magic. Once you’ve whipped up your batch and perhaps put your own creative spin on them, please, please share your experience with me! I absolutely love seeing your culinary adventures. Did you try a new variation? Was there a particular step you found surprisingly easy or incredibly fun? Snap a photo, tell me your stories, and let’s celebrate the simple, heartwarming pleasure of baking together. Happy baking, everyone!
Pilgrim Hat Cookies: Festive & Fun Thanksgiving Treat!
Pilgrim Hat Cookies are a delightful, edible symbol of autumn’s bounty and the cherished traditions of Thanksgiving. These adorable cookies perfectly capture the spirit of the season, making them an absolute must-have for any fall gathering or holiday dessert table. They offer a fantastic combination of textures and flavors, making them a wonderful project for bakers of all ages.
Ingredients
Instructions
Important Information
Nutrition Facts (Per Serving)
It is important to consider this information as approximate and not to use it as definitive health advice.
Allergy Information
Please check ingredients for potential allergens and consult a health professional if in doubt.
Leave a Comment