Maple Butter Glazed Turkey Recipe is more than just a dish; it’s an invitation to an unforgettable culinary experience that promises to elevate any holiday table or special gathering. I am absolutely thrilled to guide you through crafting a turkey so spectacularly moist, so incredibly flavorful, and so beautifully golden, it will undoubtedly become the star of your festive feast. Imagine the glistening, caramelized skin, kissed with the perfect balance of sweet maple and rich butter, giving way to unbelievably tender, juicy meat that practically melts in your mouth. This combination isn’t just delicious; it’s a celebration of classic North American flavors, bringing together the cherished tradition of a roasted turkey with the natural sweetness of maple syrup, a staple with deep historical roots in the region.
You might be wondering, “Why this turkey?” The answer lies in the exquisite alchemy of the glaze. It doesn’t just add a layer of flavor; it transforms the entire bird, sealing in moisture and creating an aromatic masterpiece that will fill your home with the most delightful scents. People adore this dish not only for its undeniable taste – that perfect harmony of sweet and savory – but also for the stunning presentation and the sheer joy it brings to the dining experience. Trust me, once you experience the magic of this Maple Butter Glazed Turkey Recipe, you’ll understand why it’s destined to become a beloved tradition in your own kitchen.

Ingredients:
Creating a truly spectacular Maple Butter Glazed Turkey Recipe begins with the finest ingredients. I always make sure to have everything prepped and measured before I start, it just makes the whole process so much smoother and more enjoyable!
- For the Turkey:
- 1 (12-16 lb) whole turkey, fresh or thawed
- 2 large yellow onions, quartered
- 4 celery stalks, roughly chopped
- 4 carrots, roughly chopped
- 1 head of garlic, cut in half horizontally
- A few sprigs of fresh rosemary
- A few sprigs of fresh thyme
- 1 lemon, halved
- 1/2 cup (1 stick) unsalted butter, softened
- 2 tablespoons olive oil
- Salt and freshly ground black pepper, to taste
- Kitchen twine (for trussing, optional but recommended)
- For the Brine (Optional, but highly recommended for a juicy turkey):
- 2 gallons cold water
- 1 cup kosher salt
- 1/2 cup granulated sugar
- 1/4 cup whole black peppercorns
- 4 bay leaves
- 2 oranges, quartered
- 1 head of garlic, halved horizontally
- A large bunch of fresh thyme and rosemary
- For the Maple Butter Glaze:
- 1 cup (2 sticks) unsalted butter, melted
- 1 cup pure maple syrup (grade A dark robust taste is my favorite for this!)
- 1/4 cup apple cider vinegar
- 2 tablespoons Dijon mustard
- 1 tablespoon fresh rosemary, finely chopped
- 1 tablespoon fresh thyme, finely chopped
- 1 teaspoon smoked paprika (optional, but adds a lovely depth)
- 1/2 teaspoon cayenne pepper (optional, for a hint of warmth)
- Salt and freshly ground black pepper, to taste
- For the Gravy (Optional, but highly recommended with all those delicious drippings!):
- All the pan drippings from the roasted turkey
- 1/4 cup all-purpose flour
- 2-3 cups chicken or turkey broth
- Salt and freshly ground black pepper, to taste
Preparing the Turkey: Brine for Unmatched Juiciness
- Brine Preparation (If Brining): This step is my secret weapon for a truly moist and flavorful turkey, even before the glaze! In a very large stockpot or a clean, food-grade bucket, combine the 2 gallons of cold water, kosher salt, granulated sugar, black peppercorns, bay leaves, quartered oranges, halved garlic head, and fresh thyme and rosemary. Stir vigorously until the salt and sugar are completely dissolved. It might take a few minutes, but don’t rush this part, as proper dissolution is key for the brine to work its magic.
- Turkey Submersion: Carefully remove the neck and giblets from the turkey cavity (save them for gravy if you like!). Rinse the turkey inside and out with cold water, then gently lower it into the brine solution, making sure it is fully submerged. If your turkey floats a bit, you can place a plate or a clean weight on top to keep it under the liquid.
- Chilling Time: Cover the container and refrigerate for 12 to 24 hours. I usually aim for around 18 hours. This brining process allows the turkey to absorb moisture and flavor, resulting in an incredibly juicy bird that’s practically impossible to dry out during roasting. This is truly what sets a good turkey apart from a great one.
- Rinsing and Drying: After brining, remove the turkey from the solution and discard the brine. Rinse the turkey thoroughly inside and out under cold running water to remove any excess salt. This is important to prevent your turkey from tasting too salty. Pat the turkey absolutely dry with paper towels, both inside and out. A dry skin is crucial for achieving that beautiful, crispy, golden-brown finish when roasting your Maple Butter Glazed Turkey.
- Air Drying (Optional but Recommended): For the absolute crispiest skin, I like to place the dried turkey on a rack set inside a roasting pan and refrigerate it uncovered for another 4-8 hours, or even overnight. This allows the skin to dry out further, creating a superior texture. If you’re short on time, skipping this is okay, but it does make a noticeable difference!
Preparing for Roasting: Setting the Stage for a Perfect Maple Butter Glazed Turkey
- Preheat Your Oven: My first step, always, is to preheat the oven to 425°F (220°C). Getting the oven to the right temperature before the turkey goes in is essential for that initial sear and even cooking.
- Aromatic Bed Preparation: In the bottom of a large roasting pan (one with a V-rack is ideal), scatter the quartered onions, roughly chopped celery, carrots, halved garlic head, lemon halves, and sprigs of fresh rosemary and thyme. This aromatic bed will not only infuse wonderful flavor into your turkey but also elevate the turkey slightly, allowing for better air circulation and preventing the bottom from getting soggy. Plus, these will contribute amazing flavor to your pan drippings for gravy later!
- Turkey Seasoning: Place the dried turkey on top of the V-rack (or directly on the aromatic bed if you don’t have a rack). In a small bowl, combine the softened 1/2 cup butter with 2 tablespoons of olive oil. Using your hands, gently separate the skin from the breast meat. Be careful not to tear the skin! Rub about half of the butter-olive oil mixture directly onto the breast meat, under the skin. This adds incredible moisture and flavor directly to the breast.
- External Seasoning and Trussing: Rub the remaining butter-olive oil mixture all over the outside of the turkey skin. Season the entire turkey generously with salt and freshly ground black pepper. Don’t be shy with the seasoning here; a large bird needs a good amount to ensure flavor penetrates.
- Trussing (Optional): If you like, you can truss the turkey. This simply means tying the legs together with kitchen twine and tucking the wing tips under the body. Trussing helps the turkey cook more evenly and makes for a more compact, attractive presentation. I usually do this because it helps prevent the wing tips and leg ends from overcooking and drying out.
- Initial Oven Placement: Place the prepared turkey in the preheated 425°F (220°C) oven.
Crafting the Maple Butter Glaze: The Star of Our Maple Butter Glazed Turkey Recipe
While your turkey gets its initial roast, let’s prepare the star of the show – our luscious Maple Butter Glaze. This glaze is what gives our turkey its signature shine, incredible flavor, and irresistible caramelization.
- Melt the Butter: In a medium saucepan, melt 1 cup of unsalted butter over medium heat.
- Combine Glaze Ingredients: Once the butter is melted and slightly bubbling, remove it from the heat. Stir in the pure maple syrup, apple cider vinegar, Dijon mustard, finely chopped fresh rosemary, finely chopped fresh thyme, smoked paprika (if using), and cayenne pepper (if using). Whisk everything together until it’s beautifully combined and smooth.
- Season the Glaze: Taste the glaze and season with salt and freshly ground black pepper as needed. I find that a little extra salt helps balance the sweetness of the maple syrup. Set this glorious glaze aside. It will thicken slightly as it cools, which is perfect for painting onto our turkey.
The Roasting Journey: Achieving a Perfectly Glazed and Juicy Turkey
- Initial High Heat Roast: Roast the turkey at 425°F (220°C) for the first 30 minutes. This initial burst of high heat helps to crisp up the skin and give it a beautiful head start on browning.
- Reduce Heat and First Basting: After 30 minutes, reduce the oven temperature to 350°F (175°C). Carefully remove the roasting pan from the oven. At this point, I like to baste the turkey with any pan drippings that have accumulated. This helps to keep the skin moist and encourages even browning. If you notice the skin browning too quickly, you can loosely tent it with aluminum foil, especially over the breast area.
- Continued Roasting and Basting: Return the turkey to the oven and continue roasting, basting every 30-45 minutes with the pan drippings. I avoid using the maple butter glaze for the first hour or two of roasting, as the sugar in the glaze can burn if applied too early. We want beautiful caramelization, not charring!
- Introducing the Maple Butter Glaze: After about 1.5 to 2 hours of total roasting (for a 12-16 lb turkey, actual time varies), when the turkey is starting to look golden and is about two-thirds of the way cooked, it’s time to start applying our Maple Butter Glaze. This is where the magic really happens for our Maple Butter Glazed Turkey Recipe!
- Glazing Process: Every 20-30 minutes, remove the turkey from the oven and liberally brush it all over with the maple butter glaze. Make sure to get into all the crevices. Return it to the oven. Repeat this glazing process every 20-30 minutes until the turkey is fully cooked. You’ll notice the skin transforming into a gorgeously glossy, caramelized, deep golden-brown hue.
- Monitoring Internal Temperature: The most accurate way to tell if your turkey is done is by using a meat thermometer. Insert it into the thickest part of the thigh, avoiding the bone. The turkey is fully cooked when the internal temperature reaches 165°F (74°C) in the thigh. I also check the thickest part of the breast, aiming for the same temperature. Remember that the temperature will continue to rise a few degrees after it comes out of the oven.
- Total Roasting Time: A 12-16 lb turkey typically takes about 3 to 4 hours to roast, but this can vary greatly depending on your oven and the turkey’s exact size and starting temperature. Always rely on your meat thermometer, not just the clock! If the turkey skin starts to get too dark before the internal temperature is reached, loosely tent the entire turkey with aluminum foil.
- The Beautiful Finish: When your thermometer tells you it’s done, and the skin is a stunning, deep golden-brown with that irresistible maple-butter glaze glistening, it’s time to take it out!
Resting and Carving: The Final Touches for Your Maple Butter Glazed Turkey
- Crucial Resting Period: This step is just as important as the roasting itself, so please don’t skip it! Once the turkey is out of the oven, transfer it to a large cutting board or platter. Tent it loosely with aluminum foil. Let the turkey rest for at least 20-30 minutes, or even up to 45 minutes for a larger bird. This resting period allows the juices to redistribute throughout the meat, ensuring every slice is incredibly moist and flavorful. If you cut into it too soon, all those precious juices will simply run out onto your cutting board, leaving you with dry meat.
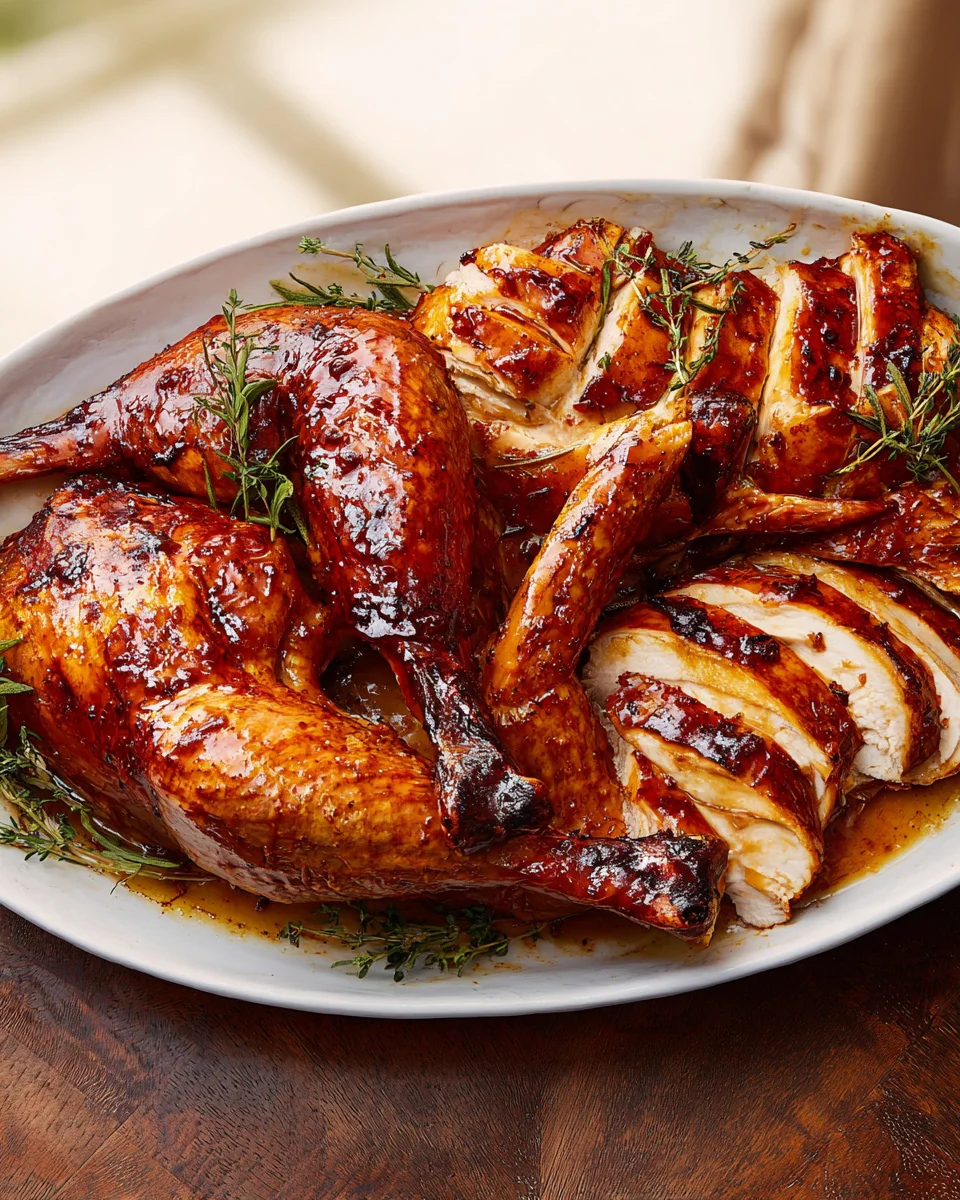
- Carving Your Masterpiece: After resting, carve the turkey. I usually start by removing the legs and thighs, then separating the drumsticks from the thighs. Next, I slice the breast meat from the bone. Arrange your beautifully carved Maple Butter Glazed Turkey on a platter, ready to be admired and devoured!
Making Maple Butter Gravy (Optional, but highly recommended!)
Don’t let those flavorful pan drippings go to waste! Making a simple gravy is the perfect accompaniment to your Maple Butter Glazed Turkey.
- Collect the Drippings: Carefully pour all the pan drippings from the roasting pan into a fat separator, or into a large measuring cup. Let it sit for a few minutes to allow the fat to separate and rise to the top.
- Deglaze the Pan: While the fat is separating, place the roasting pan over two stove burners set to medium heat. Add about 1 cup of chicken or turkey broth to the pan. Use a wooden spoon to scrape up all those delicious browned bits from the bottom of the pan – this is where so much flavor resides! Let it simmer for a few minutes, then pour this liquid into your fat separator with the drippings.
- Separate Fat and Prepare Roux: Once separated, pour off the fat, reserving about 1/4 cup. Discard the rest of the fat (or save for another use). In a clean saucepan, melt the reserved 1/4 cup of turkey fat over medium heat. Whisk in the 1/4 cup of all-purpose flour to create a roux. Cook for 1-2 minutes, stirring constantly, until the roux is light golden brown.
- Thicken the Gravy: Slowly whisk in the defatted pan drippings along with the remaining 1-2 cups of chicken or turkey broth. Continue whisking as the gravy comes to a simmer and thickens. If it’s too thick, add more broth; if too thin, let it simmer gently until it reduces to your desired consistency.
- Strain and Serve: For an extra smooth gravy, you can strain it through a fine-mesh sieve. Taste and season with salt and freshly ground black pepper. Serve your rich, flavorful gravy alongside your magnificent Maple Butter Glazed Turkey. Enjoy every single bite of this incredible meal!
Conclusion:
Well, my culinary adventurers, we’ve come to the grand finale of our journey through what I truly believe is one of the most remarkable recipes you’ll ever encounter. This isn’t just another way to cook a bird; it’s an experience, a statement, and a guaranteed showstopper for any table. I can’t emphasize enough why this particular creation is an absolute must-try. From the moment that rich, aromatic glaze starts to caramelize in your oven, filling your home with an irresistible scent, you’ll understand. The magic truly happens in that exquisite balance of sweet maple and savory butter, which coats the turkey in a gleaming, deeply flavorful crust. Beneath that glorious skin, the meat itself becomes incredibly tender and juicy, absorbing subtle hints of the glaze while retaining its natural succulence. Every single bite delivers a symphony of flavors and textures – crispy, sweet, savory, and unbelievably moist. It elevates a traditional roast into something truly extraordinary, transforming an often-overlooked centerpiece into the star attraction it was always meant to be. This isn’t just a meal; it’s a celebration, and the satisfaction of seeing your loved ones’ eyes light up as they taste this masterpiece is a reward in itself. The Maple Butter Glazed Turkey Recipe truly offers a unique and unforgettable flavor profile that will have everyone asking for seconds, and then for the recipe!
Now that you’re convinced of its deliciousness, let’s talk about how to make this culinary triumph truly shine on your table. For serving suggestions, I love to pair this magnificent turkey with classic, comforting sides that complement its rich flavor without overpowering it. Creamy mashed potatoes, perhaps infused with roasted garlic or a hint of chives, are practically mandatory for soaking up any glorious pan drippings. Roasted root vegetables, like carrots, parsnips, and sweet potatoes, tossed with a little fresh rosemary and olive oil, will caramelize beautifully alongside the turkey’s sweetness. And speaking of sweetness, a homemade cranberry sauce, bright and tangy, provides a wonderful counterpoint to the glaze’s richness. For a touch of green, consider perfectly steamed asparagus or crisp green beans almondine. Don’t forget a rich gravy made from the turkey’s own drippings; it’s an absolute game-changer. For a less traditional but equally delightful pairing, consider a wild rice pilaf studded with dried cranberries and pecans, or a savory cornbread dressing. And for presentation? A simple garnish of fresh herbs like thyme and rosemary, perhaps a few orange slices, will make your beautifully roasted turkey look even more inviting. Trust me, the visual appeal is just as important as the taste!
But the beauty of a great recipe lies in its adaptability, and the Maple Butter Glazed Turkey is no exception. While the core recipe is fantastic as written, don’t hesitate to experiment with variations to suit your taste or occasion. Want a little more warmth and spice? Try adding a pinch of ground cinnamon, nutmeg, or even a tiny dash of allspice to the maple butter glaze mixture. For those who enjoy a subtle kick, a tiny amount of cayenne pepper or a splash of hot sauce in the glaze can add an intriguing layer of heat. If you’re feeling adventurous, a tablespoon of bourbon or dark rum can introduce a sophisticated depth to the glaze’s flavor profile, making it even more complex and aromatic. This glaze isn’t just for a whole turkey, either! You can easily adapt this incredible maple butter concoction to smaller cuts, like turkey breasts, thighs, or even chicken pieces, significantly reducing cooking time while still delivering that signature irresistible flavor. This makes it a fantastic option for a weeknight meal when you’re craving that special taste but don’t have hours to roast a whole bird. Imagine the same glorious crisp skin and juicy meat, but ready in a fraction of the time! You could also experiment with adding different aromatics to the roasting pan, such as sliced apples, pears, or even onions and celery, which will infuse the pan drippings with even more flavor for your gravy. The possibilities are truly endless, and each variation offers a delightful new twist on a beloved classic.
So, my dear friends, there you have it. My heartfelt plea for you to embrace this truly exceptional dish. I’ve shared all my tips, tricks, and enthusiasm because I genuinely believe this is a recipe that deserves a place in your culinary repertoire. Don’t just read about it; dive in and experience the magic for yourself! I promise you won’t be disappointed. The rich aroma, the golden-brown crisp skin, the unbelievably tender and juicy meat – it all comes together to create a dining experience that is nothing short of spectacular. This is your moment to impress your family, delight your guests, or simply treat yourself to something truly special. There’s an immense joy in creating something so delicious from scratch, and this recipe delivers that joy in spades. So, preheat your oven, gather your ingredients, and prepare to create something truly memorable. And once you’ve had the pleasure of tasting this incredible creation, I would absolutely love to hear about your experience! Please, come back and share your stories, your photos, and your triumphs in the comments below. What did you pair it with? Did you try any variations? Your insights are invaluable to me and to other home cooks embarking on their own culinary adventures. I am so confident that this Maple Butter Glazed Turkey Recipe will become a cherished favorite in your home, just as it has in mine. Happy cooking, and bon appétit!
Maple Butter Glazed Turkey
This Maple Butter Glazed Turkey recipe creates a spectacularly moist, incredibly flavorful, and beautifully golden turkey. Featuring glistening, caramelized skin kissed with sweet maple and rich butter, giving way to unbelievably tender, juicy meat. A celebration of classic North American flavors, perfect for any holiday table.
Ingredients
Instructions
Important Information
Nutrition Facts (Per Serving)
It is important to consider this information as approximate and not to use it as definitive health advice.
Allergy Information
Please check ingredients for potential allergens and consult a health professional if in doubt.
Leave a Comment