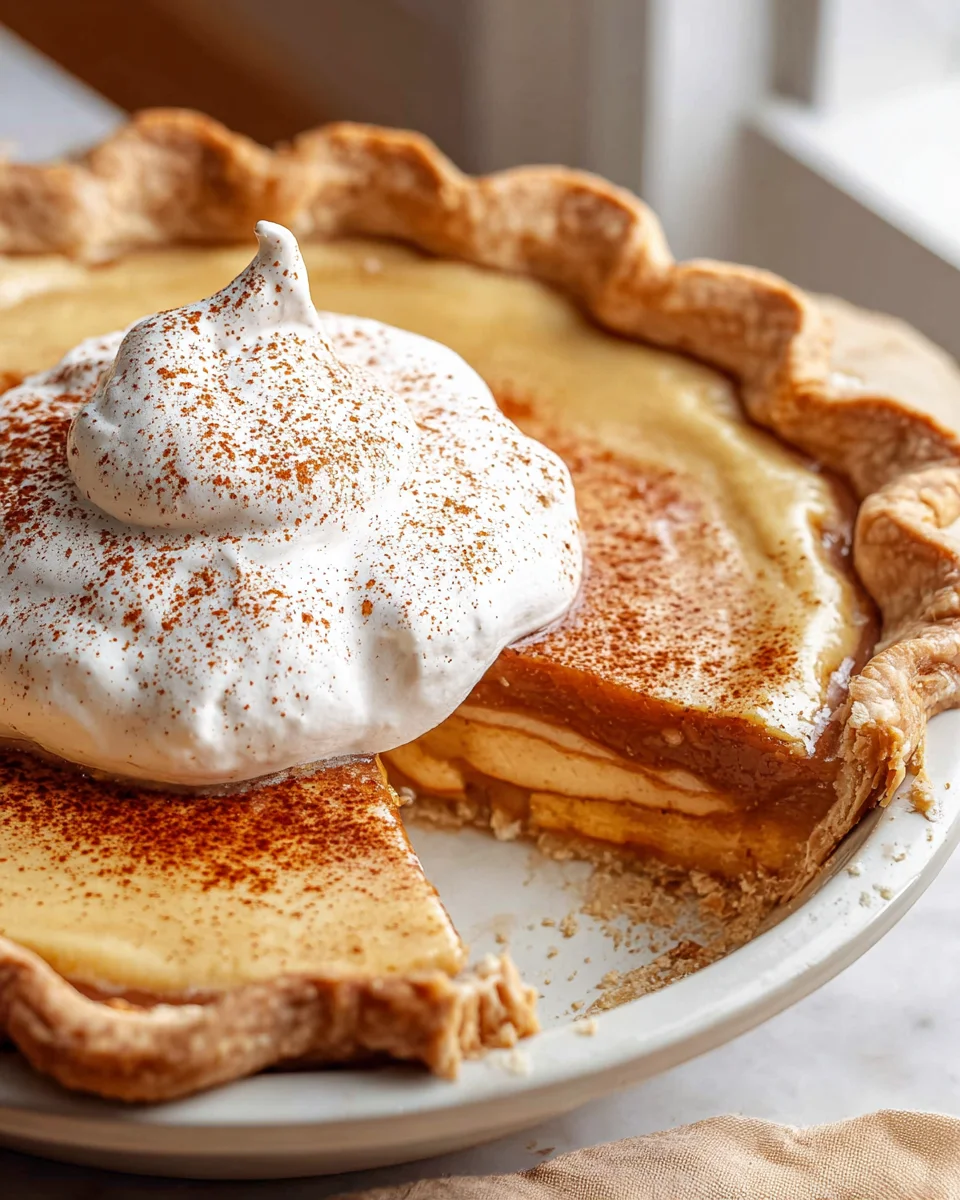
Apple Butter Pie With Cinnamon Whipped Cream is more than just a dessert; it’s a warm hug for your soul, a nostalgic journey back to simpler times with every delightful bite. Imagine the concentrated, sweet-tart essence of slow-cooked apples, nestled in a perfectly flaky crust, all crowned with a cloud of light, fragrant cinnamon whipped cream. If you’re searching for a unique twist on a classic, prepare to be utterly captivated by this comforting masterpiece.
The tradition of apple butter itself runs deep in American history, particularly in the fall months and among communities like the Pennsylvania Dutch, where preserving the bountiful apple harvest was a cornerstone of culinary life. This rich, smooth spread, created by simmering apples for hours until caramelized and deeply flavorful, brings an unparalleled depth to baking. While traditional apple pie holds a cherished place, transitioning that beloved apple butter into a pie offers an incredibly smooth, intensely apple-flavored experience that stands apart. People adore this dish not just for its comforting familiarity but for its exquisite balance: the luscious, spiced apple butter filling provides a dense yet tender counterpoint to the crisp pastry, beautifully complemented by the airy, spiced topping. Every spoonful of this Apple Butter Pie With Cinnamon Whipped Cream promises a symphony of textures and flavors, making it an instant favorite for any gathering, or simply a treat for yourself on a cozy evening.

Ingredients:
-
For the Flaky Pie Crust:
- 2 ½ cups (300g) all-purpose flour, plus more for dusting – I always use a good quality unbleached flour for the best texture.
- 1 teaspoon granulated sugar – Just a touch to aid in browning and flavor.
- 1 teaspoon salt – Crucial for balancing the flavors.
- 1 cup (226g) unsalted butter, very cold and cut into ½-inch cubes – Keeping your butter super cold is my top secret for a truly flaky crust. Pop it in the freezer for 15 minutes before you start.
- ½ cup (120ml) ice water, plus more if needed – Again, cold is key! I like to have a small bowl of ice water ready.
-
For the Apple Butter Filling:
- 2 cups (about 500g) good quality apple butter – Whether homemade or store-bought, make sure it’s rich and flavorful. I prefer a slightly less sweet version so I can control the sugar.
- ¼ cup (50g) granulated sugar – Adjust this based on the sweetness of your apple butter. Taste and decide!
- 2 tablespoons light brown sugar, packed – Adds a lovely molasses note and depth.
- 2 tablespoons cornstarch (or all-purpose flour) – This is our thickening agent to ensure the filling sets beautifully.
- 1 teaspoon ground cinnamon – Complements the apple butter perfectly.
- ½ teaspoon ground nutmeg – A warm, aromatic addition that pairs wonderfully with apples.
- ¼ teaspoon ground cloves or allspice – Adds another layer of complex spice.
- 1 tablespoon fresh lemon juice – Brightens the flavors and prevents the filling from becoming cloyingly sweet.
- 1 large egg, lightly beaten (for egg wash) – For that beautiful golden-brown crust.
- 1 tablespoon milk or water (for egg wash) – To thin out the egg for an even wash.
-
For the Cinnamon Whipped Cream:
- 1 ½ cups (360ml) heavy whipping cream, very cold – The colder your cream, the faster and better it whips!
- ¼ cup (30g) powdered sugar (confectioners’ sugar) – I prefer powdered sugar for whipped cream as it dissolves instantly and prevents a grainy texture.
- 1 teaspoon ground cinnamon – The star of our “Cinnamon Whipped Cream”!
- ½ teaspoon vanilla extract – A touch of vanilla always enhances sweet flavors.
-
Optional Garnish:
- Extra sprinkle of cinnamon, cinnamon sticks, or thinly sliced apple pieces.
Preparing the Flaky Pie Crust
-
Combine Dry Ingredients:
In a large bowl, I like to whisk together the 2 ½ cups of all-purpose flour, 1 teaspoon of granulated sugar, and 1 teaspoon of salt. Make sure these are thoroughly combined so the salt and sugar are evenly distributed throughout the flour mixture. This forms the base for our incredibly flaky pie crust, essential for a perfect Apple Butter Pie With Cinnamon Whipped Cream.
-
Cut in the Cold Butter:
Now comes the fun part for achieving flakiness! Add your very cold, ½-inch cubed unsalted butter to the flour mixture. Using a pastry blender, two knives, or even your fingertips (working quickly so the butter doesn’t warm up too much), cut the butter into the flour until the mixture resembles coarse meal with some pea-sized pieces of butter still visible. It’s absolutely critical not to overmix here; those larger butter pieces are what create steam in the oven, leading to that coveted flaky texture. If you have a food processor, you can pulse the flour and butter together a few times, being careful not to overprocess.
-
Add Ice Water:
Gradually add the ½ cup of ice water, a tablespoon at a time, mixing gently with a fork or your hands until the dough just comes together. I start with ½ cup and usually add a little more, maybe 1-2 extra tablespoons, until the dough can be pressed into a ball without being crumbly. Be careful not to add too much water, as this can make the crust tough. You want it just moist enough to hold together.
-
Chill the Dough:
Divide the dough in half, forming each half into a flat disk. Wrap each disk tightly in plastic wrap. This chilling step is non-negotiable! I always place them in the refrigerator for at least 1 hour, but ideally for 2 hours or even overnight. Chilling allows the gluten to relax, making the dough easier to roll, and it re-chills the butter, which, as I mentioned, is key for flakiness.
-
Roll Out the Dough:
Once chilled, take one disk of dough out of the fridge. On a lightly floured surface, roll out the dough into a 12-inch circle, about ⅛-inch thick. I like to rotate the dough frequently and add a sprinkle of flour as needed to prevent sticking. Carefully transfer the rolled-out dough to a standard 9-inch pie plate. Trim the edges, leaving about a ½-inch overhang. I then tuck the overhang under and crimp the edges decoratively. Pierce the bottom of the pie crust all over with a fork – this helps prevent it from puffing up during baking. Place the pie plate back in the refrigerator while you prepare the filling. If you’re planning a lattice top or a full top crust, roll out the second dough disk and prepare it as desired, then also chill it.
Preparing the Apple Butter Filling
-
Combine Filling Ingredients:
In a medium bowl, I gently combine the 2 cups of apple butter with ¼ cup granulated sugar, 2 tablespoons light brown sugar, 2 tablespoons cornstarch (or flour), 1 teaspoon ground cinnamon, ½ teaspoon ground nutmeg, and ¼ teaspoon ground cloves or allspice. I always ensure these are thoroughly mixed until no lumps of cornstarch or sugar remain.
-
Add Lemon Juice:
Stir in the 1 tablespoon of fresh lemon juice. This simple addition makes a significant difference! The lemon juice cuts through the sweetness of the apple butter, brightening all the flavors and giving the pie a lovely, balanced profile. Once everything is combined, give it a quick taste and adjust the sugar or spices if you feel it needs it. Remember, the flavors will concentrate slightly during baking.
-
Pour into Pie Crust:
Retrieve your chilled pie crust from the refrigerator. Carefully pour the apple butter filling into the prepared pie crust, spreading it evenly with a spatula. You want to make sure it’s level for an even bake.
-
Add Top Crust (Optional):
If you are adding a top crust, either a full top or a lattice, carefully place it over the filling. Trim and crimp the edges to seal the pie. For a full top crust, I usually cut a few slits in the top to allow steam to escape.
-
Prepare Egg Wash:
In a small bowl, lightly beat the 1 large egg with 1 tablespoon of milk or water. This creates our egg wash.
-
Brush and Sugar:
Gently brush the top crust (or the crimped edge of a single-crust pie) with the egg wash. This will give your pie a beautiful golden sheen. For an extra touch, I sometimes sprinkle a tablespoon or two of granulated sugar over the egg-washed crust, which adds a lovely sparkle and a bit of sweetness to the crust itself.
Baking the Apple Butter Pie
-
Preheat Oven:
Preheat your oven to 425°F (220°C). Getting the oven to the correct temperature before the pie goes in is crucial for that initial burst of heat that helps the crust set and prevents a soggy bottom.
-
Initial High Heat Bake:
Place the pie on a baking sheet (this catches any potential drips and makes it easier to transfer) and bake in the preheated oven for 15 minutes. This initial high temperature helps to set the crust quickly and start the browning process.
-
Reduce Heat and Continue Baking:
After 15 minutes, reduce the oven temperature to 375°F (190°C). Continue baking for an additional 40-50 minutes, or until the crust is deeply golden brown and the filling is bubbly around the edges. If the edges of the crust start to brown too quickly, I often use a pie shield or loosely tent the edges with aluminum foil to prevent burning.
-
Check for Doneness:
To ensure the filling is properly set, you can gently jiggle the pie; the center should look mostly set with only a slight wobble. The rich aroma filling your kitchen is usually a good sign too! The Apple Butter Pie With Cinnamon Whipped Cream is really coming along now!
-
Cool Completely:
Once baked, carefully remove the pie from the oven and place it on a wire rack to cool completely. This step is paramount! I know it’s tempting to slice into it immediately, but the filling needs ample time to set. This can take at least 3-4 hours, or even longer. Slicing too soon will result in a runny, messy pie, and nobody wants that after all this effort!
Making the Cinnamon Whipped Cream
-
Chill Equipment:
About 15-20 minutes before you plan to make the whipped cream, place your large mixing bowl (preferably metal) and your whisk attachment (if using a stand mixer) or beaters (if using a hand mixer) in the freezer. This simple trick of chilling your equipment ensures the cream whips up faster and holds its shape better.
-
Whip the Cream:
Pour the 1 ½ cups of very cold heavy whipping cream into the chilled bowl. Begin whipping on medium-low speed, gradually increasing to medium-high speed.
-
Add Sweetener and Flavor:
As the cream starts to thicken and form soft peaks (this usually takes 2-3 minutes), gradually add the ¼ cup of powdered sugar, 1 teaspoon of ground cinnamon, and ½ teaspoon of vanilla extract.
-
Whip to Stiff Peaks:
Continue whipping until the cream forms firm, stiff peaks. Be careful not to over-whip! Over-whipped cream can quickly turn grainy or even separate into butter. Stop as soon as the peaks hold their shape beautifully. The aroma of the cinnamon infusing into the cream is just delightful!
Assembling and Serving the Apple Butter Pie With Cinnamon Whipped Cream
-
Wait for the Pie to Cool:
Ensure your beautiful Apple Butter Pie has cooled completely to room temperature. This is absolutely critical for clean slices and a perfectly set filling.
-
Slice and Serve:
Once cooled, slice the pie into generous wedges. I use a sharp knife for clean cuts.
-
Top with Cinnamon Whipped Cream:
Just before serving, dollop or pipe a generous spoonful of your freshly made Cinnamon Whipped Cream onto each slice. The cool, creamy, spiced whipped cream is the perfect counterpoint to the rich, warm flavors of the apple butter pie.
-
Garnish (Optional):
For an extra touch of elegance, I sometimes sprinkle a tiny bit more cinnamon over the whipped cream, or add a small cinnamon stick or a thin apple slice as a garnish.
-
Enjoy!
Serve immediately and savor every bite of this delightful homemade Apple Butter Pie With Cinnamon Whipped Cream. It’s truly a labor of love that pays off in incredible flavor and comfort. This pie is fantastic on its own, but that cinnamon whipped cream takes it to an entirely new level, making it an unforgettable dessert experience. Leftovers, if there are any, can be stored covered in the refrigerator for up to 3-4 days. I find the pie is best enjoyed within the first two days, with the whipped cream added just before serving.
Conclusion:
What a journey we’ve taken through the delightful process of creating something truly special! As we wrap up, I sincerely hope you’re feeling as excited as I am about the prospect of bringing this incredible dessert to life in your own kitchen. This isn’t just another pie recipe; it’s an invitation to experience a symphony of flavors and textures that will undoubtedly become a new favorite in your repertoire. I truly believe that our Apple Butter Pie With Cinnamon Whipped Cream offers a uniquely comforting and sophisticated dessert experience that stands head and shoulders above many traditional options.
Think about the rich, concentrated apple butter filling – it’s a deep, caramelized hug of autumn, perfectly balanced with warm spices that evoke feelings of hearth and home. Then, imagine that nestled within a flaky, golden-brown crust, a testament to simple baking perfection. But what truly elevates this creation into something unforgettable is the cloud-like crown of cinnamon whipped cream. It’s not just a garnish; it’s an integral component, cutting through the richness of the pie with its light, airy texture and a delicate whisper of spice that complements the apple butter beautifully. This pie isn’t merely a dessert; it’s a statement piece, perfect for holiday gatherings, cozy family dinners, or simply as a well-deserved treat after a long week.
Serving This Culinary Masterpiece:
While absolutely divine served simply as is, still slightly warm from the oven, there are so many wonderful ways to enjoy your homemade Apple Butter Pie. For a truly decadent experience, I love a slice gently warmed, allowing the fragrant apple butter to release its aromas even more, perhaps alongside a robust cup of coffee or a comforting mug of spiced tea. If you’re hosting a dinner party, serving slices chilled offers a different but equally delightful texture, firm yet creamy, making it an elegant end to any meal. Don’t be afraid to add another dollop of that exquisite cinnamon whipped cream – you deserve it! For an extra touch of indulgence, a small scoop of high-quality vanilla bean ice cream melting alongside a warm slice is absolutely heavenly. A light dusting of finely chopped, toasted pecans or walnuts can add a delightful textural crunch, while a delicate drizzle of homemade caramel sauce elevates the presentation and flavor profile to a gourmet level.
Embrace the Variations:
One of the greatest joys of baking is the freedom to personalize and experiment, and this recipe offers a fantastic canvas for your creativity. If you’re looking for an alternative crust, consider a buttery graham cracker crust for a different kind of sweet crunch that pairs wonderfully with the apple butter. For those who enjoy a little extra warmth, try infusing your apple butter filling with a tablespoon of bourbon or dark rum before baking – it adds a sophisticated, boozy depth that is truly captivating. You could also swirl in a touch of cream cheese to the apple butter mixture for a slightly tangier, cheesecake-like richness that is utterly divine.
And let’s talk about that cinnamon whipped cream! While perfect as written, don’t hesitate to experiment with other flavor infusions. A hint of maple syrup can add a lovely autumn touch, or a touch of fresh orange zest could brighten the whole experience. For those with dietary considerations, a high-quality dairy-free whipped topping can be a fantastic substitute, allowing everyone to enjoy the magic. For individual servings that are perfect for portion control or a charming presentation, try making mini Apple Butter Pies in muffin tins or small ramekins. No matter how you choose to serve or adapt it, the core deliciousness of this Apple Butter Pie With Cinnamon Whipped Cream will shine through.
So, please, take the plunge! Gather your ingredients, put on your apron, and dedicate an afternoon to the simple pleasure of baking this extraordinary pie. I promise you, the aroma alone will be worth the effort, and the first bite will confirm that you’ve created something truly special. I am so eager for you to experience the warmth, the comfort, and the sheer joy that comes from sharing a homemade dessert like this. Once you’ve baked it, I would absolutely love to hear about your experience! What variations did you try? Who did you share it with? Your stories and culinary adventures inspire me, so please don’t hesitate to share your thoughts and photos with us. Happy baking, and enjoy every single delightful crumb!
Apple Butter Pie with Cinnamon Whipped Cream
Apple Butter Pie with Cinnamon Whipped Cream is a comforting dessert featuring the sweet-tart essence of slow-cooked apples in a flaky crust, crowned with light, fragrant cinnamon whipped cream. A unique and captivating twist on a classic pie.
Ingredients
Instructions
Important Information
Nutrition Facts (Per Serving)
It is important to consider this information as approximate and not to use it as definitive health advice.
Allergy Information
Please check ingredients for potential allergens and consult a health professional if in doubt.

Leave a Comment