Christmas Kitchen Chocolate Cherry.html is more than just a recipe; it’s an invitation to experience pure festive joy. Have you ever wished for a dessert that perfectly encapsulates the magic of the holiday season in every single bite? Today, I am thrilled to share with you a truly spectacular creation that will become an instant favorite in your home. This delightful combination of rich, decadent chocolate and vibrant, tart cherries is a classic for a reason, evoking warm memories and creating new traditions around the globe.
The pairing of chocolate and cherry has a long-standing culinary history, often seen in luxurious European desserts, making it a sophisticated yet comforting choice for holiday gatherings. People adore this dish not only for its incredible balance of sweet and tangy flavors but also for its beautiful presentation and the sheer indulgence it offers. It’s truly a showstopper! Imagine the joy on your loved ones’ faces as they savor the exquisite textures and aromas. This year, let your Christmas Kitchen Chocolate Cherry.html creation be the centerpiece of your dessert table, promising an unforgettable sweet ending to any festive meal. I promise, this recipe is designed to bring smiles and satisfy even the most discerning palates during this special time of year.

Ingredients:
-
For the Decadent Chocolate Cherry Cake Layers:
- 2 ½ cups (300g) all-purpose flour, sifted
- 1 ½ cups (150g) unsweetened cocoa powder, high-quality Dutch-processed recommended, sifted
- 2 ½ cups (500g) granulated sugar
- 1 cup (200g) light brown sugar, packed
- 2 teaspoons baking soda
- 1 teaspoon baking powder
- 1 teaspoon fine sea salt
- 4 large eggs, at room temperature
- 1 cup (240ml) whole milk, at room temperature (or buttermilk for extra tang)
- ½ cup (120ml) vegetable oil (or other neutral oil)
- 2 teaspoons pure vanilla extract
- 1 cup (240ml) hot water or hot freshly brewed coffee (coffee enhances chocolate flavor beautifully)
-
For the Luminous Kirsch-Soaked Cherry Filling:
- 4 cups (about 600g) fresh or frozen dark sweet cherries, pitted (if using frozen, do not thaw)
- ½ cup (100g) granulated sugar (adjust to sweetness of cherries)
- 2 tablespoons fresh lemon juice
- ¼ cup (60ml) Kirsch (cherry brandy), optional but highly recommended for that classic Christmas Kitchen flavor profile
- 2 tablespoons cornstarch, mixed with 3 tablespoons cold water to form a slurry
-
For the Velvety Chocolate Ganache Frosting:
- 2 cups (480ml) heavy cream (full-fat whipping cream)
- 1 pound (450g) high-quality dark chocolate (60-70% cacao), finely chopped or good quality chocolate chips
- 4 tablespoons (56g) unsalted butter, cut into small cubes, at room temperature
- 1 teaspoon pure vanilla extract
- Pinch of fine sea salt
-
For Festive Decoration (Optional):
- Fresh dark sweet cherries with stems
- Chocolate curls or shavings
- A light dusting of unsweetened cocoa powder or powdered sugar
- Sprigs of fresh mint or candied rosemary for a pop of green
Preparing the Decadent Chocolate Cherry Cake Batter
- Preheat and Prep: Begin by preheating your oven to 350°F (175°C). This ensures your oven is at the correct temperature when the cake goes in, which is crucial for even baking. Generously grease and flour three 8-inch round cake pans. I like to line the bottoms with parchment paper circles for extra assurance that my cakes won’t stick, making removal a breeze.
- Combine Dry Ingredients: In a very large mixing bowl, I like to whisk together all the dry ingredients for the cake: the sifted all-purpose flour, sifted unsweetened cocoa powder, both granulated sugar and light brown sugar, baking soda, baking powder, and salt. Whisk them vigorously for about 30 seconds to a minute, ensuring everything is thoroughly combined and no lumps remain. This step is important for an even rise and texture in your finished cake.
- Introduce Wet Ingredients (Except Hot Liquid): Now, create a well in the center of your dry ingredients. Into this well, I pour the room-temperature eggs, whole milk, vegetable oil, and pure vanilla extract. Using a stand mixer fitted with the paddle attachment, or a hand mixer, begin mixing on low speed until just combined. Scrape down the sides of the bowl with a rubber spatula to ensure all the dry bits are incorporated. The batter will be quite thick at this point, and that’s perfectly normal!
- Incorporate Hot Liquid: With the mixer still on low, slowly and carefully pour in the hot water or hot coffee. As you do this, the batter will transform, becoming much thinner and beautifully glossy. Continue mixing on low speed until the batter is completely smooth, typically no more than 1-2 minutes. Overmixing can develop the gluten in the flour, leading to a tougher cake, so be mindful not to overdo it. This hot liquid is key to the cake’s moistness and rich flavor, truly bringing out the deep chocolate notes that are essential for our Christmas Kitchen Chocolate Cherry masterpiece.
- Divide and Distribute: Divide the luscious cake batter evenly among your three prepared 8-inch cake pans. I often use a kitchen scale for this step to ensure each pan holds precisely the same amount of batter, which helps all three layers bake at the same rate and come out uniform in thickness. This attention to detail results in a more professional-looking finished cake.
Baking the Cake Layers to Perfection
- Bake Until Done: Carefully transfer the cake pans to your preheated 350°F (175°C) oven. Bake for approximately 28-35 minutes. Baking times can vary depending on your oven, so it’s always best to keep an eye on them. The cakes are ready when a wooden skewer or toothpick inserted into the center of a cake comes out clean or with only a few moist crumbs attached. I also gently touch the top of the cake; if it springs back, it’s a good indicator of doneness.
- Cooling in Pans: Once baked, remove the cake pans from the oven and place them on a wire rack. Allow the cakes to cool in their pans for about 10-15 minutes. This crucial cooling period allows the cakes to set up properly and makes them much less likely to break or crumble when you attempt to remove them. Patience here truly pays off!
- Full Cooling Process: After the initial cooling, gently invert each cake layer onto the wire rack. Carefully peel off the parchment paper circles (if you used them). Allow the cake layers to cool completely to room temperature. This step is absolutely non-negotiable before frosting. If you try to frost warm cakes, the ganache will simply melt and slide right off, creating a messy situation. I often bake my layers the day before and wrap them tightly in plastic wrap once cool, storing them at room temperature overnight. This can even improve their texture and makes assembly day less rushed.
Crafting the Luminous Kirsch-Soaked Cherry Filling
- Combine and Simmer: In a medium saucepan, combine the pitted dark sweet cherries (fresh or frozen), granulated sugar, and fresh lemon juice. Place the saucepan over medium heat. Bring the mixture to a gentle simmer, stirring occasionally to help dissolve the sugar and prevent sticking. If using fresh cherries, they will release their juices; if using frozen, they will release a lot more liquid as they thaw and heat. Continue to simmer for about 5-7 minutes, until the cherries have softened slightly and their beautiful juices are flowing.
- Thicken with Slurry: Give your cornstarch slurry (cornstarch mixed with cold water) a quick stir to re-incorporate the cornstarch, as it tends to settle at the bottom. Slowly pour the slurry into the simmering cherry mixture, stirring continuously. As you stir, you’ll notice the mixture begin to thicken, transforming into a glossy, jam-like consistency. Continue to cook for another 1-2 minutes after adding the slurry, allowing it to bubble gently to ensure the cornstarch is fully cooked and no starchy taste remains.
- Infuse with Kirsch: Remove the cherry filling from the heat. This is the perfect moment to stir in the Kirsch (cherry brandy), if you’re using it. The residual heat will warm the Kirsch, releasing its aromatic notes and infusing the cherries with that distinct, elegant flavor that screams “Christmas Kitchen Chocolate Cherry.” If you prefer to omit alcohol, you can simply skip this step or add an extra splash of vanilla extract or almond extract for an alternative flavor boost.
- Cool Completely: Transfer the cherry filling to a clean bowl and press a piece of plastic wrap directly onto the surface of the filling. This prevents a skin from forming as it cools. Allow the filling to cool completely to room temperature, or even chill it in the refrigerator. A cold filling will be much easier to work with when assembling the cake and will prevent any issues with your ganache.
Creating the Velvety Chocolate Ganache Frosting
- Heat the Cream: In a medium saucepan, gently heat the heavy cream over medium-low heat until it just begins to simmer around the edges. You’ll see tiny bubbles forming. Be careful not to let it boil rapidly, as we don’t want to scorch the cream. Just a gentle warmth is what we’re aiming for to properly melt the chocolate.
- Melt the Chocolate: Place your finely chopped dark chocolate or chocolate chips in a heatproof bowl. Once the cream is simmering, immediately pour the hot cream over the chocolate. Let it sit undisturbed for 5 minutes. This allows the heat from the cream to gently melt the chocolate, ensuring a smooth and lump-free ganache. I sometimes gently tap the bowl to ensure all the chocolate is submerged.
- Emulsify and Finish: After 5 minutes, use a whisk or rubber spatula to start stirring the mixture gently from the center outwards. You’ll notice the chocolate and cream beginning to emulsify, transforming into a beautiful, homogenous, shiny chocolate sauce. Continue stirring until it’s completely smooth and glossy. At this point, I stir in the small cubes of room-temperature unsalted butter and the vanilla extract, along with a tiny pinch of salt. The butter adds a wonderful richness and shine to the ganache, making it even more decadent, while the salt balances the sweetness.
- Cool to Frosting Consistency: Now, this is a critical step for frosting. The ganache will be quite liquid at this stage. It needs to cool down and thicken to a spreadable consistency. Cover the bowl with plastic wrap and let it sit at room temperature for several hours, or chill it in the refrigerator, stirring every 15-20 minutes, until it reaches the consistency of a thick, spreadable frosting. It should be firm enough to hold its shape but still soft enough to spread easily. If it becomes too firm, you can warm it gently over a double boiler or in the microwave for a few seconds, stirring well until it softens to the right consistency. This perfect ganache is what will bind our magnificent Christmas Kitchen Chocolate Cherry cake together.
Assembling and Decorating Your Christmas Kitchen Chocolate Cherry Cake
- Level the Cakes (Optional but Recommended): If your cake layers have domed tops, I recommend using a serrated knife or a cake leveler to carefully trim them flat. This creates a much more stable and professional-looking cake, ensuring each layer sits perfectly.
- First Layer and Ganache Dam: Place your first leveled cake layer on your chosen cake stand or serving plate. Spread a thin, even layer of the cooled, spreadable chocolate ganache over the top of the cake layer. Then, using a piping bag fitted with a round tip (or simply a spoon), pipe a “dam” or border of ganache around the very edge of the cake layer. This dam acts as a barrier, preventing the cherry filling from oozing out the sides.
- Add Cherry Filling: Carefully spoon about one-third to half of your cooled Kirsch-soaked cherry filling within the ganache dam on the first cake layer. Spread it gently and evenly. Be careful not to overfill, as too much filling can make the cake unstable.
- Second Layer and Repeat: Place the second cake layer gently on top of the cherry filling. Repeat the process: a thin layer of ganache, a ganache dam, and then the remaining cherry filling.
- Final Layer and Crumb Coat: Carefully place the third and final cake layer on top. Now, it’s time for the crumb coat. Apply a very thin, even layer of ganache all over the top and sides of the entire cake. This “crumb coat” traps any loose crumbs, preventing them from mixing into your final layer of frosting. Once applied, refrigerate the cake for at least 20-30 minutes, or until the crumb coat is firm to the touch. This step is essential for a clean, professional finish.
- The Final Frosting Layer: Once the crumb coat is firm, retrieve the cake from the refrigerator. Now, apply a generous, smooth, and even layer of the remaining chocolate ganache all over the top and sides of the cake. Use an offset spatula or bench scraper to create smooth sides and a beautiful top. Don’t be afraid to take your time here; a well-frosted cake is a sight to behold. This rich ganache is the perfect complement to our festive Christmas Kitchen Chocolate Cherry flavors.
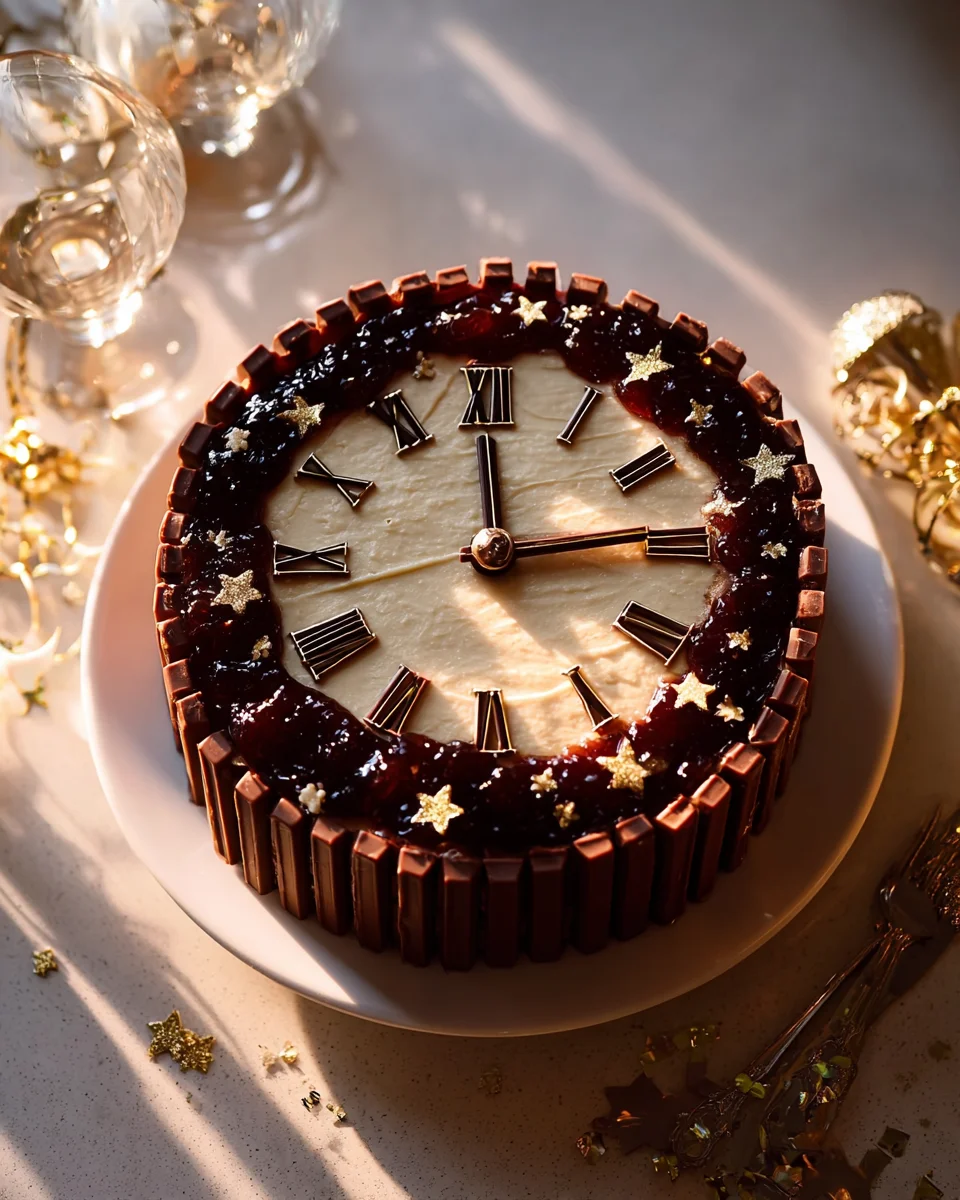
- Decorate and Present: This is where you can let your creativity shine! Arrange fresh dark sweet cherries (stems on for an elegant look) on top of the cake, perhaps creating a beautiful wreath pattern or simply scattering them artfully. Sprinkle some chocolate curls or shavings, or even a light dusting of cocoa powder or powdered sugar for a snowy effect. A few sprigs of fresh mint or candied rosemary can add a lovely festive touch and a pop of contrasting color.
- Chill and Serve: For best results, I always recommend chilling the finished Christmas Kitchen Chocolate Cherry cake in the refrigerator for at least 30 minutes to an hour before serving. This allows the ganache to fully set and makes for cleaner slices. This magnificent cake is a true showstopper, perfect for your holiday table and an unforgettable dessert that captures the warmth and indulgence of the season!
Conclusion:
And there you have it, my friends! We’ve reached the sweet finale of our culinary journey, and I genuinely hope you’re feeling as inspired and excited as I am about this incredible creation. This isn’t just another recipe; it’s an experience, a delightful symphony of flavors and textures that truly stands out. If you’re looking for something that effortlessly marries sophistication with heartwarming comfort, then this dish, whatever the season, is an absolute must-try. It’s the kind of treat that looks incredibly impressive but is surprisingly straightforward to bring to life in your own kitchen, making you feel like a star chef without all the fuss.
What makes this recipe so special, so utterly irresistible, is its masterful balance. The rich, deep cocoa notes perfectly complement the bright, tangy burst of cherries, creating a harmonious interplay that dances on your palate. There’s a comforting familiarity in the chocolate, yet the cherries add an unexpected twist, elevating it beyond the ordinary. It’s comforting enough for a cozy evening in, yet elegant enough to grace your most festive holiday table. I’ve personally witnessed the sheer joy and satisfied smiles it brings, and that, to me, is the true mark of a successful recipe. It’s a guaranteed crowd-pleaser, delivering that sought-after “wow” factor every single time. Honestly, once you dive into the magic of this particular creation, you’ll understand why it quickly becomes a cherished favorite in any household, truly embodying the spirit of a memorable occasion. Imagine the aroma filling your home; it’s truly a sensory delight.
Now, let’s talk about enjoying this masterpiece. While it’s absolutely perfect as is, straight from your cooling rack, I love to offer a few serving suggestions to truly make it your own. For an extra touch of decadence, try serving a warm slice alongside a scoop of high-quality vanilla bean ice cream or a dollop of freshly whipped cream – the contrast in temperature and creaminess is divine. If you’re feeling adventurous, a light dusting of cocoa powder or a delicate drizzle of melted white chocolate can add a beautiful visual appeal and an extra layer of flavor. For those who love a bit of crunch, a sprinkle of toasted slivered almonds or chopped pistachios over the top would be fantastic. And why stop there? Think about incorporating different types of dried fruit next time, maybe some dried cranberries or even a hint of candied orange peel for a citrusy zing. For an adult-friendly variation, a splash of cherry liqueur or brandy in the mixture before baking would infuse it with a sophisticated warmth, making it an ideal after-dinner treat. Don’t be afraid to experiment with the type of chocolate either; a darker chocolate will yield a more intense, bittersweet profile, while milk chocolate will lean towards a sweeter, creamier indulgence. This versatility is part of what makes the Christmas Kitchen Chocolate Cherry.html such a foundational recipe, ready to be adapted to your unique taste and the occasion.
So, what are you waiting for? I wholeheartedly encourage you to roll up your sleeves, gather your ingredients, and embark on this wonderful baking adventure. Trust me, the smiles and contented sighs from your loved ones (or just from yourself!) will be more than worth it. This recipe is designed to be approachable and rewarding, offering a delightful experience from start to finish. Once you’ve whipped up your own batch, please, please come back and share your experience with me! I absolutely adore hearing about your kitchen triumphs, your personal twists, and the joy these recipes bring into your homes. Did you try a unique serving suggestion? Did you make a brilliant substitution? Your feedback and shared stories are what truly make this community special. Get ready to create some truly delicious memories!
Christmas Kitchen Chocolate Cherry Cake
A truly spectacular Christmas dessert combining rich, decadent chocolate and vibrant, tart cherries. This showstopper cake, assembled with a classic buttercream and cherry jam, evokes warm memories and creates new traditions, offering an unforgettable sweet ending to any festive meal.
Ingredients
Instructions
Important Information
Nutrition Facts (Per Serving)
It is important to consider this information as approximate and not to use it as definitive health advice.
Allergy Information
Please check ingredients for potential allergens and consult a health professional if in doubt.


Leave a Comment