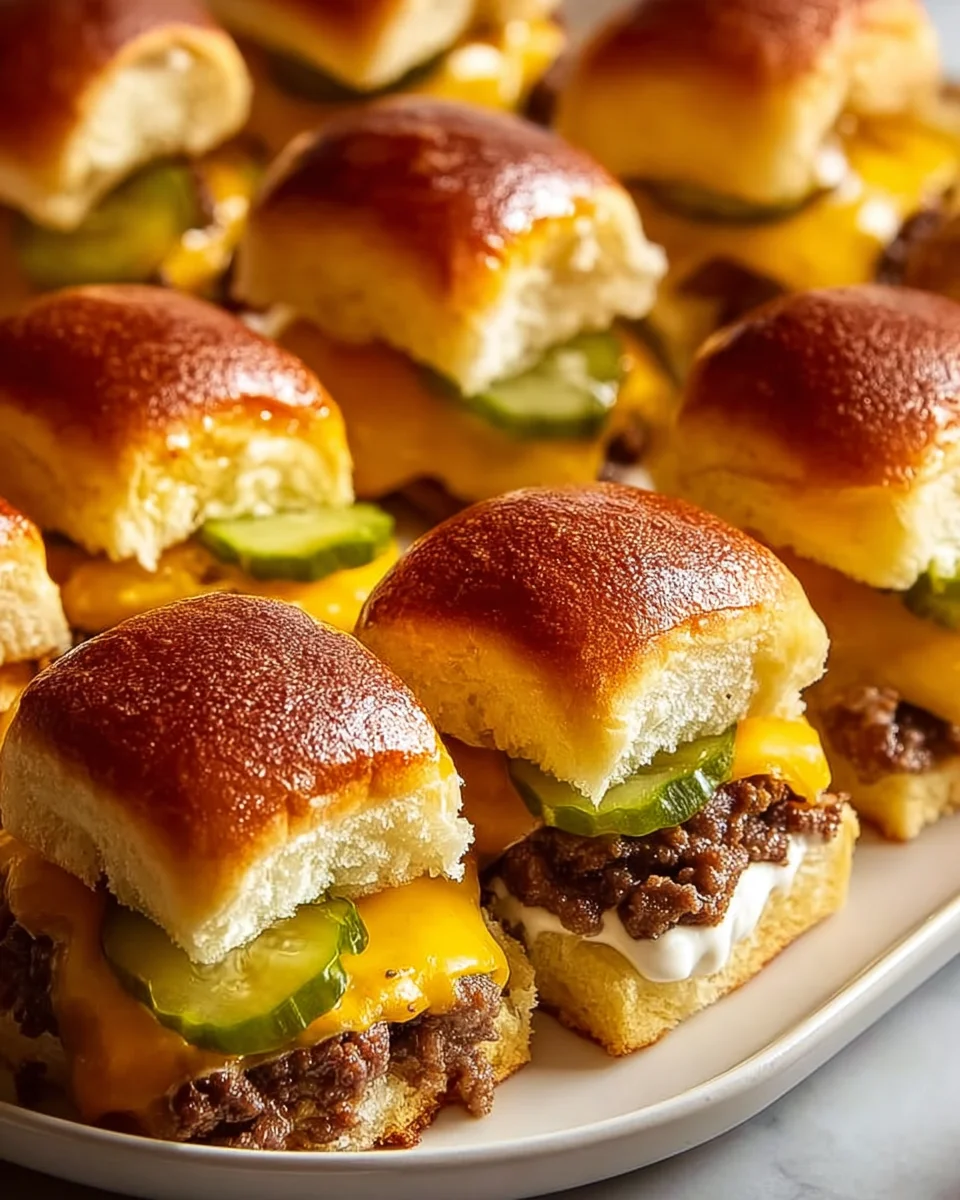
Sheetpan Burger Sliders
Hey there, fellow food lovers! Are you ready for a game-changer in your kitchen? I know I am! I’m absolutely thrilled to share the recipe for Sheetpan Burger Sliders with you today. Forget about messy grills or juggling multiple pans to get your burger fix. This recipe is pure genius!
What makes these Sheetpan Burger Sliders so special, you ask? It’s all in the name – everything comes together on a single sheetpan! We’re talking about perfectly cooked, juicy mini beef patties, nestled on soft slider buns, blanketed with melty cheese, and baked until golden and irresistible. It’s the ultimate combination of classic burger flavor with unbeatable convenience.
You’re going to absolutely love these because they deliver all the deliciousness of a classic burger with virtually no fuss and minimal cleanup. Whether you’re feeding a hungry crowd on game night, looking for an easy-peasy weeknight dinner, or planning a fun gathering, these sliders are your new best friend. They’re quick, customizable, and unbelievably satisfying. Get ready to ditch the grease and embrace the ease!

Hey there, fellow foodies! I’m so excited to share one of my absolute favorite hacks for feeding a crowd or just making weeknight burgers incredibly simple: Sheetpan Burger Sliders. Forget flipping individual patties; we’re going big and baking our burgers on a sheetpan, then slicing them into perfect slider portions. It’s less mess, less fuss, and unbelievably delicious. Let’s get cooking!
Ingredient Notes
Creating fantastic Sheetpan Burger Sliders starts with choosing the right ingredients. Here’s a rundown of what you’ll need and some thoughts on substitutions to make these truly your own.
- Ground Beef: This is the star of our show! I highly recommend using 1.5 to 2 pounds of 80/20 ground beef. The “80/20” ratio means 80% lean and 20% fat, which provides incredible flavor and moisture, preventing your burgers from drying out on the sheetpan. If you prefer a leaner option, 90/10 ground beef works too, but you might want to add a tablespoon or two of a neutral oil to the pan before pressing the beef to ensure it doesn’t stick or become too dry. For a sheetpan of standard size (like a half-sheet pan, roughly 18×13 inches), 2 pounds will give you a nice, even thickness that’s perfect for slicing into sliders.
- Slider Buns: These little buns are what make our burgers “sliders”! My personal go-to are Hawaiian sweet rolls. Their slight sweetness and soft texture perfectly complement the savory beef. Potato rolls or brioche slider buns are also excellent choices for their tender crumb and rich flavor. You could even use small dinner rolls in a pinch!
- Cheese Slices: What’s a burger without cheese? For these sliders, I find American cheese slices to be the ultimate melter, creating that iconic gooey burger experience. Cheddar, Monterey Jack, or even provolone slices are fantastic alternatives if you prefer a different flavor profile. The key is to use pre-sliced cheese so it covers the large patty evenly and melts beautifully.
- Onion (optional, but recommended): A finely diced or thinly sliced onion can be mixed directly into the ground beef for an extra layer of flavor, or you can caramelize some onions to layer on top of the cooked patty before adding cheese. For a classic burger experience, thinly sliced white or red onion works wonderfully as a fresh topping.
- Seasonings: Keep it simple and classic for these burgers. I always use a generous amount of salt and freshly cracked black pepper. Beyond that, garlic powder, onion powder, and a dash of smoked paprika are my secret weapons for an irresistible savory flavor. Feel free to use your favorite burger seasoning blend!
- Your Favorite Burger Toppings: This is where you can really customize! Think crisp lettuce leaves, juicy tomato slices, tangy pickle chips, and of course, your essential condiments like ketchup, mustard, and mayonnaise. For an extra special touch, whip up a simple “special sauce” with a mix of mayo, ketchup, relish, and a dash of hot sauce.
Step-by-Step Instructions
Let’s get those Sheetpan Burger Sliders from concept to your table! This method is super straightforward and perfect for a fuss-free meal.
Step 1: Preheat and Prep Your Pan
First things first, preheat your oven to 400°F (200°C). Line a large, rimmed baking sheet (a half-sheet pan is ideal) with parchment paper. This is a crucial step that makes cleanup a breeze and prevents sticking. If you don’t have parchment paper, aluminum foil works, but I recommend lightly greasing it with a little cooking spray or oil.
Step 2: Season the Beef
In a large bowl, combine your 1.5 to 2 pounds of ground beef with your desired seasonings. I typically use 1 teaspoon of salt, ½ teaspoon of black pepper, 1 teaspoon of garlic powder, and ½ teaspoon of onion powder. If you’re using diced onion, add it in now. Using your hands, gently mix the seasonings into the beef. Be careful not to overmix, as this can lead to a tough burger. You just want everything evenly distributed.
Step 3: Form the Giant Patty
Transfer the seasoned ground beef to the center of your prepared sheet pan. Using your hands or the bottom of another clean sheet pan, firmly press the beef evenly across the entire surface of the parchment-lined pan, pushing it right to the edges. Aim for a uniform thickness – about ½ to ¾ inch – so that your burger cooks evenly. If some areas are thicker than others, they’ll cook at different rates, which we want to avoid for perfectly cooked sliders.
Step 4: Bake to Perfection
Place the sheet pan with the beef patty into your preheated oven. Bake for 15-20 minutes, or until the beef is cooked through to your desired doneness. For medium, aim for an internal temperature of 145°F (63°C). For well-done, target 160°F (71°C). Once cooked, carefully remove the sheet pan from the oven. You’ll likely see a good amount of rendered fat in the pan; this is normal! Carefully tilt the pan and drain off the excess grease. This prevents soggy burgers and improves the texture.
Step 5: Cheese Please!
Immediately after draining the fat, arrange your cheese slices over the hot burger patty, making sure to cover it completely. Return the sheet pan to the oven for just 2-3 minutes, or until the cheese is beautifully melted and gooey. For an extra golden top, you can briefly switch to the broiler for about 30-60 seconds, but keep a very close eye on it to prevent burning!
Step 6: Toast the Buns (Optional, but Recommended)
While the cheese is melting, you can quickly toast your slider buns. Split your slider buns and arrange them cut-side up on a separate small baking sheet. Pop them into the oven for 2-4 minutes, or until lightly golden. This step adds great texture and prevents the buns from getting soggy.
Step 7: Slice and Assemble
Once the cheese is melted, remove the sheet pan from the oven. Using a large sharp knife or a pizza cutter, carefully slice the giant patty into individual slider portions. I usually aim for a grid pattern, making 12-16 sliders depending on the size of my buns. Use the parchment paper to help carefully lift the patty sections onto your toasted buns. Now, pile on your favorite toppings and condiments. Serve immediately and enjoy your incredibly easy and delicious Sheetpan Burger Sliders!
Tips & Suggestions
Making Sheetpan Burger Sliders is already a fantastic shortcut, but here are a few extra tips to elevate your experience and make them truly unforgettable.
- Don’t Overmix the Beef: This is a golden rule for any burger! Overmixing the ground beef can compress the meat fibers, resulting in a tougher, chewier burger. Gently combine your seasonings until just incorporated. The goal is to keep the patty tender and juicy.
- Even Thickness is Key: When pressing the ground beef onto the sheet pan, take an extra minute or two to ensure it’s spread in an even layer from edge to edge. Any areas that are thicker or thinner will cook at different rates, leading to some dry spots and some undercooked ones. Uniformity guarantees perfectly cooked sliders every time.
- Pre-cooked Toppings: If you’re adding toppings like cooked bacon bits or caramelized onions, prepare them in advance. You can even sprinkle pre-cooked bacon bits over the beef patty during the last few minutes of baking before adding the cheese for an extra layer of flavor and crispness.
- Toast Those Buns: I know I mentioned it in the instructions, but it’s worth reiterating! Toasting your slider buns, even just lightly, makes a huge difference. It adds a lovely texture, a subtle nutty flavor, and creates a barrier that prevents the buns from getting soggy from the juicy burger and condiments.
- Customize Your Cheese: While American cheese is a classic for its melting ability, don’t be afraid to experiment. Provolone, Muenster, cheddar, or even a spicy pepper jack can add a fantastic twist. You could even use a mix of cheeses!
- The “Secret Sauce” Advantage: A really good special sauce can take your sliders from great to extraordinary. My go-to is a simple mix of mayonnaise, ketchup, a touch of relish (dill or sweet, whatever you prefer), a dash of hot sauce for a kick, and a tiny bit of yellow mustard. Whisk it all together and spread it generously on your toasted buns.
- Serve with Sides: Sheetpan Burger Sliders are perfect for parties, picnics, or just a fun family dinner. Pair them with classic sides like crispy French fries, onion rings, a refreshing coleslaw, or a light green salad to complete the meal.
- Easy Crowd Pleaser: This recipe is a dream for entertaining! You can easily double or even triple the recipe by using multiple sheet pans, making it incredibly efficient to feed a large group without being stuck flipping burgers at the grill.
Storage
While Sheetpan Burger Sliders are undeniably best enjoyed fresh, you might find yourself with a few leftovers, or perhaps you’re planning to make some components ahead of time. Here’s how to handle storage and reheating like a pro.
Storing Leftover Sliders:
If you have fully assembled sliders with all the fixings, I recommend storing the beef patties and buns separately from wet toppings like lettuce, tomato, and pickles. The moisture from these can make the buns and patties soggy.
- Patties: Once the cooked and cheesed patty has cooled completely, you can slice it into individual portions and place them in an airtight container. They will keep well in the refrigerator for 3-4 days.
- Buns: Store any leftover buns in an airtight container or bag at room temperature to prevent them from drying out.
- Toppings: Keep your fresh toppings (lettuce, tomato, onion, pickles) in separate airtight containers in the refrigerator. Condiments should also be stored separately.
Reheating Cooked Patties:
Reheating is best done with the patties alone, then reassembling.
- Oven/Toaster Oven: This is my preferred method for reheating the cheesed patties to retain the best texture. Preheat your oven or toaster oven to 300-325°F (150-160°C). Place the slider patties on a baking sheet and heat for about 10-15 minutes, or until warmed through. This method helps the cheese soften nicely without the patty becoming rubbery.
- Microwave: For a quick reheat, you can microwave individual slider patties for 30-60 seconds, or until heated through. Be mindful that the microwave can sometimes make the beef a bit tougher, but it’s a perfectly acceptable option when you’re in a hurry.
- Skillet: You can also gently reheat the patties in a lightly greased non-stick skillet over medium-low heat for a few minutes per side, until warmed through.
Freezing Cooked Patties:
Yes, you can absolutely freeze the cooked sheetpan burger patty! This is a fantastic option for meal prep.
- Preparation: Allow the cooked, cheesed patty to cool completely. Slice it into individual slider portions.
- Wrapping: To prevent freezer burn, wrap each individual slider patty tightly in plastic wrap, then place the wrapped patties into a freezer-safe bag or airtight container.
- Shelf Life: Frozen cooked burger patties can be stored for up to 2-3 months.
- Reheating from Frozen: You can reheat frozen patties directly in a preheated oven (around 350°F/175°C) for about 20-30 minutes, or until thoroughly heated, adding a little extra cheese if desired for freshness. Alternatively, thaw them in the refrigerator overnight before reheating using the oven, microwave, or skillet method.
No matter how you store and reheat them, these Sheetpan Burger Sliders are designed for convenience and deliciousness!
Final Thoughts
And there you have it! My hope is that you’re now as excited as I am about these incredible Sheetpan Burger Sliders. What makes them an absolute game-changer, you ask? It’s the brilliant simplicity of achieving restaurant-quality flavor with hardly any fuss. Imagine juicy beef patties, perfectly melted cheese, and soft buns, all cooked on one single sheetpan. That means less time scrubbing dishes and more time enjoying the delicious payoff!
Whether you’re hosting a casual get-together, need a fun family dinner solution, or just craving a bite-sized burger fix, these Sheetpan Burger Sliders are your answer. They’re infinitely customizable with your favorite toppings, making them a crowd-pleaser for every palate. Trust me, once you experience the ease and deliciousness of these Sheetpan Burger Sliders, they’ll become a regular in your culinary rotation. Get ready to impress everyone with minimal effort and maximum flavor!
Quick & Easy Sheetpan Burger Sliders – Family Dinner Win

These Sheetpan Burger Sliders are a game-changer for easy weeknight dinners or gatherings. Enjoy juicy mini beef patties on soft buns, topped with melty cheese, all baked on a single sheetpan for minimal cleanup.
- Prep Time: 15 mins
- Cook Time: 20 mins
- Total Time: 35 minutes
- Yield: 12-16 sliders 1x
- Category: Dinner
- Method: Baking
- Cuisine: American
Ingredients
- 1.5 to 2 pounds of 80/20 ground beef
- Slider buns (Hawaiian sweet rolls, potato rolls, or brioche slider buns)
- American cheese slices (or cheddar, Monterey Jack, or provolone slices)
- Onion (optional, finely diced or thinly sliced)
- 1 teaspoon of salt
- ½ teaspoon of black pepper
- 1 teaspoon of garlic powder
- ½ teaspoon of onion powder
- A dash of smoked paprika
- Your favorite burger toppings (lettuce, tomato, pickle chips, ketchup, mustard, mayonnaise)
- Ingredients for special sauce (mayonnaise, ketchup, relish, hot sauce)
Instructions
- Preheat your oven to 400°F (200°C). Line a large, rimmed baking sheet with parchment paper.
- In a large bowl, combine your ground beef with salt, black pepper, garlic powder, onion powder, and smoked paprika. If using diced onion, add it now. Mix gently to combine.
- Transfer the seasoned ground beef to the center of your prepared sheet pan. Press the beef evenly across the entire surface of the pan, aiming for a uniform thickness of about ½ to ¾ inch.
- Place the sheet pan with the beef patty into your preheated oven. Bake for 15-20 minutes, or until the beef is cooked through to your desired doneness.
- Immediately after draining the fat, arrange your cheese slices over the hot burger patty. Return the sheet pan to the oven for 2-3 minutes, or until the cheese is melted.
- While the cheese is melting, toast your slider buns by splitting them and arranging them cut-side up on a separate baking sheet. Toast in the oven for 2-4 minutes until lightly golden.
- Once the cheese is melted, remove the sheet pan from the oven. Slice the giant patty into individual slider portions and lift them onto your toasted buns. Add your favorite toppings and condiments. Serve immediately.
Nutrition
- Serving Size: 1 slider
- Calories: 250
- Sugar: 3 g
- Sodium: 400 mg
- Fat: 15 g
- Saturated Fat: 7 g
- Unsaturated Fat: 8 g
- Trans Fat: 0 g
- Carbohydrates: 20 g
- Fiber: 1 g
- Protein: 12 g
- Cholesterol: 50 mg
Keywords: Avoid overmixing the beef to keep the patties tender. Toasting the buns adds great texture and prevents sogginess. Customize your cheese and toppings for a personal touch.


Leave a Comment