Chicken And Cabbage Potstickers
Oh, prepare yourselves for a truly delightful culinary adventure! If you’ve ever dreamed of biting into a perfectly crispy-bottomed, tender-wrapped parcel of pure flavor, then you are in exactly the right place. These Chicken And Cabbage Potstickers are not just a recipe; they’re an experience, a journey to dumpling bliss right in your own kitchen.
What makes these particular potstickers so incredibly special, you ask? Well, it’s all about that classic, comforting combination of tender, savory ground chicken perfectly balanced with the slight sweetness and satisfying crunch of fresh cabbage. Forget those mystery-meat store-bought versions; when you make these at home, you control every delicious ingredient, ensuring a burst of fresh, vibrant flavor with every single bite. The process itself is wonderfully therapeutic, and the reward? An incredibly juicy filling encased in a delicate wrapper that gets gloriously golden and crisp on the bottom before steaming to tender perfection.
I promise, you are going to absolutely adore how easy and rewarding it is to create these little pockets of joy. They’re fantastic as an appetizer for a gathering, a fun project for a weekend afternoon, or even a light, satisfying meal on their own. Essentially, we’ll be stuffing thin wrappers with our delectable chicken and cabbage mixture, pan-frying them until they achieve that signature crispy base, and then steaming them until they’re plump and tender. Served with your favorite dipping sauce, these potstickers are guaranteed to become a new staple in your culinary repertoire. Let’s get cooking!

Ingredient Notes
Crafting delicious Chicken and Cabbage Potstickers starts with selecting the right ingredients. I find that using fresh, high-quality components truly makes all the difference in achieving that irresistible flavor and texture. Here’s a rundown of what you’ll need and some handy substitutions I often use.
- Ground Chicken: This is the star of our potsticker filling. I prefer lean ground chicken, typically 90-93% lean, as it provides a wonderful texture without being overly greasy. If you’re looking for a different flavor profile, finely ground beef would also work beautifully here, maintaining a similar consistency for the filling.
- Cabbage: Napa cabbage is my go-to for potstickers. Its tender leaves and slightly sweet flavor are perfect. You’ll want to finely shred it. Green cabbage can be used as a substitute; it’s a bit firmer, so just make sure to shred it very thinly. The critical step with any cabbage is salting and squeezing out the excess water – this prevents a watery filling and ensures your potstickers hold their shape and flavor.
- Fresh Ginger: The pungent, aromatic warmth of fresh ginger is absolutely essential to the authentic taste of these potstickers. I always recommend using freshly grated ginger. If you’re in a pinch, about a teaspoon of ground ginger powder can be used for every tablespoon of fresh, but the fresh flavor is truly superior.
- Garlic: Freshly minced garlic provides a lovely savory depth. Like ginger, fresh is best, but a teaspoon of garlic powder can stand in for a clove or two if necessary.
- Green Onions (Scallions): These add a mild oniony bite and a pop of color to the filling. I use both the white and green parts, finely sliced.
- Soy Sauce: A cornerstone of the seasoning, offering umami and saltiness. I usually opt for a good quality light (or regular) soy sauce. For dietary needs, low-sodium soy sauce or tamari (for a gluten-free option) are excellent alternatives.
- Toasted Sesame Oil: This ingredient provides a deep, nutty aroma and flavor that is characteristic of Asian cuisine. Make sure it’s toasted sesame oil for that distinctive richness; untoasted sesame oil has a much milder flavor.
- Non-Alcoholic Alternative for Rice Wine: Traditional potsticker recipes often call for Shaoxing wine. To keep this recipe non-alcoholic, I find that a good substitute is a tablespoon of chicken broth combined with a quarter teaspoon of apple cider vinegar and a pinch of sugar. This mimics the subtle tang and depth without the alcohol.
- Potsticker Wrappers: Store-bought round potsticker or gyoza wrappers are a lifesaver. You can find them in the refrigerated section of most Asian markets or well-stocked grocery stores. Look for wrappers labeled “dumpling wrappers” or “gyoza wrappers.” If you can only find square wonton wrappers, you can cut them into rounds with a cookie cutter or simply fold them into triangles or rectangles.
- Cornstarch: A little bit of cornstarch in the filling helps bind everything together and keeps the filling moist.
- Salt and Freshly Ground Black Pepper: To taste, to enhance all the other wonderful flavors.
Step-by-Step Instructions
Making Chicken and Cabbage Potstickers might seem intricate, but I promise it’s incredibly satisfying and quite straightforward once you get the hang of it. Follow these steps for perfect, crispy-bottomed potstickers every time!
- Prepare the Cabbage: First, let’s tackle that cabbage. Finely shred your Napa cabbage (or green cabbage). Place the shredded cabbage in a large bowl, sprinkle about 1 teaspoon of salt over it, and toss well. Let it sit for at least 15-20 minutes. This draws out excess moisture, which is crucial for a flavorful and non-soggy filling. After 15-20 minutes, firmly squeeze the cabbage with your hands or place it in a clean kitchen towel and wring out as much liquid as possible. You’ll be surprised how much water comes out!
- Make the Filling: In a large mixing bowl, combine the ground chicken (or finely ground beef), the squeezed cabbage, minced fresh ginger, minced garlic, finely sliced green onions, soy sauce, toasted sesame oil, your non-alcoholic rice wine substitute (chicken broth + apple cider vinegar + sugar), cornstarch, and a pinch of black pepper. Using clean hands, thoroughly mix all the ingredients until everything is well combined. I like to mix until the mixture feels slightly sticky, indicating the proteins are starting to bind.
- Assemble the Potstickers: Now for the fun part! Take one potsticker wrapper and lay it flat in the palm of your hand. Keep the remaining wrappers covered with a damp cloth to prevent them from drying out. Place about 1 tablespoon of the chicken and cabbage filling in the center of the wrapper. Dip your finger in a small bowl of water and moisten the edge of half of the wrapper. Fold the wrapper in half over the filling to create a half-moon shape, pressing the center top edge together to seal.
- Pleat and Seal: Starting from one end, create small pleats along the moistened edge, pressing each pleat firmly against the back (unmoistened) edge as you go. This creates the classic potsticker shape. Alternatively, for a simpler seal, just press the edges together firmly to create a half-moon, ensuring no gaps. Make sure the potsticker is well-sealed to prevent the filling from leaking during cooking. Repeat this process with the remaining filling and wrappers. If you’re not cooking them all immediately, see my storage tips below.
- Cook the Potstickers (The Three-Stage Method): This is my favorite method for perfectly cooked, crispy-bottomed potstickers.
- Stage 1: Sear. Heat 1-2 tablespoons of vegetable oil (or another neutral cooking oil) in a large non-stick skillet over medium-high heat. Once hot, carefully place the potstickers in a single layer, flat-side down, making sure not to overcrowd the pan. Cook for 2-3 minutes, or until the bottoms are golden brown and crispy.
- Stage 2: Steam. Once the bottoms are crispy, carefully pour about 1/2 cup of water (or chicken broth) into the skillet. Immediately cover the skillet tightly with a lid. Reduce the heat to medium-low and let the potstickers steam for 6-8 minutes, or until the chicken filling is cooked through and the wrappers are translucent and tender. The water should evaporate during this stage.
- Stage 3: Crisp. Remove the lid. If there’s any remaining water, allow it to evaporate. Increase the heat slightly if needed and cook for another 1-2 minutes, uncovered, allowing the bottoms to re-crisp. You want those beautiful, golden-brown, crunchy undersides!
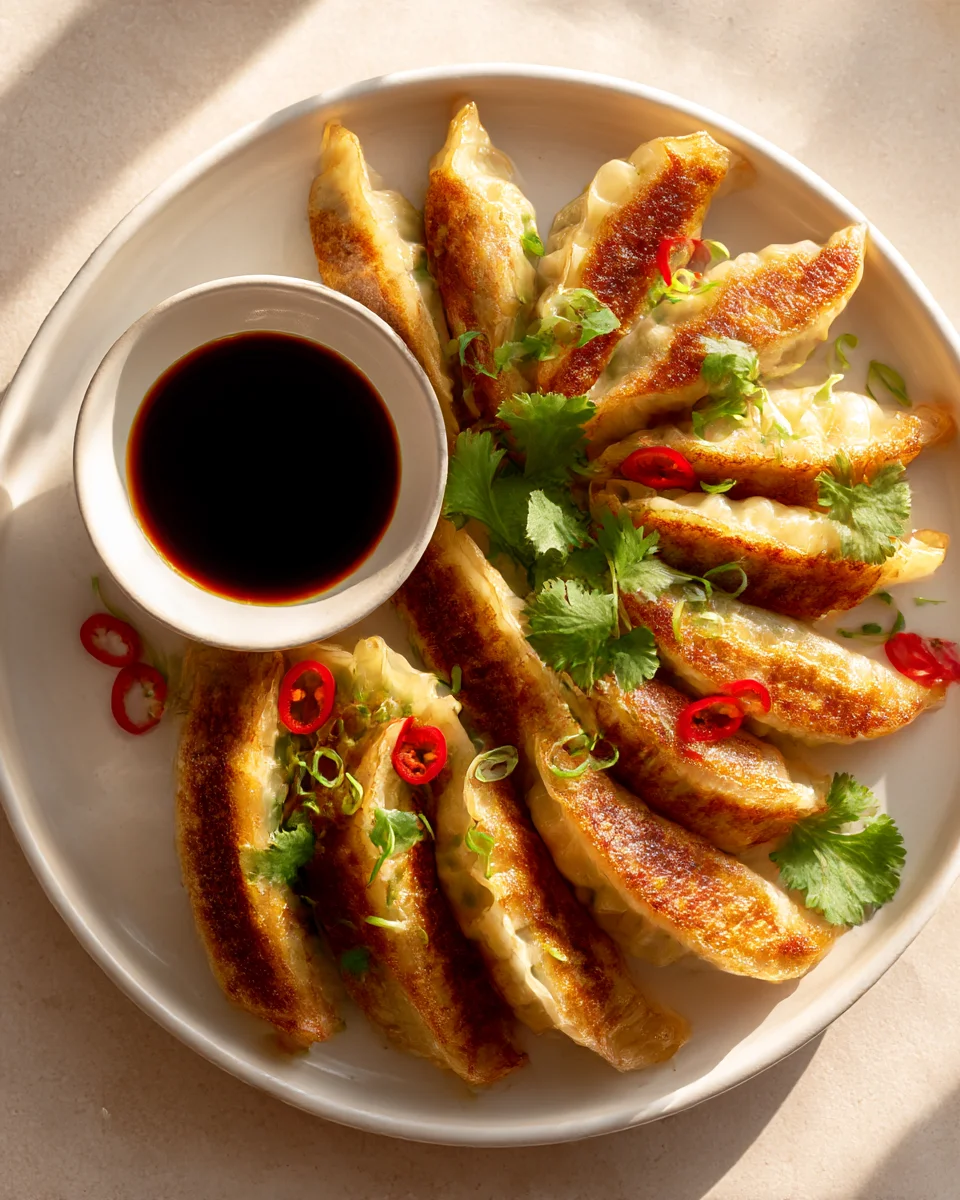
- Serve Immediately: Transfer the cooked potstickers to a serving platter. Serve hot with your favorite dipping sauce. My go-to is a simple mix of soy sauce, rice vinegar, a touch of sesame oil, and a dash of chili oil for a kick.
Tips & Suggestions
Achieving the perfect Chicken and Cabbage Potstickers is an art form, but with a few pointers, you’ll be a master in no time! Here are my favorite tips and suggestions to elevate your potsticker game:
- Don’t Skip Salting the Cabbage: I cannot stress this enough! Salting the cabbage and squeezing out its excess moisture is absolutely critical. If you skip this step, your filling will be watery, making your potstickers soggy and prone to breaking during cooking. It also concentrates the cabbage’s flavor.
- Don’t Overfill: It’s tempting to pack in as much filling as possible, but overfilling makes it incredibly difficult to seal the wrappers properly. A tablespoon of filling is usually just right for standard-sized wrappers. An overfilled potsticker is also more likely to burst during cooking.
- Keep Wrappers Moist: Store-bought wrappers dry out quickly once exposed to air. Always keep unused wrappers covered with a damp kitchen towel while you’re working. If they dry out, they become brittle and won’t seal properly.
- Practice Your Pleats (or Keep it Simple!): The classic pleated edge is beautiful and helps seal the potsticker tightly. Don’t be discouraged if your first few aren’t perfect! There are many ways to pleat, and even a simple half-moon shape with a good, firm crimp from a fork around the edge will work just fine. The goal is to enclose the filling securely.
- Achieving the Perfect Crispy Bottom: The key to that coveted crispy bottom is patience and enough oil in the searing stage. Don’t be afraid to let them get a good golden-brown color before adding water for steaming. A non-stick pan is your best friend here.
- Make a Killer Dipping Sauce: While the potstickers are delicious on their own, a good dipping sauce takes them to the next level. My go-to is a simple blend of 3 parts soy sauce, 1 part rice vinegar, a dash of toasted sesame oil, and a few drops of chili oil for heat. Sometimes I’ll add finely minced garlic or ginger for extra zing. Experiment to find your favorite!
- Prevent Sticking When Freezing: If you’re making a big batch to freeze, arrange the uncooked potstickers in a single layer on a parchment-lined baking sheet. Ensure they aren’t touching each other. Freeze until solid (about 1-2 hours), then transfer them to a freezer-safe bag or container. This prevents them from sticking together.
- Vary the Filling: While chicken and cabbage is classic, feel free to experiment! You could add finely chopped mushrooms, shredded carrots, or even a touch of finely chopped water chestnuts for extra crunch. Just remember to finely chop any additions and ensure they don’t add too much moisture.
- Batch Cooking for Entertaining: Potstickers are fantastic for parties. You can do all the assembly ahead of time and freeze them. Then, simply cook them from frozen (adding a minute or two to the steaming time) when your guests arrive for fresh, hot appetizers.
Storage
Whether you’ve made a big batch or have leftovers, proper storage ensures your Chicken and Cabbage Potstickers remain delicious and safe to eat. Here’s how I handle them:
Uncooked Potstickers (Freezing for Later):
This is my absolute favorite way to prepare potstickers for future meals. It’s a fantastic meal prep hack!
- Initial Freeze: Once you’ve assembled your potstickers, arrange them in a single layer on a parchment paper-lined baking sheet. Make sure they are not touching each other, as they will stick together if they freeze in contact.
- Freeze Until Solid: Place the baking sheet in the freezer for about 1-2 hours, or until the potstickers are completely frozen solid.
- Transfer to Storage: Once frozen, transfer the potstickers into a freezer-safe zip-top bag or an airtight container. This step is crucial to prevent freezer burn and save space.
- Shelf Life: Uncooked, frozen potstickers will last for up to 2-3 months in the freezer.
- Cooking from Frozen: When you’re ready to cook them, there’s no need to thaw! Simply follow the standard cooking instructions (sear, steam, crisp), but add an extra 2-3 minutes to the steaming stage to ensure they cook through properly. I often add an extra splash of water too.
Cooked Potstickers:
If you have leftover cooked potstickers, they can be stored and reheated, though they’re definitely best enjoyed fresh off the pan.
- Refrigeration: Allow any cooked potstickers to cool completely to room temperature. Then, place them in an airtight container in the refrigerator.
- Shelf Life: Cooked potstickers will keep well in the refrigerator for 3-4 days.
- Reheating:
- Skillet Reheating: This is my preferred method for reheating, as it helps regain some of that crispy texture. Heat a little oil in a non-stick skillet over medium heat. Place the potstickers in a single layer and cook for 2-3 minutes per side, or until heated through and the bottoms are re-crisped. You can add a tablespoon of water and cover for a minute to steam them through if they feel a bit dry, then uncover to re-crisp.
- Microwave: While quick, the microwave tends to make potstickers a bit soft and chewy, and you’ll lose the crispy bottom. If using, place them on a microwave-safe plate, cover loosely, and heat in 30-second intervals until warmed through.
- Air Fryer: An air fryer can also do a decent job of crisping them up. Place the potstickers in a single layer in the air fryer basket (a light spray of oil helps) and cook at 350°F (175°C) for 5-7 minutes, shaking the basket halfway through, until hot and crispy.
Final Thoughts
So there you have it! My absolute favorite recipe for these delightful Chicken And Cabbage Potstickers. I truly believe that once you try making them, they’ll become a staple in your kitchen. The exquisite blend of savory chicken and wonderfully crisp-sweet cabbage, all enveloped in that perfectly crafted dumpling skin, creates a flavor profile that’s both deeply comforting and incredibly exciting.
Whether you’re looking for a crowd-pleasing appetizer to share with loved ones or a satisfying, wholesome main course for a weeknight meal, these Chicken And Cabbage Potstickers are guaranteed to impress. They offer that perfect balance of textures and tastes that keeps you coming back for more. Don’t hesitate – gather your ingredients, follow the steps, and get ready to experience the immense joy of homemade Chicken And Cabbage Potstickers. I promise, you won’t regret a single bite!
Savory Chicken & Cabbage Potstickers: A Must-Try Recipe!

Experience the delightful combination of tender, savory ground chicken and fresh cabbage in these crispy-bottomed potstickers. Perfect as an appetizer or a light meal, these dumplings are sure to become a new favorite in your kitchen.
- Prep Time: 30 mins
- Cook Time: 20 mins
- Total Time: 50 minutes
- Yield: 4 servings 1x
- Category: Appetizer
- Method: Pan-frying and steaming
- Cuisine: Asian
Ingredients
- 1 lb Ground Chicken (lean, 90-93% lean)
- 2 cups Napa Cabbage (finely shredded)
- 1 tablespoon Fresh Ginger (grated)
- 2 cloves Garlic (minced)
- 3 Green Onions (Scallions, finely sliced)
- 2 tablespoons Soy Sauce
- 1 tablespoon Toasted Sesame Oil
- 1 tablespoon Non-Alcoholic Alternative for Rice Wine (1 tablespoon chicken broth + 1/4 teaspoon apple cider vinegar + pinch of sugar)
- 1 tablespoon Cornstarch
- Salt (to taste)
- Freshly Ground Black Pepper (to taste)
- 1 package Potsticker Wrappers (store-bought)
- 1–2 tablespoons Vegetable Oil (for cooking)
Instructions
- Prepare the Cabbage: Finely shred your Napa cabbage (or green cabbage). Place the shredded cabbage in a large bowl, sprinkle about 1 teaspoon of salt over it, and toss well. Let it sit for at least 15-20 minutes. After 15-20 minutes, firmly squeeze the cabbage with your hands or place it in a clean kitchen towel and wring out as much liquid as possible.
- Make the Filling: In a large mixing bowl, combine the ground chicken, the squeezed cabbage, minced fresh ginger, minced garlic, finely sliced green onions, soy sauce, toasted sesame oil, your non-alcoholic rice wine substitute, cornstarch, and a pinch of black pepper. Using clean hands, thoroughly mix all the ingredients until everything is well combined.
- Assemble the Potstickers: Take one potsticker wrapper and lay it flat in the palm of your hand. Place about 1 tablespoon of the chicken and cabbage filling in the center of the wrapper. Dip your finger in a small bowl of water and moisten the edge of half of the wrapper. Fold the wrapper in half over the filling to create a half-moon shape, pressing the center top edge together to seal.
- Pleat and Seal: Starting from one end, create small pleats along the moistened edge, pressing each pleat firmly against the back edge as you go. Alternatively, just press the edges together firmly to create a half-moon, ensuring no gaps. Repeat this process with the remaining filling and wrappers.
- Cook the Potstickers (The Three-Stage Method): Heat 1-2 tablespoons of vegetable oil in a large non-stick skillet over medium-high heat. Once hot, carefully place the potstickers in a single layer, flat-side down. Cook for 2-3 minutes, or until the bottoms are golden brown and crispy. Carefully pour about 1/2 cup of water into the skillet. Cover the skillet tightly with a lid and reduce the heat to medium-low. Let the potstickers steam for 6-8 minutes. Remove the lid and allow any remaining water to evaporate. Increase the heat slightly if needed and cook for another 1-2 minutes, uncovered.
- Serve Immediately: Transfer the cooked potstickers to a serving platter. Serve hot with your favorite dipping sauce.
Nutrition
- Serving Size: 1 potsticker
- Calories: 80
- Sugar: 1 g
- Sodium: 200 mg
- Fat: 4 g
- Saturated Fat: 1 g
- Unsaturated Fat: 3 g
- Trans Fat: 0 g
- Carbohydrates: 6 g
- Fiber: 1 g
- Protein: 5 g
- Cholesterol: 30 mg
Keywords: Salting the cabbage and squeezing out its excess moisture is critical to prevent soggy filling. Keep unused wrappers covered with a damp kitchen towel while working to prevent them from drying out.


Leave a Comment