Skillet Raspberry Crum extractble
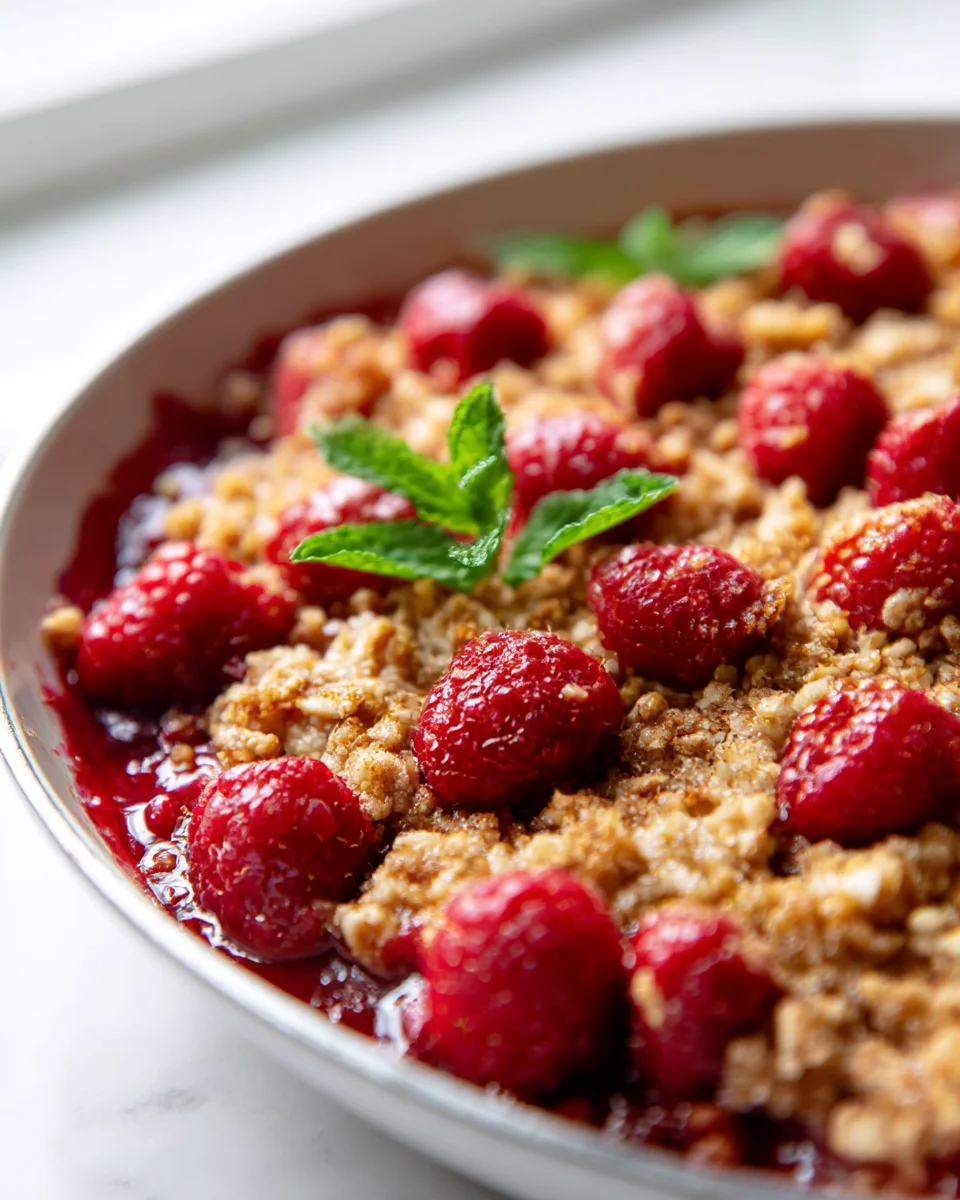
Oh, hello there, fellow dessert lover! Get ready to fall head over heels for something truly special: my Skillet Raspberry Crum extractble. This isn’t just any old fruit crumble; it’s a dessert experience that brings together rustic charm with an explosion of vibrant flavors and a uniquely delightful texture. I absolutely adore making this because it’s incredibly simple, yet it tastes like a million bucks!
So, what makes this “extractble” wonder so special? Imagine juicy, sun-ripened raspberries, sweetened just so, bubbling away in a hot skillet, becoming wonderfully jammy and concentrated. That’s the heart of it! But then, we crown it with a perfectly buttery, golden-brown “crum” topping that delivers just the right amount of crunch. The magic of “extractble” comes from how effortlessly scoopable and deeply flavorful the fruit base becomes, making every spoonful a pure delight. It’s like all the best parts of a pie and a crumble got together for a party in one pan, designed for easy serving!
You’re going to love this Skillet Raspberry Crum extractble because it’s the ultimate cozy dessert. It’s incredibly easy to whip up, making it perfect for a weeknight treat or an impressive-but-low-effort dish for guests. Serve it warm, perhaps with a scoop of vanilla ice cream melting gloriously over the top, and watch it disappear. Trust me, once you try this one-pan marvel, you’ll be making it again and again!

Welcome to my absolute favorite way to enjoy fresh raspberries – a warm, bubbly Skillet Raspberry Crumble! There’s something so comforting about a dessert baked right in a skillet, creating that perfect rustic feel. This recipe is all about letting those vibrant raspberries shine, tucked under a buttery, sweet, and perfectly crunchy oat crumble topping. It’s surprisingly simple to put together, making it an ideal treat for a cozy night in or a casual gathering. Let’s dive in!
Ingredient Notes
Crafting the perfect Skillet Raspberry Crumble starts with understanding the role each ingredient plays. I’ve broken down the key players and shared some tips for substitutions to ensure your crumble is always a triumph.
- Fresh Raspberries: These are the star of our show! I highly recommend using fresh, ripe raspberries for their bright, tangy flavor and delicate texture. If fresh aren’t available or in season, you can absolutely use frozen raspberries. There’s no need to thaw them first; just toss them directly into the skillet. You might need to add a couple of extra minutes to the baking time, and perhaps a touch more cornstarch if they seem excessively watery.
- Granulated Sugar (for the filling): This sugar balances the natural tartness of the raspberries. Depending on the sweetness of your berries and your personal preference, you can adjust the amount slightly. If your raspberries are super ripe and sweet, you might reduce it a bit. If they’re on the tart side, feel free to add a tablespoon or two more.
- Cornstarch (or all-purpose flour): This is your secret weapon against a watery crumble! Cornstarch acts as a thickener, ensuring your raspberry filling is delightfully jammy and not a runny mess. If you don’t have cornstarch, you can substitute it with an equal amount of all-purpose flour, though cornstarch usually provides a clearer, glossier finish.
- Lemon Zest and Juice: A little bit goes a long way here! The lemon zest adds a wonderful aromatic brightness, while the juice enhances and perks up the natural flavor of the raspberries without making the filling taste overtly lemony. Don’t skip this; it truly elevates the fruit.
- All-Purpose Flour (for the crumble): This forms the structure of our irresistible topping. For those with gluten sensitivities, a 1:1 gluten-free all-purpose flour blend can often be used successfully. Just ensure your blend contains xanthan gum, or add a quarter teaspoon per cup of flour.
- Brown Sugar (light or dark): I prefer brown sugar for the crumble topping because it adds a wonderful depth of flavor, a hint of molasses, and a lovely chewiness that granulated sugar alone can’t quite replicate. Light brown sugar is usually sufficient, but dark brown sugar will give a richer, more caramel-like note.
- Rolled Oats (Old-fashioned): While optional, I love adding old-fashioned rolled oats to my crumble. They provide a fantastic chewy texture, a subtle nutty flavor, and a satisfying heartiness to the topping. Quick oats can work in a pinch, but they tend to disappear more into the topping, losing some of that textural appeal.
- Unsalted Butter (cold): This is perhaps the most critical ingredient for the crumble topping! Using cold, unsalted butter, cut into small pieces, is essential for achieving that beautifully crumbly, distinct texture. As it bakes, the cold butter slowly melts, creating pockets of steam that make the topping light and crisp. For a vegan alternative, cold, firm vegan butter sticks work wonderfully; just make sure it’s a brand known for baking.
- Vanilla Extract: A splash of good quality vanilla extract ties all the flavors together, adding a warm, sweet aroma to the fruit filling.
Step-by-Step Instructions
Making this Skillet Raspberry Crumble is a joy – straightforward and incredibly rewarding. Follow these steps for a perfect dessert every time!
- Preheat Your Oven & Prep Your Skillet: First things first, preheat your oven to 375°F (190°C). Grab your favorite 10-inch oven-safe skillet (cast iron works beautifully for this). If your skillet isn’t naturally non-stick, or if you just want extra insurance, you can lightly grease the bottom and sides with a little butter or cooking spray.
- Prepare the Raspberry Filling: In a medium bowl, gently combine the fresh (or frozen, unthawed) raspberries with the granulated sugar, cornstarch, lemon zest, lemon juice, and vanilla extract. Toss everything together very carefully so as not to crush the delicate raspberries too much. The cornstarch should evenly coat the berries, ensuring a perfectly thickened filling. Pour this delightful raspberry mixture evenly into the prepared skillet.
- Craft the Crumble Topping: Now for the best part – the crumble! In another medium bowl, whisk together the all-purpose flour, brown sugar, rolled oats (if using), and a pinch of salt. Add the cold, diced unsalted butter to the dry ingredients. Using your fingertips, a pastry blender, or even a fork, work the butter into the flour mixture until it resembles coarse crumbs with some pea-sized pieces of butter remaining. The key here is to work quickly so the butter stays cold. If you prefer, you can also pulse it a few times in a food processor until just combined into crumbs, being careful not to overmix.
- Assemble Your Crumble: Evenly sprinkle the glorious crumble topping over the raspberry filling in the skillet. Make sure the fruit is well covered.
- Bake to Perfection: Carefully place the skillet in your preheated oven. Bake for 30-35 minutes, or until the raspberry filling is bubbly around the edges and the crumble topping is beautifully golden brown and crisp. Keep an eye on it towards the end to prevent over-browning. If the top starts to get too dark before the filling is bubbly, you can loosely tent it with a piece of aluminum foil.
- Rest and Serve: This is crucial! Once baked, carefully remove the skillet from the oven (remember that handle will be HOT!). Let the crumble rest for at least 15-20 minutes before serving. This allows the fruit filling to cool slightly and set, preventing it from being too runny. Serve warm, perhaps with a scoop of vanilla bean ice cream, a dollop of fresh whipped cream, or a drizzle of custard. Enjoy every single bite!
Tips & Suggestions
To make your Skillet Raspberry Crumble truly outstanding, here are a few of my go-to tips and suggestions:
- Keep Your Butter Cold for the Crumble: I can’t stress this enough! Cold butter is the secret to a perfectly crumbly, light, and crisp topping. If your kitchen is warm and the butter starts to soften too much while you’re working it into the flour, pop the bowl (with the butter and dry ingredients) into the fridge for 10-15 minutes to chill before continuing. This prevents the topping from becoming dense or cake-like.
- Don’t Overmix the Crumble Topping: Once you’ve added the butter, mix just until coarse crumbs form. Overmixing develops the gluten in the flour and melts the butter, which can lead to a tough or greasy topping instead of that delightful light crispness. Lumps are good!
- Adjust Sweetness to Your Liking: Raspberries can vary greatly in sweetness. Taste a raspberry from your batch before adding the sugar to the filling. If they’re very tart, you might want to add an extra tablespoon or two of sugar. If they’re incredibly sweet, you can slightly reduce the amount.
- Prevent a Soggy Bottom: The cornstarch in the filling is key, but also ensure you don’t use overly wet raspberries. If you’re using frozen raspberries that have thawed a bit and released a lot of liquid, you might want to increase the cornstarch by half a teaspoon. A proper thickener ensures a jammy, not watery, filling.
- Personalize Your Fruit: While raspberry crumble is divine on its own, feel free to experiment with other fruits or fruit combinations! A mix of raspberries and blueberries, or raspberries and sliced peaches, works beautifully. Just ensure the fruit pieces are roughly similar in size so they cook evenly.
- Add a Pinch of Spice: For an extra layer of warmth and complexity, try adding a quarter teaspoon of ground cinnamon, nutmeg, or even a tiny pinch of cardamom to the crumble topping mixture. It complements the raspberries beautifully.
- Serving Suggestions: This crumble is heavenly on its own, but it truly shines when paired with something cool and creamy. My top recommendations are a generous scoop of vanilla bean ice cream (the melting ice cream mixing with the warm fruit is pure bliss!), a dollop of freshly whipped cream, or a drizzle of crème fraîche for a sophisticated tang.
- Skillet Safety: Always remember that your skillet handle will be incredibly hot when it comes out of the oven. Use an oven mitt or a handle cover to prevent burns. A good trick is to drape an oven mitt over the handle as soon as it comes out of the oven as a visual reminder.
Storage
So, you’ve somehow managed to have leftover Skillet Raspberry Crumble (a rare occurrence in my house!). Here’s how to store it to keep it delicious for as long as possible:
- Cool Completely First: Before storing, it’s crucial to let your crumble cool down completely to room temperature. Storing it while still warm can create condensation, which makes the crumble topping soggy. Just leave the skillet on a cooling rack for an hour or two until it’s no longer warm to the touch.
- Room Temperature Storage (Short-Term): If you plan to finish the crumble within 1-2 days, you can store it right in the skillet, loosely covered with plastic wrap or aluminum foil, at room temperature. The topping will remain relatively crisp, though it may soften slightly over time.
- Refrigeration (Longer-Term): For longer storage, or if your kitchen is particularly warm, cover the cooled skillet tightly with plastic wrap or transfer the crumble to an airtight container. Store it in the refrigerator for up to 4-5 days. The crumble topping will likely soften in the fridge, but the flavors will still be fantastic.
- Reheating Instructions:
- Oven (Recommended for Crispness): To bring back some of that delightful crispness to the topping, reheat individual portions or the whole skillet in an oven preheated to 350°F (175°C) for 10-15 minutes, or until warmed through and the topping is slightly crisp again.
- Microwave (Quick but Softer): If you’re in a hurry, individual portions can be reheated in the microwave for 30-60 seconds, or until warm. Be aware that the topping will remain soft and won’t regain its original crispness with this method.
- Freezing (Components Only, Recommended): While you can freeze a baked crumble, the texture of the topping can suffer somewhat upon thawing and reheating. What I prefer to do for future crumbles is freeze the unbaked crumble topping separately. Prepare the topping mixture, then spread it out on a baking sheet and freeze until solid. Transfer the frozen crumble to a freezer-safe bag or container and store for up to 2-3 months. When ready to bake, you can assemble the fruit filling in your skillet, top with the frozen crumble, and bake as directed, possibly adding an extra 5-10 minutes to the baking time.
Final Thoughts
There’s just something incredibly satisfying about a warm, bubbly dessert made right in your skillet, and the Skillet Raspberry Crum extractble truly delivers on that front. I absolutely adore how effortlessly this comes together, bringing together the bright, tangy burst of raspberries with that irresistible golden, crunchy crumble topping. It’s the kind of treat that transforms a simple evening into something special, whether you’re enjoying it solo or sharing it with loved ones.
From its vibrant color to its comforting aroma filling your kitchen, this Skillet Raspberry Crum extractble is a testament to how simple ingredients can create pure magic. I truly believe you’ll find it becomes a fast favorite, perfect for any occasion when you crave something sweet, fruity, and utterly delightful. Give it a try – you won’t be disappointed!
Easy Skillet Raspberry Crumble – Your New Favorite Dessert!
Indulge in the delightful flavors of this Easy Skillet Raspberry Crumble, featuring juicy raspberries and a buttery crumble topping. Perfect for a cozy night in or an impressive dessert for guests!
- Prep Time: 15 mins
- Cook Time: 30-35 mins
- Total Time: 12 minute
- Yield: 4 servings
- Category: Dessert
- Method: Baking
- Cuisine: American
Ingredients
- Fresh Raspberries
- Granulated Sugar (for the filling)
- Cornstarch (or all-purpose flour)
- Lemon Zest and Juice
- All-Purpose Flour (for the crumble)
- Brown Sugar (light or dark)
- Rolled Oats (Old-fashioned)
- Unsalted Butter (cold)
- Vanilla Extract
Instructions
- Preheat your oven to 375°F (190°C) and prepare your 10-inch oven-safe skillet by lightly greasing it if necessary.
- In a medium bowl, gently combine the fresh (or frozen, unthawed) raspberries with the granulated sugar, cornstarch, lemon zest, lemon juice, and vanilla extract. Toss carefully to coat the raspberries without crushing them, then pour the mixture into the prepared skillet.
- In another medium bowl, whisk together the all-purpose flour, brown sugar, rolled oats (if using), and a pinch of salt. Add the cold, diced unsalted butter and work it into the flour mixture until it resembles coarse crumbs with some pea-sized pieces of butter remaining.
- Evenly sprinkle the crumble topping over the raspberry filling in the skillet.
- Bake in the preheated oven for 30-35 minutes, or until the raspberry filling is bubbly and the crumble topping is golden brown and crisp. Tent with aluminum foil if it starts to over-brown.
- Let the crumble rest for at least 15-20 minutes before serving to allow the filling to set. Serve warm with vanilla bean ice cream, whipped cream, or custard.
Nutrition
- Serving Size: 1 bowl
- Calories: 320
- Sugar: 18 g
- Sodium: 150 mg
- Fat: 15 g
- Saturated Fat: 9 g
- Unsaturated Fat: 5 g
- Trans Fat: 0 g
- Carbohydrates: 45 g
- Fiber: 4 g
- Protein: 3 g
- Cholesterol: 30 mg
Keywords: Keep your butter cold for the crumble to ensure a light and crisp topping. Adjust sweetness based on the tartness of your raspberries, and feel free to experiment with different fruits or spices for added flavor.

Leave a Comment