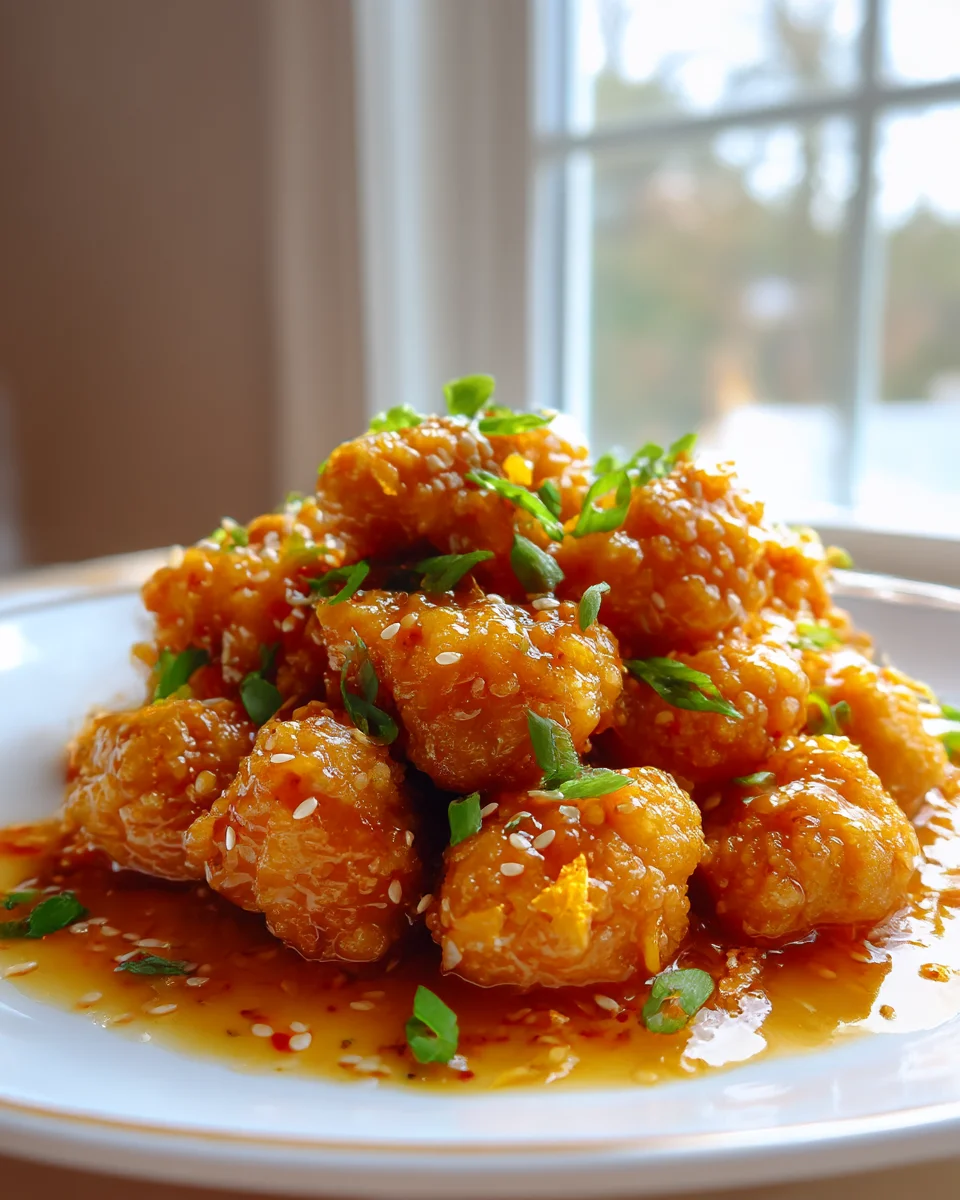
Gluten Free Orange Chicken
Oh, how I love a good takeout classic, especially when I can whip up an even better, healthier version right in my own kitchen! This isn’t just any orange chicken; it’s a triumph of flavor and texture that caters beautifully to gluten-free lifestyles without sacrificing one bit of that irresistible taste we all crave. I promise you, this recipe is going to become an instant favorite in your household.
What makes this Gluten Free Orange Chicken so special, you ask? Well, it’s all about that perfect balance. We’re talking succulent pieces of chicken, coated in a light, crispy gluten-free breading, then drenched in a vibrant, zesty, and perfectly sweet-and-tangy orange sauce. It’s a dish that sings with fresh citrus notes and savory undertones, proving that going gluten-free doesn’t mean compromising on deliciousness. You’ll love how easy it is to make a restaurant-quality meal at home, knowing exactly what goes into it, and serving up a dish that pleases everyone at the table.
I truly believe you’ll fall head over heels for this recipe because it delivers on every front: incredible flavor, satisfying crunch, and the comfort of a homemade meal. It’s perfect for a weeknight dinner, a special gathering, or whenever you’re craving that classic takeaway experience but want a healthier, gluten-free option. Get ready to transform simple ingredients into a dazzling main course that will have everyone asking for seconds!

Ingredient Notes
Crafting a truly delicious Gluten Free Orange Chicken starts with understanding your key ingredients. Each component plays a vital role in achieving that perfect balance of crispy chicken and sweet, tangy sauce. I’ve broken down what you’ll need and some helpful substitutions to ensure your dish is both fantastic and adheres to a gluten-free lifestyle.
- Chicken: I typically use boneless, skinless chicken breasts for this recipe, cut into bite-sized 1-inch pieces. Chicken thighs are also an excellent choice, offering a slightly richer flavor and remaining very juicy after frying. Whatever you choose, make sure to pat the chicken pieces very dry before coating them; this is crucial for getting a crispy exterior. For a fun variation, you could even try this recipe with bite-sized pieces of beef, making it a delicious Gluten Free Orange Beef!
- Gluten-Free Coating: The secret to that iconic crispy coating is a good gluten-free starch. Cornstarch is my go-to, as it creates a wonderfully light and crisp crust when fried. Tapioca starch (also known as tapioca flour) is another fantastic option and behaves very similarly. You could also use a gluten-free all-purpose flour blend, but be aware that the texture might be slightly different—often a bit denser than a pure starch coating. I sometimes like to combine a bit of cornstarch with a touch of gluten-free flour for a slight textural variation.
- Orange Sauce Base:
- Orange Juice & Zest: Freshly squeezed orange juice is non-negotiable for the best flavor! It makes a huge difference compared to store-bought concentrate. Don’t forget the zest; it contains aromatic oils that intensify the orange flavor.
- Gluten-Free Soy Sauce (Tamari): This is paramount for keeping the recipe gluten-free. Tamari is a Japanese soy sauce that is typically gluten-free and has a rich, savory depth. Do not substitute with regular soy sauce, as it contains wheat.
- Sweetener: Granulated sugar is standard, but you can also use honey or maple syrup for a more natural sweetness. Adjust the amount to your taste; some prefer a sweeter sauce, others a bit tarter.
- Vinegar: Rice vinegar (often labeled rice wine vinegar) provides that essential tang and acidity that balances the sweetness. Look for a brand that explicitly states it’s gluten-free if you have severe sensitivities, though most plain rice vinegars are.
- Ginger & Garlic: Freshly minced ginger and garlic are key for an aromatic, flavorful sauce. Powdered alternatives simply won’t give you the same vibrant taste.
- Thickener: A cornstarch slurry (cornstarch mixed with a little cold water) is what will give your sauce that beautiful, glossy, and thick consistency.
- Non-Alcoholic Alternative: Many traditional orange chicken recipes call for rice wine. To keep this recipe strictly non-alcoholic, I simply increase the amount of rice vinegar slightly or add a splash of chicken broth or even apple cider vinegar. This ensures depth of flavor without any alcohol.
- Oil for Frying: A neutral-flavored oil with a high smoke point, like vegetable oil, canola oil, or peanut oil, is best for frying the chicken.
- Garnish: Sliced green onions and toasted sesame seeds add both flavor and visual appeal.
Step-by-Step Instructions
Making delicious Gluten Free Orange Chicken at home is a rewarding experience, and I’m here to guide you through each step to ensure your dish turns out perfectly crispy and saucy!
- Prepare the Chicken: Start by patting your chicken pieces completely dry with paper towels. This step is critical for a crispy coating! In a medium bowl, toss the chicken with a pinch of salt and pepper. Add about 1/2 cup of cornstarch (or tapioca starch) and toss until each piece of chicken is evenly coated. You want a thin, even layer.
- Prepare the Orange Sauce: In a separate medium saucepan, combine the fresh orange juice, orange zest, gluten-free tamari, sugar (or your chosen sweetener), rice vinegar, minced ginger, and minced garlic. Whisk everything together until the sugar dissolves. Bring the mixture to a gentle simmer over medium heat.
- Thicken the Sauce: While the sauce simmers, whisk together 2 tablespoons of cornstarch with 2 tablespoons of cold water in a small bowl to create a slurry. Once the sauce is simmering, slowly pour the cornstarch slurry into the sauce while whisking constantly. Continue to whisk until the sauce thickens to your desired consistency. It should be thick enough to coat the back of a spoon. Remove the sauce from the heat and set aside.
- Fry the Chicken: Heat about 1 inch of neutral oil in a large skillet or Dutch oven over medium-high heat to approximately 350-375°F (175-190°C). If you don’t have a thermometer, a good test is to drop a tiny bit of coated chicken into the oil; it should sizzle immediately.
- Cook in Batches: Carefully add the coated chicken pieces to the hot oil in a single layer, ensuring not to overcrowd the pan. Overcrowding will lower the oil temperature and result in soggy chicken. Fry for 4-6 minutes, flipping halfway through, until the chicken is golden brown and cooked through. The internal temperature should reach 165°F (74°C).
- Drain Excess Oil: Once cooked, use a slotted spoon to transfer the fried chicken to a wire rack set over a baking sheet to drain any excess oil. This helps keep the chicken crispy. Repeat with the remaining chicken until all pieces are fried.
- Combine Chicken and Sauce: In a large bowl, or directly back into the clean skillet you used for frying (if you prefer a saucier presentation), add the fried chicken. Pour the prepared orange sauce over the chicken and gently toss until every piece is evenly coated.
- Serve Immediately: Garnish with sliced green onions and toasted sesame seeds. I love serving this Gluten Free Orange Chicken over fluffy white rice or brown rice, with a side of steamed broccoli or snow peas. Enjoy your delicious homemade meal!
Tips & Suggestions
To help you get the absolute best results from your Gluten Free Orange Chicken, I’ve gathered some of my favorite tips and suggestions. These small tweaks can make a big difference in the final outcome!
- Achieve Maximum Crispiness:
- Double Fry (Optional, but Recommended!): For restaurant-level crispiness, consider double-frying your chicken. After the first fry (cooking the chicken through until lightly golden), remove it from the oil and let it rest for 5-10 minutes. Then, increase the oil temperature slightly and fry the chicken again for 1-2 minutes until deeply golden brown and extra crispy. This creates an incredibly satisfying crunch.
- Don’t Overcrowd the Pan: This is a golden rule for frying. Frying in batches ensures the oil temperature stays high, leading to crispy, not greasy, chicken.
- Perfecting the Sauce:
- Taste and Adjust: Always taste your sauce before thickening. Do you prefer it sweeter? Add a touch more sugar or honey. More tangy? A splash more rice vinegar or orange juice. Spicier? A pinch of red pepper flakes is wonderful!
- Sauce Consistency: If your sauce becomes too thick, you can thin it out with a little extra orange juice or water. If it’s too thin, make another small cornstarch slurry and whisk it in, simmering gently until it reaches the desired thickness.
- Make Ahead: The orange sauce can be made a day or two in advance and stored in an airtight container in the refrigerator. Reheat gently on the stovetop before tossing with the freshly fried chicken.
- Spice it Up: If you enjoy a bit of heat, add a pinch or two of red pepper flakes to the sauce along with the ginger and garlic. You can also add a finely minced fresh red chili for a bolder kick.
- Healthier Preparation Options:
- Air Fryer Chicken: For a lighter version, you can air fry the coated chicken! Preheat your air fryer to 375°F (190°C), lightly spray the chicken with oil, and cook in batches for 12-18 minutes, flipping halfway, until golden and cooked through.
- Baked Chicken: Alternatively, bake the coated chicken on a wire rack over a baking sheet at 400°F (200°C) for 20-25 minutes, flipping halfway, until crispy and cooked.
- Serving Suggestions: My favorite way to serve Gluten Free Orange Chicken is over steamed jasmine rice or brown rice. To complete the meal, add some simple steamed vegetables like broccoli, snap peas, or asparagus.
Storage
Proper storage is key to enjoying your Gluten Free Orange Chicken leftovers, though it’s always best enjoyed fresh due to the crispy coating. Here’s how I handle storing and reheating:
- Refrigeration: Leftover Gluten Free Orange Chicken can be stored in an airtight container in the refrigerator for up to 3-4 days. While the flavor remains excellent, please note that the crispy coating on the chicken will inevitably soften once it’s been tossed in the sauce and refrigerated.
- Reheating:
- Oven/Toaster Oven: My preferred method for reheating to try and revive some crispiness is in the oven or toaster oven. Preheat to 350°F (175°C). Spread the chicken in a single layer on a baking sheet and heat for 10-15 minutes, or until warmed through and the chicken begins to crisp up again.
- Air Fryer: The air fryer is also excellent for reheating. Place the chicken in the air fryer basket in a single layer and heat at 350°F (175°C) for 5-8 minutes, shaking the basket halfway, until heated through and crisped.
- Microwave: While convenient, the microwave will not help restore any crispiness and might even make the coating softer. It’s best used if you’re just looking for quick heating and aren’t concerned about texture. Heat in 30-second intervals until warmed through.
- Freezing: I generally do not recommend freezing the sauced chicken, as the texture of the coating will become very soggy upon thawing and reheating. However, you can freeze the orange sauce separately in an airtight container for up to 2-3 months. Thaw in the refrigerator overnight, then gently reheat on the stovetop before tossing with freshly fried chicken. You could also fry the chicken, let it cool completely, and freeze it on its own. Then, reheat the frozen chicken in an oven or air fryer until crispy, and toss with fresh or reheated sauce.
Final Thoughts
And there you have it – my go-to recipe for the most delightful Gluten Free Orange Chicken! I truly believe this dish is a game-changer, whether you’re strictly gluten-free or simply looking to expand your culinary horizons. This isn’t just another take on a classic; it’s a carefully crafted experience that delivers on every front.
From the perfectly crispy chicken pieces to the vibrant, tangy, and sweet sauce, every bite of this Gluten Free Orange Chicken is bursting with flavor. It proves unequivocally that eating gluten-free doesn’t mean compromising on taste or texture. It’s comforting, satisfying, and boasts that irresistible takeout charm, all made with ingredients you can feel good about.
I genuinely hope you give this incredible Gluten Free Orange Chicken a try. It’s a dish I’m incredibly proud of, and I know it has the power to become a firm favorite in your kitchen, just as it has in mine. Get ready to impress your taste buds and everyone around your table with this flavorful masterpiece!
Delicious Gluten Free Orange Chicken Recipe – Easy & Zesty

This Gluten Free Orange Chicken is a healthier take on a classic takeout dish, featuring crispy chicken coated in a vibrant orange sauce. It’s easy to make and bursting with flavor, perfect for any weeknight dinner.
- Prep Time: 15 mins
- Cook Time: 30 mins
- Total Time: 45 minutes
- Yield: 4 servings 1x
- Category: Dinner
- Method: Frying
- Cuisine: Asian
Ingredients
- Boneless, skinless chicken breasts or thighs, cut into bite-sized 1-inch pieces
- Salt
- Pepper
- 1/2 cup cornstarch or tapioca starch
- Freshly squeezed orange juice
- Orange zest
- Gluten-free soy sauce (Tamari)
- Granulated sugar or honey or maple syrup (to taste)
- Rice vinegar
- Freshly minced ginger
- Freshly minced garlic
- 2 tablespoons cornstarch mixed with 2 tablespoons cold water (for slurry)
- Neutral-flavored oil (vegetable oil, canola oil, or peanut oil for frying)
- Sliced green onions (for garnish)
- Toasted sesame seeds (for garnish)
Instructions
- Prepare the Chicken: Start by patting your chicken pieces completely dry with paper towels. In a medium bowl, toss the chicken with a pinch of salt and pepper. Add about 1/2 cup of cornstarch (or tapioca starch) and toss until each piece of chicken is evenly coated.
- Prepare the Orange Sauce: In a separate medium saucepan, combine the fresh orange juice, orange zest, gluten-free tamari, sugar (or your chosen sweetener), rice vinegar, minced ginger, and minced garlic. Whisk everything together until the sugar dissolves. Bring the mixture to a gentle simmer over medium heat.
- Thicken the Sauce: While the sauce simmers, whisk together 2 tablespoons of cornstarch with 2 tablespoons of cold water in a small bowl to create a slurry. Once the sauce is simmering, slowly pour the cornstarch slurry into the sauce while whisking constantly. Continue to whisk until the sauce thickens to your desired consistency. Remove the sauce from the heat and set aside.
- Fry the Chicken: Heat about 1 inch of neutral oil in a large skillet or Dutch oven over medium-high heat to approximately 350-375°F (175-190°C).
- Cook in Batches: Carefully add the coated chicken pieces to the hot oil in a single layer, ensuring not to overcrowd the pan. Fry for 4-6 minutes, flipping halfway through, until the chicken is golden brown and cooked through.
- Drain Excess Oil: Once cooked, use a slotted spoon to transfer the fried chicken to a wire rack set over a baking sheet to drain any excess oil. Repeat with the remaining chicken until all pieces are fried.
- Combine Chicken and Sauce: In a large bowl, add the fried chicken. Pour the prepared orange sauce over the chicken and gently toss until every piece is evenly coated.
- Serve Immediately: Garnish with sliced green onions and toasted sesame seeds. Serve over fluffy white rice or brown rice, with a side of steamed broccoli or snow peas.
Nutrition
- Serving Size: 1 bowl
- Calories: 400
- Sugar: 15 g
- Sodium: 600 mg
- Fat: 20 g
- Saturated Fat: 3 g
- Unsaturated Fat: 15 g
- Trans Fat: 0 g
- Carbohydrates: 30 g
- Fiber: 1 g
- Protein: 25 g
- Cholesterol: 70 mg
Keywords: For maximum crispiness, consider double-frying the chicken. Adjust the sauce sweetness and tanginess to your preference by adding more sugar or vinegar as needed.
Leave a Comment