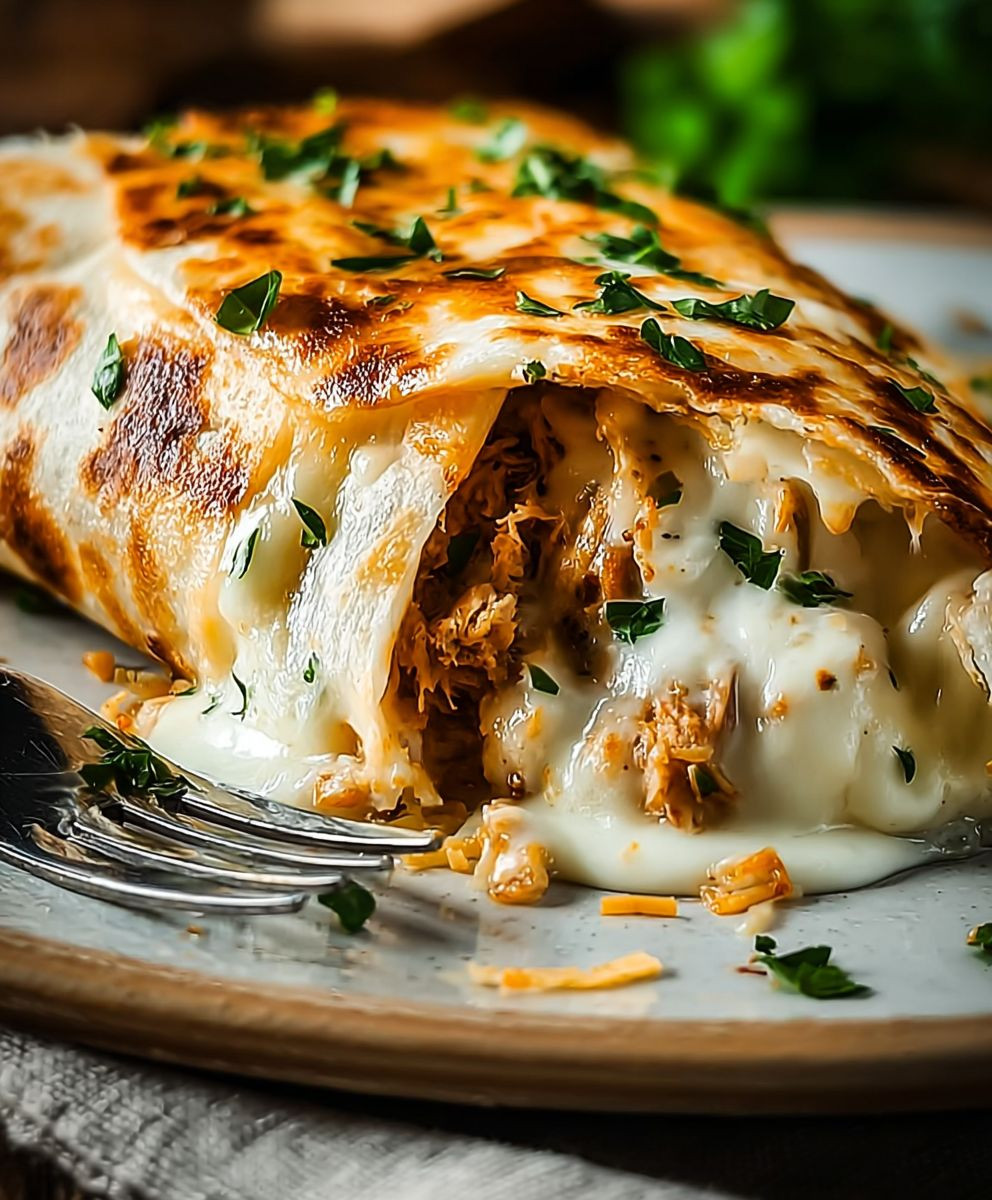
Cheesy Garlic Chicken Wraps: Prepare to be amazed! Imagine sinking your teeth into a warm, toasted wrap bursting with juicy, garlic-infused chicken, smothered in melted cheese, and finished with your favorite fresh toppings. It’s a flavor explosion that’s both comforting and incredibly satisfying. This isn’t just lunch; it’s an experience!
While the exact origins of the chicken wrap are debated, its popularity soared in the late 20th century as a convenient and customizable meal. Think of it as a modern take on the classic burrito, offering endless possibilities for fillings and flavor combinations. The beauty of Cheesy Garlic Chicken Wraps lies in their versatility. They are perfect for a quick weeknight dinner, a packed lunch, or even a crowd-pleasing appetizer at your next gathering.
People adore this dish for several reasons. First, the taste is simply irresistible – the savory garlic chicken paired with gooey cheese is a match made in heaven. Second, the texture is fantastic, offering a delightful contrast between the soft tortilla, the tender chicken, and the melted cheese. Finally, and perhaps most importantly, these wraps are incredibly easy and quick to make. In under 30 minutes, you can have a delicious and satisfying meal on the table. So, let’s get cooking and create some unforgettable Cheesy Garlic Chicken Wraps!

Ingredients:
- 1.5 lbs boneless, skinless chicken breasts, cut into bite-sized pieces
- 1 tablespoon olive oil
- 2 cloves garlic, minced
- 1 teaspoon Italian seasoning
- 1/2 teaspoon paprika
- 1/4 teaspoon red pepper flakes (optional, for a little heat)
- Salt and pepper to taste
- 8 large flour tortillas
- 1 cup shredded mozzarella cheese
- 1/2 cup shredded cheddar cheese
- 1/4 cup grated Parmesan cheese
- 1/4 cup butter, melted
- 2 cloves garlic, minced (for garlic butter)
- 1/4 teaspoon dried parsley (for garlic butter)
- Optional toppings: sour cream, salsa, guacamole, chopped cilantro
Preparing the Chicken:
Okay, let’s get started! First, we need to prepare the chicken. This is the foundation of our cheesy, garlicky goodness, so let’s make sure it’s flavorful and cooked perfectly.
- Season the chicken: In a large bowl, combine the bite-sized chicken pieces with olive oil, minced garlic, Italian seasoning, paprika, red pepper flakes (if using), salt, and pepper. Make sure the chicken is evenly coated with the spices. I like to use my hands to really massage the flavors in there.
- Cook the chicken: Heat a large skillet over medium-high heat. Once the skillet is hot, add the seasoned chicken. Cook for about 6-8 minutes, or until the chicken is cooked through and no longer pink inside. Be sure to stir occasionally to ensure even cooking. You want a nice golden-brown color on the chicken, but don’t overcook it, or it will become dry.
- Rest the chicken (optional): Once the chicken is cooked, you can remove it from the skillet and let it rest for a few minutes. This allows the juices to redistribute, resulting in more tender and flavorful chicken. While it’s resting, you can move on to preparing the other components of the wraps.
Preparing the Garlic Butter:
Now, let’s make the magic happen with the garlic butter! This is what will take our wraps from good to absolutely amazing. The aroma alone will have everyone drooling!
- Melt the butter: In a small bowl, melt the butter in the microwave or in a small saucepan over low heat. Be careful not to burn the butter.
- Add garlic and parsley: Once the butter is melted, add the minced garlic and dried parsley. Stir well to combine. The heat from the butter will infuse the garlic flavor, creating a delicious and fragrant garlic butter.
- Set aside: Set the garlic butter aside for later use. We’ll be brushing it on the tortillas before baking.
Assembling the Wraps:
Alright, the moment we’ve been waiting for! It’s time to assemble our cheesy garlic chicken wraps. This is where the fun begins, so get ready to get your hands a little messy!
- Warm the tortillas (optional): To make the tortillas more pliable and easier to work with, you can warm them slightly. You can do this by wrapping them in a damp paper towel and microwaving them for about 30 seconds, or by heating them in a dry skillet for a few seconds per side.
- Layer the cheese: Lay a tortilla flat on a clean surface. Sprinkle a generous amount of mozzarella cheese, cheddar cheese, and Parmesan cheese evenly over the tortilla, leaving a small border around the edge. I like to start with mozzarella as it melts really well.
- Add the chicken: Top the cheese with a portion of the cooked chicken. Distribute the chicken evenly over the cheese. Don’t overload the tortilla, or it will be difficult to roll up.
- Add more cheese (optional): If you’re feeling extra cheesy (and who isn’t?), you can sprinkle a little more cheese on top of the chicken.
- Roll up the wrap: Carefully roll up the tortilla tightly, starting from one edge and tucking in the sides as you go. Secure the wrap with a toothpick if needed.
- Repeat: Repeat steps 2-5 with the remaining tortillas, cheese, and chicken.
Baking the Wraps:
Almost there! Now we need to bake the wraps to melt the cheese and create that golden-brown, crispy exterior. The oven will do the rest of the work for us.
- Preheat the oven: Preheat your oven to 375°F (190°C).
- Prepare the baking sheet: Line a baking sheet with parchment paper. This will prevent the wraps from sticking to the baking sheet and make cleanup easier.
- Brush with garlic butter: Place the assembled wraps on the prepared baking sheet. Brush the tops of the wraps generously with the garlic butter. This will give them a beautiful golden-brown color and add a ton of flavor.
- Bake: Bake for 10-12 minutes, or until the wraps are golden brown and the cheese is melted and bubbly. Keep a close eye on them to prevent them from burning.
- Let cool slightly: Remove the baking sheet from the oven and let the wraps cool slightly before serving. This will prevent you from burning your mouth on the hot cheese.
Serving and Enjoying:
Finally, the best part! It’s time to serve and enjoy our cheesy garlic chicken wraps. These are perfect for a quick and easy weeknight meal, a party appetizer, or even a game-day snack.
- Cut and serve: Cut each wrap in half or into smaller pieces, depending on your preference.
- Add toppings (optional): Serve the wraps with your favorite toppings, such as sour cream, salsa, guacamole, or chopped cilantro.
- Enjoy! Dig in and enjoy the cheesy, garlicky goodness! These wraps are best served warm, so don’t wait too long to eat them.
Tips and Variations:
Here are a few tips and variations to make these wraps even more amazing:
- Add vegetables: Feel free to add some chopped vegetables to the wraps, such as bell peppers, onions, or mushrooms.
- Use different cheeses: Experiment with different types of cheese, such as Monterey Jack, pepper jack, or provolone.
- Spice it up: Add a pinch of cayenne pepper or a dash of hot sauce to the chicken for a little extra heat.
- Make it vegetarian: Substitute the chicken with black beans, refried beans, or tofu for a vegetarian option.
- Grill the wraps: For a smoky flavor, grill the wraps for a few minutes per side instead of baking them in the oven.
- Make it ahead: You can assemble the wraps ahead of time and store them in the refrigerator until you’re ready to bake them. Just add a few minutes to the baking time.
Storage Instructions:
If you have any leftover wraps, you can store them in an airtight container in the refrigerator for up to 3 days. Reheat them in the microwave, oven, or skillet until heated through.
Nutritional Information (approximate, per wrap):
Please note that the nutritional information is approximate and may vary depending on the specific ingredients used.
- Calories: 450-550
- Protein: 30-40g
- Fat: 20-30g
- Carbohydrates: 30-40g
Conclusion:
Well, there you have it! I truly believe these Cheesy Garlic Chicken Wraps are about to become a staple in your kitchen, just like they have in mine. They’re quick, easy, satisfying, and bursting with flavor – everything you could possibly want in a weeknight meal. But beyond the convenience, it’s the incredible taste that really makes them a must-try. The creamy, garlicky sauce combined with the tender chicken and melted cheese… honestly, what’s not to love?
Why are these wraps a must-try? Because they offer a delicious and versatile solution for busy weeknights, picky eaters, and anyone craving a comforting and flavorful meal. They’re also incredibly adaptable to your own personal preferences and dietary needs.
Looking for serving suggestions? These wraps are fantastic on their own, but they also pair beautifully with a simple side salad, some crispy sweet potato fries, or even a bowl of creamy tomato soup. For a lighter option, try serving them with a side of steamed broccoli or asparagus. And if you’re feeling adventurous, why not cut them into smaller pieces and serve them as appetizers at your next gathering? I guarantee they’ll be a hit!
Now, let’s talk variations! The possibilities are truly endless. If you’re a fan of spice, add a pinch of red pepper flakes to the garlic sauce or a drizzle of your favorite hot sauce before wrapping. For a vegetarian option, substitute the chicken with grilled halloumi cheese or seasoned chickpeas. You could also experiment with different types of cheese – pepper jack for a kick, provolone for a milder flavor, or even a sprinkle of crumbled feta for a tangy twist.
Another fun variation is to add some veggies to the mix. Sautéed bell peppers, onions, or mushrooms would all be delicious additions. You could even throw in some spinach or kale for a boost of nutrients. And if you’re looking for a heartier meal, consider adding some cooked rice or quinoa to the filling.
Don’t be afraid to get creative and experiment with different ingredients until you find your perfect combination. That’s the beauty of these cheesy garlic chicken wraps – they’re a blank canvas for your culinary imagination!
I’m so excited for you to try this recipe and experience the deliciousness for yourself. I have a feeling these wraps will quickly become a family favorite.
So, what are you waiting for? Head to the kitchen, gather your ingredients, and get ready to whip up a batch of these amazing Cheesy Garlic Chicken Wraps. I promise you won’t be disappointed.
And most importantly, I’d love to hear about your experience! Once you’ve tried the recipe, please come back and leave a comment below. Let me know what you thought, what variations you tried, and any tips or tricks you discovered along the way. Sharing your feedback helps me improve the recipe and also inspires other readers to give it a try. Happy cooking! I can’t wait to hear from you!
Cheesy Garlic Chicken Wraps: The Ultimate Recipe Guide
Bite-sized chicken and a blend of cheeses baked in a tortilla brushed with garlic butter. A quick, easy, and flavorful meal!
Ingredients
- 5 lbs boneless, skinless chicken breasts, cut into bite-sized pieces
- 1 tablespoon olive oil
- 2 cloves garlic, minced
- 1 teaspoon Italian seasoning
- 1/2 teaspoon paprika
- 1/4 teaspoon red pepper flakes (optional, for a little heat)
- Salt and pepper to taste
- 8 large flour tortillas
- 1 cup shredded mozzarella cheese
- 1/2 cup shredded cheddar cheese
- 1/4 cup grated Parmesan cheese
- 1/4 cup butter, melted
- 2 cloves garlic, minced (for garlic butter)
- 1/4 teaspoon dried parsley (for garlic butter)
- Optional toppings: sour cream, salsa, guacamole, chopped cilantro
Instructions
- Season the chicken: In a large bowl, combine the bite-sized chicken pieces with olive oil, minced garlic, Italian seasoning, paprika, red pepper flakes (if using), salt, and pepper. Make sure the chicken is evenly coated with the spices.
- Cook the chicken: Heat a large skillet over medium-high heat. Once the skillet is hot, add the seasoned chicken. Cook for about 6-8 minutes, or until the chicken is cooked through and no longer pink inside. Be sure to stir occasionally to ensure even cooking.
- Melt the butter: In a small bowl, melt the butter in the microwave or in a small saucepan over low heat. Be careful not to burn the butter.
- Add garlic and parsley: Once the butter is melted, add the minced garlic and dried parsley. Stir well to combine.
- Warm the tortillas (optional): To make the tortillas more pliable and easier to work with, you can warm them slightly. You can do this by wrapping them in a damp paper towel and microwaving them for about 30 seconds, or by heating them in a dry skillet for a few seconds per side.
- Layer the cheese: Lay a tortilla flat on a clean surface. Sprinkle a generous amount of mozzarella cheese, cheddar cheese, and Parmesan cheese evenly over the tortilla, leaving a small border around the edge.
- Add the chicken: Top the cheese with a portion of the cooked chicken. Distribute the chicken evenly over the cheese. Don’t overload the tortilla, or it will be difficult to roll up.
- Add more cheese (optional): If you’re feeling extra cheesy (and who isn’t?), you can sprinkle a little more cheese on top of the chicken.
- Roll up the wrap: Carefully roll up the tortilla tightly, starting from one edge and tucking in the sides as you go. Secure the wrap with a toothpick if needed.
- Repeat: Repeat steps 6-9 with the remaining tortillas, cheese, and chicken.
- Preheat the oven: Preheat your oven to 375°F (190°C).
- Prepare the baking sheet: Line a baking sheet with parchment paper.
- Brush with garlic butter: Place the assembled wraps on the prepared baking sheet. Brush the tops of the wraps generously with the garlic butter.
- Bake: Bake for 10-12 minutes, or until the wraps are golden brown and the cheese is melted and bubbly. Keep a close eye on them to prevent them from burning.
- Let cool slightly: Remove the baking sheet from the oven and let the wraps cool slightly before serving.
- Cut and serve: Cut each wrap in half or into smaller pieces, depending on your preference.
- Add toppings (optional): Serve the wraps with your favorite toppings, such as sour cream, salsa, guacamole, or chopped cilantro.
Notes
- Add vegetables: Feel free to add some chopped vegetables to the wraps, such as bell peppers, onions, or mushrooms.
- Use different cheeses: Experiment with different types of cheese, such as Monterey Jack, pepper jack, or provolone.
- Spice it up: Add a pinch of cayenne pepper or a dash of hot sauce to the chicken for a little extra heat.
- Make it vegetarian: Substitute the chicken with black beans, refried beans, or tofu for a vegetarian option.
- Grill the wraps: For a smoky flavor, grill the wraps for a few minutes per side instead of baking them in the oven.
- Make it ahead: You can assemble the wraps ahead of time and store them in the refrigerator until you’re ready to bake them. Just add a few minutes to the baking time.
- Storage Instructions: If you have any leftover wraps, you can store them in an airtight container in the refrigerator for up to 3 days. Reheat them in the microwave, oven, or skillet until heated through.


Leave a Comment