Chocolate Yogurt Clusters – oh my goodness, prepare to meet your new favorite healthy-ish indulgence! I am absolutely thrilled to share this recipe with you because it’s everything I look for in a treat: unbelievably simple, incredibly satisfying, and it hits that sweet spot without making you feel like you overdid it. What makes these clusters so special, you ask? It’s that perfect harmony between creamy, tangy yogurt and rich, decadent chocolate, all coming together in a delightful bite-sized package.
I just know you’re going to fall head over heels for these! They’re ridiculously easy to whip up with just a few ingredients you probably already have on hand. Seriously, we’re talking minimal effort for maximum enjoyment. Whether you need a quick pick-me-up, a guilt-free dessert, or something refreshing on a warm day, these Chocolate Yogurt Clusters are your answer. Plus, they’re wonderfully customizable – think of all the fun toppings you can add!
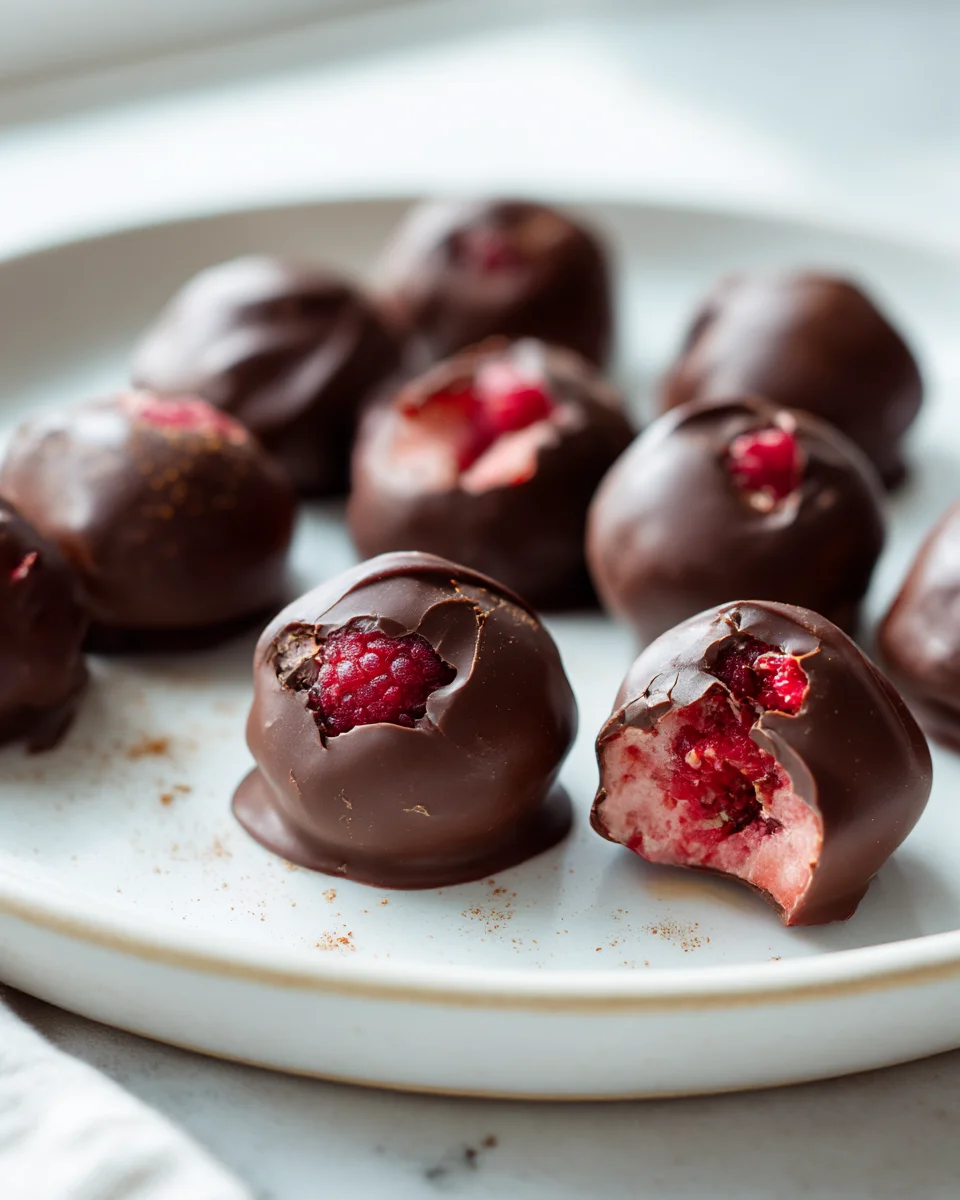
So, what exactly are we making? Imagine spoonfuls of creamy, flavored yogurt—I love a hint of vanilla or a touch of honey in mine—dolloped onto a tray, then lovingly coated or drizzled with melted chocolate. Pop them in the freezer for a bit, and voilà! You’ve got these delightful, firm clusters that are cool, refreshing, and just burst with flavor. It’s the kind of snack that feels like a treat but is secretly good for you. Let’s dive in!

Ingredient Notes
Oh, my friends, let me tell you, the magic of Chocolate Yogurt Clusters truly begins with choosing the right ingredients! These aren’t just any old frozen treats; they’re a delightful symphony of creamy, tangy, and rich flavors, and selecting quality components is key to that harmonious taste.
The Star: Greek Yogurt
- Full-Fat Greek Yogurt: This is my absolute top recommendation. The higher fat content lends itself to an incredibly creamy, luxurious texture that holds up beautifully once frozen. It also offers a wonderfully rich mouthfeel that perfectly balances the sweetness of the chocolate.
- Low-Fat or Non-Fat Greek Yogurt: If you’re looking for a lighter option, these can certainly work! Just be aware that the clusters might be a touch icier and slightly less creamy. If you find your low-fat yogurt to be a bit thin, you can try straining it through a coffee filter-lined sieve for an hour or two in the fridge to remove excess whey, resulting in a thicker consistency.
- Dairy-Free Alternatives: For my vegan or dairy-sensitive friends, rejoice! Thick coconut yogurt, almond yogurt, or cashew yogurt can be fantastic substitutes. Just ensure they are thick-style varieties, as watery dairy-free yogurts might not freeze well and could result in a less satisfying texture.
The Indulgence: Chocolate
- Good Quality Chocolate: This is where you can truly elevate your clusters! I love using high-quality chocolate chips (dark, milk, or semi-sweet), melting wafers, or even a chopped chocolate bar. The better the chocolate, the smoother it melts and the richer the final coating will be.
- Dark Chocolate: My personal favorite! Its slightly bitter notes beautifully cut through the tanginess of the yogurt. A good quality dark chocolate (around 70% cacao) creates a sophisticated flavor profile.
- Milk or Semi-Sweet Chocolate: If you prefer a sweeter treat, these are excellent choices. They provide a classic, comforting flavor that’s always a crowd-pleaser.
- White Chocolate: For a different flavor dynamic, white chocolate can be lovely, especially when paired with berries or citrus zest in your yogurt base.
- Optional: Coconut Oil: A tiny bit (about 1 teaspoon per cup of chocolate) of refined coconut oil can work wonders. It helps the chocolate melt more smoothly, gives it a beautiful sheen, and makes it easier to achieve a thin, even coating on your frozen yogurt clusters.
The Sweetener (Optional, but Recommended!)
- Maple Syrup or Honey: These are my go-to liquid sweeteners. They blend seamlessly into the yogurt, adding just the right touch of sweetness without any gritty texture. Start with a little, taste, and add more if needed.
- Agave Nectar: A good vegan alternative to honey, it has a neutral flavor and mixes in easily.
- Powdered Sugar: If you don’t want to add extra liquid, a small amount of powdered sugar can sweeten the yogurt without clumping.
- Vanilla Extract: A splash of pure vanilla extract can enhance all the flavors, bringing a lovely warmth to the yogurt base.
The Fun Stuff: Add-Ins & Toppings
This is where your creativity truly shines! Sprinkling these over the yogurt before freezing adds texture, flavor, and visual appeal.
- Nuts: Chopped almonds, pecans, walnuts, or pistachios add a delightful crunch and healthy fats.
- Dried Fruit: Mini dried cranberries, chopped apricots, or raisins can provide bursts of chewy sweetness.
- Granola: A sprinkle of your favorite granola adds extra crunch and a hearty feel.
- Sprinkles: For a festive touch, especially if making these for kids (or the kid in you!).
- Shredded Coconut: Toasted or untoasted, it brings a tropical flair.
- Mini Chocolate Chips: Double the chocolate fun!
- Fresh Berries: While they add moisture, a few finely chopped fresh raspberries or blueberries pressed into the yogurt can be divine. Just ensure they’re small pieces.
Step-by-Step Instructions
Ready to create some pure frozen joy? Making Chocolate Yogurt Clusters is wonderfully straightforward, and I promise, the biggest challenge will be waiting for them to freeze! Follow these simple steps, and you’ll be enjoying these delightful treats in no time.
Step 1: Prepare Your Workspace
- First things first, let’s get organized! Grab a baking sheet – a standard cookie sheet works perfectly.
- Line your baking sheet with parchment paper. This is a non-negotiable step, my friends! It prevents the yogurt clusters from sticking to the pan, making them super easy to peel off once frozen. You don’t want to be wrestling with frozen yogurt!
- Set this aside for a moment.
Step 2: Sweeten Your Yogurt (If Desired)
- In a medium bowl, combine your Greek yogurt (full-fat is my favorite for creaminess!) with your chosen sweetener. I usually start with 1-2 tablespoons of maple syrup or honey per cup of yogurt.
- Add a splash of vanilla extract here if you’re using it – it really brightens the flavor.
- Stir gently until everything is well combined and smooth. Taste it and adjust the sweetness to your liking. Remember, flavors can be a little muted when frozen, so don’t be afraid to make it taste just right now.
Step 3: Form the Yogurt Clusters
- Now for the fun part! Take a spoon (I like using a regular tablespoon for this, or a small cookie scoop for more uniform shapes) and scoop dollops of the sweetened yogurt onto your prepared parchment-lined baking sheet.
- Aim for clusters that are about 1.5 to 2 inches in diameter. You can make them circular, slightly oblong, or whatever freeform shape you fancy! Just try to keep them relatively consistent in size so they freeze and coat evenly.
- Leave a little space between each dollop, as you don’t want them freezing together.
Step 4: Sprinkle with Your Favorite Add-Ins
- Immediately after forming the clusters, sprinkle your chosen toppings over each yogurt dollop. This is where you can truly customize each cluster!
- Whether it’s chopped nuts, mini chocolate chips, dried fruit, granola, or a medley of everything, press them gently into the yogurt so they adhere well.
Step 5: Freeze Until Solid
- Carefully transfer the baking sheet with your beautiful yogurt clusters into the freezer.
- Freeze for at least 2-3 hours, or until the clusters are completely solid and firm. This is crucial! If they’re not fully frozen, they’ll melt into a gooey mess when you try to dip them in warm chocolate. Patience is a virtue here, I promise it’s worth the wait!
Step 6: Melt the Chocolate
- Once your yogurt clusters are rock solid, it’s time to prepare the chocolate coating.
- In a microwave-safe bowl, combine your chocolate chips, chopped chocolate bar, or melting wafers. If you’re using it, add that tiny bit of coconut oil now – it helps create a beautifully smooth, dippable consistency.
- Melt the chocolate in the microwave in 30-second intervals, stirring well after each interval, until it’s smooth and glossy. Be careful not to overheat it, as chocolate can seize and become thick. Alternatively, you can melt it over a double boiler.
- Let the melted chocolate cool slightly for a few minutes. It should still be warm and fluid, but not scorching hot, to prevent the yogurt from melting too quickly.
Step 7: Dip or Drizzle the Clusters
- Working quickly, take the frozen yogurt clusters out of the freezer.
- You have a couple of options here:
- For Fully Coated Clusters: Gently drop a frozen yogurt cluster into the melted chocolate. Using a fork or a skewer, quickly flip it to coat completely, then lift it out, allowing any excess chocolate to drip off.
- For Half-Dipped Clusters: Dip one side or half of the frozen yogurt cluster into the chocolate.
- For Drizzled Clusters: Place the frozen clusters back on the parchment paper. Use a spoon or a piping bag with a small hole to drizzle the melted chocolate creatively over the tops.
- Return each chocolate-coated or drizzled cluster immediately back to the parchment-lined baking sheet.
Step 8: Final Freeze and Enjoy!
- Once all your clusters are coated (or drizzled!), place the baking sheet back into the freezer.
- Freeze for another 15-30 minutes, or until the chocolate coating is completely set and firm.
- And there you have it! Your delightful Chocolate Yogurt Clusters are ready to be devoured. They’re best enjoyed straight from the freezer for that perfect, crisp outer shell and creamy, tangy interior.
Tips & Suggestions
My dearest home chefs, while Chocolate Yogurt Clusters are simple to make, a few insider tips can elevate your experience from good to absolutely amazing! I’ve learned these tricks through my own kitchen adventures, and I’m thrilled to share them with you.
Yogurt Consistency is King!
- Go Greek or Go Home (Mostly): I truly can’t stress this enough – using a thick Greek yogurt makes all the difference. Its lower water content means less ice crystal formation and a much creamier, more luxurious bite when frozen. Thinner yogurts tend to become too icy.
- Strain if Necessary: If your preferred yogurt isn’t super thick, fear not! Line a colander with cheesecloth or a coffee filter, place it over a bowl, and let your yogurt drain in the fridge for an hour or two (or even overnight). You’ll be amazed at how much whey comes out, leaving you with wonderfully thick yogurt.
Mastering the Freeze
- Solid as a Rock: Ensure your yogurt clusters are absolutely, undeniably frozen solid before attempting to dip them in chocolate. If they’re even a little soft, they’ll start to melt and disintegrate into the warm chocolate, creating a messy situation. Pop them back in for an extra 30 minutes if you have any doubts.
- Work Quickly: Once you take the frozen clusters out, have your melted chocolate ready and work efficiently. The longer they sit out, the softer they become. You can even work in small batches, keeping the rest of the clusters in the freezer until you’re ready to dip them.
Chocolate Charms
- Don’t Overheat: When melting your chocolate, gentle heat is your friend. Overheated chocolate can seize up, become grainy, or even burn. Microwave in short bursts (30 seconds), stirring well between each, or use a double boiler. Remove it from the heat when there are still a few small lumps, and keep stirring – the residual heat will melt them.
- A Little Oil, a Lot of Shine: That tiny bit of coconut oil I mentioned earlier? It’s a secret weapon! It not only helps the chocolate melt smoothly but also gives your finished clusters a beautiful, professional-looking sheen and a thinner, more pleasant coating.
- Temperature Control: Let your melted chocolate cool slightly before dipping. It should be warm and fluid, but not piping hot. Dipping super cold yogurt into super hot chocolate can cause thermal shock, making the chocolate coating crack.
Flavor Combinations & Customization
This is where you can truly make these clusters your own! Don’t be afraid to experiment.
- Tropical Dream: Try coconut yogurt with shredded toasted coconut, chopped macadamia nuts, and a touch of lime zest. Dip in white chocolate.
- Nut Butter Swirl: Swirl a teaspoon of melted peanut butter or almond butter into each yogurt dollop before freezing. Dip in dark chocolate for a decadent treat.
- Berry Bliss: Mix finely chopped fresh berries (like raspberries or strawberries) into your yogurt. Top with more berries and dip in milk chocolate.
- Mocha Moment: Add a tiny pinch of instant espresso powder to your yogurt before sweetening. Top with chocolate-covered coffee beans and dip in dark chocolate.
- Spice it Up: A pinch of cinnamon or cardamom in the yogurt can add a warm, inviting flavor, especially good with pecans and milk chocolate.
- Crunch Factor: If you love texture, consider adding crushed pretzels, rice cereal, or even crushed potato chips (trust me on this one, salty-sweet is amazing!) to your toppings.
Presentation Perfection
- Drizzle vs. Dip: While fully dipping gives a lovely uniform coating, a simple drizzle can be elegant and reduce the amount of chocolate needed. You can even drizzle with a contrasting chocolate color (e.g., dark chocolate over white chocolate).
- Garnish While Wet: If you want to add extra sprinkles or finely chopped nuts to your chocolate coating, do so immediately after dipping, while the chocolate is still wet, so they adhere.
Storage
Once you’ve made a batch of these glorious Chocolate Yogurt Clusters, you’ll want to make sure they stay perfectly delicious for as long as possible. Here’s how I recommend storing them to preserve their delightful texture and taste.
The Best Method: Keep Them Frozen!
These clusters are designed to be enjoyed straight from the freezer. They’re not meant to be left out at room temperature for extended periods, as both the yogurt and the chocolate will start to soften and melt.
- Airtight Container is Key: Transfer your fully frozen and set clusters to an airtight freezer-safe container. This is crucial for preventing freezer burn, which can make them taste icy and diminish their flavor.
- Layer with Parchment Paper: To prevent the clusters from sticking together in the container, especially if they’re piled on top of each other, place a piece of parchment paper between the layers. This makes it super easy to grab one without a struggle!
Shelf Life in the Freezer
- How Long Do They Last?: When stored properly in an airtight container, your Chocolate Yogurt Clusters will remain fresh and delicious in the freezer for up to 2-3 weeks. Beyond that, while they’ll still be safe to eat, the texture might start to become a bit icier, and the flavors might dull slightly.
Serving Temperature
- Straight from the Freezer: For the absolute best experience, I always recommend enjoying these clusters directly from the freezer. That perfect combination of a crisp chocolate shell and a creamy, tangy frozen yogurt interior is simply divine.
- A Moment to Soften (Optional): If you prefer them slightly less firm, you can let them sit out at room temperature for just a minute or two before eating. However, be mindful that they soften very quickly, especially on a warm day.
Avoiding a Meltdown
- Quick to Soften: Remember, the yogurt base will melt pretty rapidly once exposed to room temperature. If you take them out for a party, plan to serve them immediately and keep any remaining clusters in the freezer until ready to replenish.
- Not Ideal for Travel: These aren’t the best treats for packing in a lunchbox unless you have a very effective cooler with ice packs, and even then, they’re best consumed within an hour or two.
So go ahead, make a big batch, store them well, and enjoy these little bursts of chocolatey, tangy goodness whenever a craving strikes!
Final Thoughts
And there you have it! I truly hope you’re as excited as I am about these incredible Chocolate Yogurt Clusters. What I love most about them is their sheer simplicity combined with an unbelievably satisfying taste. They perfectly bridge the gap between a guilt-free treat and a truly indulgent experience.
These aren’t just any snack; they are a delightful fusion of creamy yogurt, rich chocolate, and your favorite toppings, all coming together in a bite-sized package of pure joy. Whether you’re looking for a quick pick-me-up, a healthier dessert option, or just something wonderfully delicious to curb those sweet cravings, these Chocolate Yogurt Clusters are an absolute game-changer.
So, go ahead, give these a try! I promise you, once you taste the refreshing coolness and the satisfying crunch of your very own batch of Chocolate Yogurt Clusters, you’ll find yourself making them again and again. They are truly a testament to how simple ingredients can create something truly extraordinary. Enjoy!
Delicious Chocolate Yogurt Clusters: Healthy Frozen Snack
These Chocolate Yogurt Clusters are a simple yet satisfying treat that combines creamy yogurt with rich chocolate. Perfect for a guilt-free dessert or a refreshing snack on a warm day!
- Prep Time: 15 mins
- Cook Time: 30 mins
- Total Time: 45 minutes
- Yield: 4 servings
- Category: Snack
- Method: Freezing
- Cuisine: American
Ingredients
- Full-Fat Greek Yogurt
- Low-Fat or Non-Fat Greek Yogurt
- Dairy-Free Alternatives (thick coconut yogurt, almond yogurt, or cashew yogurt)
- Good Quality Chocolate (dark, milk, or semi-sweet chocolate chips, melting wafers, or chopped chocolate bar)
- Dark Chocolate (around 70% cacao)
- Milk or Semi-Sweet Chocolate
- White Chocolate
- Optional: Coconut Oil (about 1 teaspoon per cup of chocolate)
- Maple Syrup or Honey
- Agave Nectar
- Powdered Sugar
- Vanilla Extract
- Nuts (chopped almonds, pecans, walnuts, or pistachios)
- Dried Fruit (mini dried cranberries, chopped apricots, or raisins)
- Granola
- Sprinkles
- Shredded Coconut (toasted or untoasted)
- Mini Chocolate Chips
- Fresh Berries (finely chopped fresh raspberries or blueberries)
Instructions
- Step 1: Prepare Your Workspace – Grab a baking sheet and line it with parchment paper.
- Step 2: Sweeten Your Yogurt (If Desired) – In a medium bowl, combine your Greek yogurt with your chosen sweetener and a splash of vanilla extract. Stir gently until well combined and smooth.
- Step 3: Form the Yogurt Clusters – Scoop dollops of the sweetened yogurt onto your prepared baking sheet, aiming for clusters about 1.5 to 2 inches in diameter.
- Step 4: Sprinkle with Your Favorite Add-Ins – Immediately sprinkle your chosen toppings over each yogurt dollop and press them gently into the yogurt.
- Step 5: Freeze Until Solid – Transfer the baking sheet to the freezer and freeze for at least 2-3 hours until the clusters are completely solid.
- Step 6: Melt the Chocolate – In a microwave-safe bowl, combine your chocolate and optional coconut oil. Melt in 30-second intervals until smooth and glossy.
- Step 7: Dip or Drizzle the Clusters – Quickly take the frozen yogurt clusters out of the freezer and dip, half-dip, or drizzle them with the melted chocolate.
- Step 8: Final Freeze and Enjoy! – Place the baking sheet back into the freezer for another 15-30 minutes until the chocolate coating is set.
Nutrition
- Serving Size: 2 clusters
- Calories: 150
- Sugar: 10 g
- Sodium: 50 mg
- Fat: 8 g
- Saturated Fat: 5 g
- Unsaturated Fat: 3 g
- Trans Fat: 0 g
- Carbohydrates: 15 g
- Fiber: 2 g
- Protein: 5 g
- Cholesterol: 10 mg
Keywords: Using thick Greek yogurt is crucial for creamy clusters. If your yogurt is thin, strain it to achieve a thicker consistency. Work quickly when dipping clusters to prevent melting.
Leave a Comment