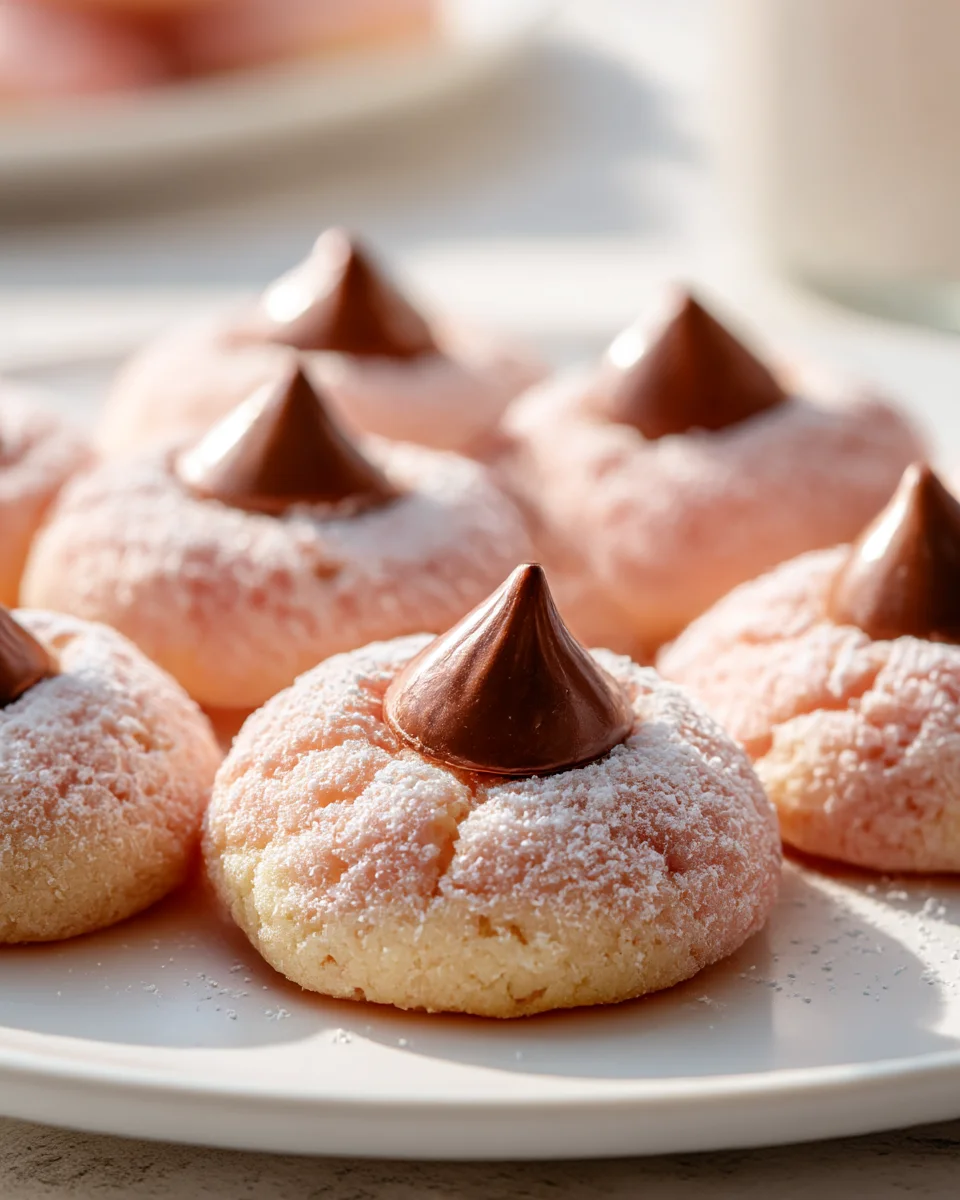
Strawberry Kiss Cookies Recipe
Oh my goodness, I am so excited to share my Strawberry Kiss Cookies Recipe with you today! If you’re looking for a cookie that’s as beautiful to look at as it is utterly delicious, then you’ve found your next favorite. What makes these little gems so special, you ask? Well, it’s all in that incredible burst of fresh strawberry flavor in every single bite, combined with a delightful, often melt-in-your-mouth surprise center. Trust me, these aren’t just any cookies; they’re a little taste of sunshine, perfect for brightening anyone’s day and bringing a smile.
I absolutely adore making these, and I know you will too! Readers will fall head over heels for their gorgeous pink hue and soft, tender texture. They’re surprisingly easy to whip up, making them ideal for baking with family, impressing guests, or simply treating yourself to something truly sweet and comforting. Picture this: a tender, subtly sweet strawberry-infused cookie base, often crowned with a delicious white chocolate kiss, a strawberry-flavored drop, or perhaps a dollop of vibrant strawberry jam nestled in its center. The result is a truly enchanting cookie that feels like a warm, fruity hug. Get ready to spread some strawberry love!

Ingredient Notes
Crafting the perfect batch of Strawberry Kiss Cookies really starts with understanding your ingredients. I always find that knowing a little more about what goes into my baking helps me achieve the best results, and these delightful pink treats are no exception!
Freeze-Dried Strawberry Powder: This, for me, is the secret weapon for these cookies. Unlike fresh strawberries or purées, which can introduce too much moisture and alter the cookie’s texture, freeze-dried powder delivers an intense, natural strawberry flavor and a beautiful pink hue without making your dough wet. You can often find it in health food stores or online. If you can’t find it, a good quality strawberry extract can boost flavor, but the powder truly provides that authentic berry taste and color. I wouldn’t recommend using fresh strawberries in the dough itself for this particular recipe, as it will significantly change the texture.
Unsalted Butter vs. Shortening: I prefer using unsalted butter for its rich flavor, but a 50/50 blend of unsalted butter and shortening can give you a cookie that’s slightly chewier and less prone to spreading. If you use all butter, just make sure it’s softened, not melted, to ensure proper creaming with the sugar. For those looking for a dairy-free option, a good quality plant-based butter substitute would work beautifully here.
Granulated Sugar & Powdered Sugar: Granulated sugar is for the dough, providing sweetness and helping with the cookie’s structure. Powdered sugar is crucial for rolling the dough balls before baking. This gives the cookies that signature slightly crinkled, sweet exterior and prevents them from sticking, adding a lovely delicate texture. Don’t skip the rolling step!
All-Purpose Flour: Standard all-purpose flour works perfectly. Make sure to measure it correctly, either by weight (my preferred method for accuracy) or by spooning it into your measuring cup and leveling it off. Too much flour can make your cookies dry and crumbly, while too little can lead to excessive spreading.
Leavening Agents: A combination of baking soda and baking powder often works best to give these cookies a soft, tender crumb with just the right amount of lift. Make sure yours aren’t expired for optimal results!
Vanilla Extract: A good quality pure vanilla extract complements the strawberry flavor beautifully, adding a layer of warmth and depth. I always recommend using pure vanilla over imitation for the best taste.
Red or Pink Food Coloring (Optional): While the strawberry powder will give a natural pinkish tint, if you’re aiming for that vibrant, eye-catching strawberry pink, a few drops of gel food coloring can work wonders. I usually add it when I add the wet ingredients to the creamed butter and sugar.
Hershey’s Kisses: This is where the “kiss” in “Strawberry Kiss Cookies” comes from! Classic milk chocolate Kisses are wonderful, but if you can find strawberry creme Kisses or even white chocolate Kisses, they can add an extra layer of flavor and visual appeal. Make sure they are unwrapped and ready to go before your cookies come out of the oven.
Step-by-Step Instructions
Making these Strawberry Kiss Cookies is a delightful process, and I’ll walk you through my method for achieving perfect, tender, and flavorful results every time. Remember, baking is a joyful science, so precise measurements and careful steps are key!
1. Prepare Your Workspace: First things first, I preheat my oven to 350°F (175°C). Then, I line two baking sheets with parchment paper or silicone baking mats. This prevents sticking and makes cleanup a breeze. While the oven preheats, I make sure to unwrap all my Hershey’s Kisses – you’ll want them ready to press into the warm cookies the moment they come out of the oven!
2. Combine Dry Ingredients: In a medium bowl, I whisk together my all-purpose flour, freeze-dried strawberry powder, baking soda, baking powder, and a pinch of salt. Whisking ensures everything is evenly distributed, which is important for consistent texture and flavor throughout your cookies. Set this bowl aside for a moment.
3. Cream Wet Ingredients: In a large mixing bowl, using an electric mixer (either stand or hand-held), I cream together my softened unsalted butter and granulated sugar until the mixture is light and fluffy. This usually takes about 2-3 minutes on medium speed. This step incorporates air, which contributes to the cookies’ tender crumb.
4. Add Egg and Flavor: Next, I beat in my large egg until it’s just combined. Overmixing at this stage can make your cookies tough. Then, I stir in the vanilla extract and any optional red or pink food coloring if I’m aiming for a more vivid pink color. Scrape down the sides of the bowl to ensure everything is well incorporated.
5. Gradually Add Dry to Wet: With the mixer on low speed, I gradually add the dry ingredient mixture to the wet ingredients, mixing until just combined. Be careful not to overmix; overdeveloping the gluten can lead to tough cookies. As soon as you no longer see streaks of dry flour, stop mixing.
6. Chill the Dough (Crucial!): This step is non-negotiable for these cookies, especially with the butter. I cover the bowl with plastic wrap and refrigerate the dough for at least 30 minutes, or up to an hour. Chilling helps solidify the butter, preventing the cookies from spreading too much in the oven and ensuring they hold their shape beautifully for that Hershey’s Kiss.
7. Roll and Coat: Once the dough is chilled, I place my powdered sugar in a shallow bowl. I scoop out rounded tablespoons of dough and roll them into smooth balls, about 1-inch in diameter. Then, I roll each dough ball generously in the powdered sugar, ensuring it’s fully coated. The powdered sugar creates that lovely crinkly texture and sweet crust.
8. Bake ‘Em Up!: I arrange the coated dough balls about 2 inches apart on my prepared baking sheets. Bake for 9-11 minutes, or until the edges are just set and very lightly golden, and the centers still look slightly soft. The exact baking time can vary depending on your oven, so keep an eye on them!
9. Add the Kisses: This is the moment! As soon as I pull the cookies out of the oven, while they are still warm, I immediately press one unwrapped Hershey’s Kiss into the center of each cookie. Press just firmly enough so the chocolate melts slightly and adheres to the cookie. If you wait too long, the cookies will harden, and the Kisses won’t stick or melt properly.
10. Cool and Enjoy: I let the cookies cool on the baking sheets for about 5 minutes to allow them to set up a bit before transferring them to a wire rack to cool completely. The Kisses will finish setting as the cookies cool. Once completely cooled, they’re ready to be devoured!
Tips & Suggestions
I’ve baked countless batches of Kiss cookies over the years, and I’ve picked up a few tricks that really make a difference, especially for these Strawberry Kiss Cookies. Here are my top tips to ensure your cookies turn out perfectly:
- Don’t Skimp on the Freeze-Dried Strawberry Powder: Seriously, this is your flavor hero! If you want a truly prominent, natural strawberry taste, don’t be shy with the powder. For an extra punch, you can even add a tiny bit of strawberry extract in addition to the powder, but be careful not to overdo it – a little goes a long way with extracts.
- Chill Your Dough Adequately: I know, waiting is hard when you want cookies, but this step is crucial for preventing your cookies from spreading into flat discs. Cold dough means the butter stays solid longer in the oven, giving your cookies time to set and maintain their lovely dome shape, which is perfect for holding a Kiss. If your kitchen is warm, you might even need to chill for a bit longer.
- Perfecting the Kiss Placement: The timing for adding the Hershey’s Kiss is key. You want to press it into the cookie immediately after taking them out of the oven. The residual heat will slightly melt the base of the Kiss, allowing it to adhere perfectly to the warm cookie. If you wait even a few minutes, the cookie starts to set, and the Kiss won’t stick as well. Don’t press too hard, just enough to secure it.
- Achieving a Vibrant Pink: While the strawberry powder provides a lovely natural pink, if you desire a brighter, more “strawberry-milkshake” pink, I recommend adding a few drops of gel food coloring (red or pink) along with your wet ingredients. Gel colors provide intense color without adding extra liquid.
- Measuring Flour Correctly: For baking success, especially with cookies, proper flour measurement is vital. Spoon your flour into your measuring cup and then level it off with the back of a knife. Scooping directly from the bag can compact the flour, leading to too much in your recipe, which results in dry, crumbly cookies.
- Experiment with Kisses: While classic milk chocolate Kisses are traditional, don’t be afraid to get creative! White chocolate Kisses would offer a different flavor profile, and if you can find special edition strawberry-flavored Kisses, they would be absolutely divine and amplify that strawberry goodness.
- Even Baking: If you’re baking multiple trays, rotate them halfway through the baking time. This ensures all your cookies bake evenly and prevents some from over-baking while others are still underdone.
Storage
Once you’ve baked a batch of these delightful Strawberry Kiss Cookies, you’ll want to ensure they stay fresh and delicious for as long as possible. Here are my best tips for storing them:
At Room Temperature:
- Once your Strawberry Kiss Cookies have completely cooled and the chocolate Kisses have fully set, transfer them to an airtight container.
- Store them in a cool, dry place at room temperature.
- They will stay fresh and soft for about 3-5 days. I find that storing them in layers separated by parchment paper can help prevent them from sticking together, especially if it’s warm and the chocolate softens a bit.
- The texture of the Kisses usually holds up well at room temperature, but avoid direct sunlight or warm spots, which could cause them to melt.
Freezing Baked Cookies:
- If you want to keep them longer, these cookies freeze surprisingly well, even with the Kisses.
- Allow the cookies to cool completely and ensure the Kisses are fully set and firm.
- Place the cookies in a single layer on a baking sheet and freeze for about 1-2 hours, until solid. This “flash freezing” prevents them from sticking together.
- Once solid, transfer the cookies to a heavy-duty freezer bag or an airtight freezer-safe container. Try to remove as much air as possible to prevent freezer burn.
- They can be frozen for up to 1-2 months.
- To thaw, simply remove them from the freezer and let them come to room temperature on a wire rack for a few hours. The Kisses might lose a tiny bit of their original luster or become slightly firmer, but the taste will still be fantastic!
Freezing Cookie Dough:
- If you want fresh-baked cookies on demand, you can freeze the unbaked dough.
- After forming the dough balls and rolling them in powdered sugar (Step 7), arrange them in a single layer on a baking sheet and flash freeze for about 1-2 hours until solid.
- Once solid, transfer the dough balls to a freezer-safe bag or container. They can be frozen for up to 3 months.
- When you’re ready to bake, you can bake them directly from frozen. You might need to add an extra 2-4 minutes to the baking time. Remember to have your unwrapped Kisses ready for when they come out of the oven!
Final Thoughts
And there you have it! I truly hope you enjoyed baking your way through this Strawberry Kiss Cookies Recipe. I honestly believe these aren’t just any cookies; they’re a delightful symphony of sweet strawberry flavor, a charming pop of pink, and that perfectly melt-in-your-mouth chocolate kiss on top that makes them utterly irresistible. The unique blend of fruity zest and rich chocolate makes the Strawberry Kiss Cookies Recipe an absolute must-try for anyone looking to add a little extra joy and sweetness to their day. Whether you’re making them for a special occasion or simply to treat yourself, I promise the effort is well worth it. Go ahead, share the love (and the cookies!), and let the magic of this Strawberry Kiss Cookies Recipe brighten your baking adventures!
Strawberry Kiss Cookies Recipe: Sweet & Easy Treat!

These Strawberry Kiss Cookies are a delightful blend of fresh strawberry flavor and a melt-in-your-mouth chocolate surprise. Perfect for brightening anyone’s day, they are as beautiful as they are delicious!
- Prep Time: 15 mins
- Cook Time: 11 mins
- Total Time: 26 minutes
- Yield: 24 cookies 1x
- Category: Dessert
- Method: Baking
- Cuisine: American
Ingredients
- 1 cup unsalted butter, softened
- 1 cup granulated sugar
- 1 large egg
- 1 teaspoon vanilla extract
- 2 1/2 cups all-purpose flour
- 1/2 cup freeze-dried strawberry powder
- 1 teaspoon baking soda
- 1 teaspoon baking powder
- 1/4 teaspoon salt
- Powdered sugar for rolling
- Red or pink food coloring (optional)
- Hershey's Kisses, unwrapped
Instructions
- Preheat the oven to 350°F (175°C) and line two baking sheets with parchment paper or silicone baking mats.
- In a medium bowl, whisk together the all-purpose flour, freeze-dried strawberry powder, baking soda, baking powder, and a pinch of salt. Set aside.
- In a large mixing bowl, cream together the softened unsalted butter and granulated sugar until light and fluffy, about 2-3 minutes.
- Beat in the large egg until just combined, then stir in the vanilla extract and any optional food coloring.
- Gradually add the dry ingredient mixture to the wet ingredients, mixing until just combined.
- Cover the bowl with plastic wrap and refrigerate the dough for at least 30 minutes.
- Scoop out rounded tablespoons of dough and roll them into smooth balls, then roll each ball in powdered sugar.
- Arrange the coated dough balls about 2 inches apart on the prepared baking sheets and bake for 9-11 minutes.
- Immediately press one unwrapped Hershey's Kiss into the center of each cookie after removing them from the oven.
- Let the cookies cool on the baking sheets for about 5 minutes before transferring them to a wire rack to cool completely.
Nutrition
- Serving Size: 1 cookie
- Calories: 120
- Sugar: 10 g
- Sodium: 50 mg
- Fat: 5 g
- Saturated Fat: 3 g
- Unsaturated Fat: 2 g
- Trans Fat: 0 g
- Carbohydrates: 18 g
- Fiber: 0 g
- Protein: 1 g
- Cholesterol: 15 mg
Keywords: For the best flavor, do not skimp on the freeze-dried strawberry powder. Ensure to chill the dough adequately to prevent spreading, and consider using different types of Kisses for variety.

Leave a Comment