Peppermint Brownie Cookies! Oh my goodness, where do I even begin with these little bites of heaven? I absolutely adore how these cookies take everything we love about a rich, fudgy brownie – that intense chocolate flavor, that delightfully chewy texture – and marry it with the delightful, refreshing zing of peppermint. It’s a match made in dessert paradise, I tell you!
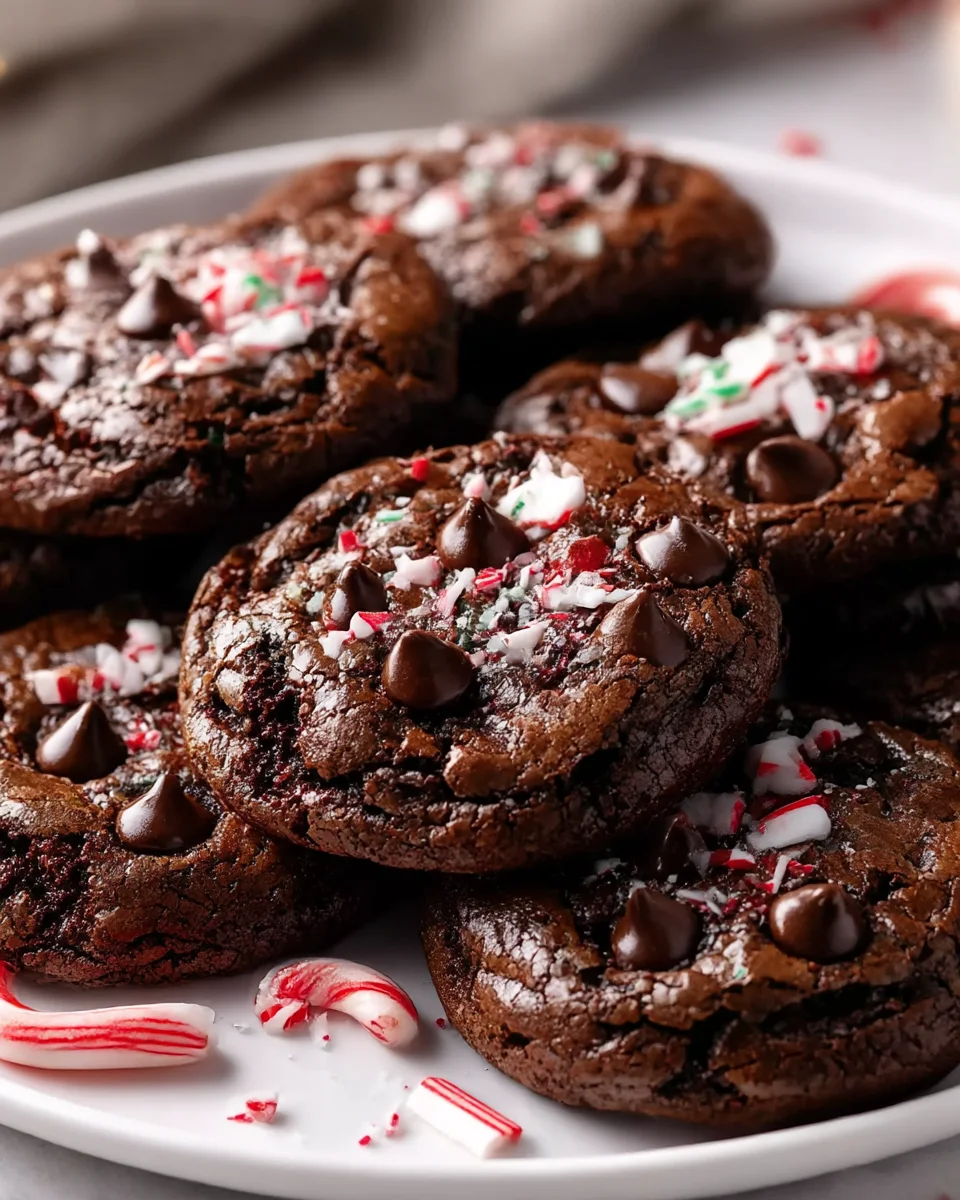
What makes these Peppermint Brownie Cookies truly special is that they aren’t just a chocolate cookie with a hint of mint; they deliver the full, glorious experience of a dense, intensely chocolatey brownie, but in a convenient, perfectly portioned cookie form. Then, that cool, crisp peppermint flavor swirls through, usually from a touch of extract and a sprinkle of crushed peppermint candies on top, creating an incredible flavor contrast that dances on your palate. Imagine that classic shiny, crackled brownie top, but in a handheld cookie!
You, my friend, are going to absolutely fall in love with these. They’re the kind of treat that feels incredibly sophisticated and festive, yet they’re surprisingly simple to whip up. Perfect for holiday gatherings, a cozy night in, or just whenever that chocolate-peppermint craving strikes (and trust me, it will!). Get ready for soft, chewy centers, slightly crisp edges, and that unforgettable combination of deep dark chocolate and bright, cool peppermint. These cookies are a celebration in every single bite!

Ingredient Notes
Creating the perfect batch of Peppermint Brownie Cookies hinges on understanding a few key ingredients. When I set out to make these, I’m always thinking about achieving that ultimate fudgy texture combined with a vibrant peppermint kick. Here’s what I find makes all the difference:
- Unsweetened Cocoa Powder: This is the backbone of our rich, deep chocolate flavor. I almost always reach for a good quality Dutch-processed cocoa powder. It has a smoother, less bitter chocolate flavor compared to natural cocoa, and it contributes beautifully to the dark color and fudgy texture we want in a brownie cookie. If you only have natural cocoa on hand, it will still work, but the flavor profile might be slightly brighter and the color a touch lighter.
- Unsalted Butter: Melted butter is essential for that chewy, fudgy brownie cookie texture. It incorporates differently than softened butter, helping create a dense, rich crumb. I always use unsalted so I can control the overall salt content in the recipe. If you only have salted butter, simply reduce the added salt by about a quarter teaspoon. For a dairy-free option, a good quality vegan butter alternative works wonderfully in the same melted state.
- Granulated and Brown Sugars: I use a combination of both for a reason! Granulated sugar helps create those signature crinkly tops and crisp edges, while brown sugar (light brown is my preference) adds moisture, chewiness, and a subtle caramel note that complements the chocolate perfectly. Don’t skip the brown sugar, it’s key for that ultimate fudgy texture.
- Eggs and an Extra Yolk: Eggs provide structure and richness. That extra egg yolk? It’s my secret weapon for super fudgy and chewy brownie cookies, adding richness without making them cakey. Make sure your eggs are at room temperature for better emulsification with the other ingredients.
- All-Purpose Flour: For brownie cookies, less is definitely more when it comes to flour. I use just enough to bind everything together without making them tough or cakey. Over-measuring flour is a common pitfall, so I always spoon and level my flour to ensure accuracy.
- Peppermint Extract: This is where the magic happens! A good quality pure peppermint extract is crucial for that refreshing, festive flavor. Be cautious when adding it; peppermint can be potent. I usually start with the recommended amount and then add a tiny bit more if I feel it needs a stronger kick after a quick taste test of the batter (before adding eggs, of course!).
- Chocolate Chips or Chunks: While the cocoa powder provides the base, adding extra chocolate in chip or chunk form enhances the overall chocolate experience. Semi-sweet or dark chocolate chips are my go-to, as they provide a lovely contrast to the sweetness of the cookie and the peppermint. You could also use milk chocolate if you prefer a sweeter cookie.
- Crushed Peppermint Candies: For that iconic holiday look and delightful crunch, crushed peppermint candies (like candy canes!) are non-negotiable for me. I like to sprinkle them on top right after the cookies come out of the oven, so they adhere nicely as the cookies cool.
- Vanilla Extract and Salt: Don’t underestimate these! Pure vanilla extract deepens the chocolate flavor, while a good pinch of fine sea salt balances the sweetness and enhances all the other flavors.
Step-by-Step Instructions
Making Peppermint Brownie Cookies is a straightforward process, but following these steps carefully will ensure you get that perfect fudgy texture and festive flavor every time. Here’s how I do it:
- Prepare for Baking: First things first, I always preheat my oven to 350°F (175°C). Then, I line two large baking sheets with parchment paper or silicone baking mats. This prevents sticking and makes cleanup a breeze.
- Melt Chocolate and Butter: In a medium microwave-safe bowl, I combine the unsalted butter and cocoa powder. I microwave them in 30-second intervals, stirring well after each, until the butter is fully melted and the cocoa is completely dissolved into it, forming a thick, glossy paste. Alternatively, you can do this over a double boiler. I set this aside to cool slightly while I prepare the wet ingredients.
- Combine Wet Ingredients: In a large mixing bowl, I whisk together the granulated sugar, light brown sugar, eggs, and the extra egg yolk. I whisk vigorously for about 2-3 minutes until the mixture is light in color, thick, and slightly fluffy. This step is crucial for achieving those desirable crinkly tops. Then, I stir in the vanilla extract and, of course, the peppermint extract. Remember to start with the recommended amount of peppermint and adjust to your taste preference.
- Integrate Chocolate Mixture: Once the cocoa and butter mixture has cooled a bit (it shouldn’t be piping hot, just warm), I pour it into the egg and sugar mixture. I fold it gently with a spatula until just combined. Overmixing at this stage can incorporate too much air, which we want to avoid for a fudgy cookie.
- Add Dry Ingredients: Next, I sprinkle the all-purpose flour and salt over the wet ingredients. Using a spatula, I fold them in very gently until just a few streaks of flour remain. The key here is not to overmix; overmixing develops gluten and can lead to tough cookies.
- Fold in Chocolate Chips: Now for more chocolate! I gently fold in the chocolate chips or chunks until they are evenly distributed throughout the dough.
- Chill the Dough (CRITICAL STEP!): This is probably the most important step for achieving fudgy brownie cookies that don’t spread too much. I cover the bowl with plastic wrap and chill the dough in the refrigerator for at least 30-60 minutes. Sometimes, if I’m preparing ahead, I’ll even chill it for a few hours. The colder the dough, the better the cookie will hold its shape.
- Scoop and Bake: Once the dough is chilled, I use a medium cookie scoop (about 1.5-2 tablespoons) to portion out the dough. I place the scoops about 2 inches apart on the prepared baking sheets.
- Bake to Perfection: I bake the cookies for 10-12 minutes. They might still look a little soft and underbaked in the center when you pull them out, and that’s exactly what you want for maximum fudginess! The edges should be set, but the centers will be delightfully gooey.
- Decorate and Cool: As soon as I pull the hot cookies from the oven, I immediately sprinkle them generously with the crushed peppermint candies. The residual heat helps the peppermint stick. I let the cookies cool on the baking sheets for about 5-10 minutes before carefully transferring them to a wire rack to cool completely. This helps them set up and prevents them from breaking.
Tips & Suggestions
Over the years of baking countless batches of these delightful Peppermint Brownie Cookies, I’ve picked up a few tricks that I believe make all the difference. Here are my top tips and suggestions to ensure your cookies turn out perfectly fudgy, chewy, and bursting with peppermint flavor:
- Don’t Overmix the Batter: This is a golden rule for any brownie or fudgy cookie recipe. Once you add the flour, fold it in gently with a spatula until just combined. Overmixing develops gluten, which can lead to a tough, cakey texture rather than the desired fudgy chewiness. We want tender, moist cookies, not dense hockey pucks!
- Chilling the Dough is Non-Negotiable: I cannot stress this enough! Chilling the dough for at least 30-60 minutes (or even longer) is absolutely crucial for these brownie cookies. It solidifies the butter, preventing the cookies from spreading too much in the oven. More importantly, it allows the flavors to meld and develop, resulting in a richer, chewier cookie. If you skip this step, you’ll likely end up with flat, thin, and crispy cookies, not the fudgy brownie-like texture we’re aiming for.
- Do NOT Overbake: This is another key factor for fudgy cookies. Brownie cookies are meant to be slightly underbaked in the center. When you take them out of the oven, the edges should be set, but the center might still look a little soft and gooey. They will continue to set as they cool on the hot baking sheet. If you bake them until they look completely firm, they will turn out dry and cakey once cooled. Trust the process!
- Quality Ingredients Matter: Especially for a recipe with prominent flavors like chocolate and peppermint. Invest in good quality unsweetened cocoa powder and pure peppermint extract. The difference in flavor is truly noticeable. A cheap extract can sometimes taste artificial, which we definitely want to avoid here.
- Adjust Peppermint to Your Taste: Peppermint extract can be very potent. I always recommend starting with the specified amount and then, if you’re brave enough to taste a tiny bit of the batter (before adding eggs, of course!), you can add a tiny bit more if you prefer a stronger peppermint punch. It’s easier to add more than to take it away!
- Variations for Topping: While crushed peppermint candies are classic, feel free to get creative! You could drizzle cooled cookies with melted white chocolate (perhaps even tinted green or red!), or sprinkle them with festive holiday sprinkles alongside the peppermint. Sometimes I’ll even add a touch of flaky sea salt on top with the peppermint for a lovely sweet and salty contrast.
- Make Ahead Option: The dough for these cookies freezes beautifully. You can scoop the chilled dough into balls, place them on a parchment-lined tray, freeze until solid, and then transfer them to an airtight freezer bag. When you’re ready to bake, you can bake them directly from frozen, adding a couple of extra minutes to the baking time. This is fantastic for fresh-baked cookies on demand!
Storage
So you’ve baked a wonderful batch of Peppermint Brownie Cookies, and now you’re wondering how to keep them fresh? Here’s my advice for storing them, whether you plan to enjoy them over a few days or save some for later:
- At Room Temperature: For maximum freshness, I recommend storing these cookies in an airtight container at room temperature. They will stay wonderfully fudgy and delicious for up to 3-4 days. I find that storing them in a single layer or with parchment paper between layers helps prevent them from sticking together.
- In the Refrigerator: While not strictly necessary, if you want to extend their shelf life by a few extra days, you can store them in an airtight container in the refrigerator for up to a week. Just be aware that chilling them might make them a bit firmer. If you prefer a softer texture, simply let them come to room temperature for about 15-20 minutes before enjoying, or even pop them in the microwave for a few seconds.
- Freezing Baked Cookies: These cookies freeze exceptionally well! Once they are completely cooled, I arrange them in a single layer on a baking sheet and flash freeze them for about 30 minutes until solid. Then, I transfer the frozen cookies to a freezer-safe airtight container or a heavy-duty freezer bag, layering them with parchment paper to prevent sticking. They can be stored in the freezer for up to 2-3 months. When you’re ready to enjoy, simply thaw them at room temperature for an hour or two, or warm them gently in the microwave for a few seconds for that “fresh from the oven” feel.
- Freezing Raw Dough Balls: This is a fantastic option for future cravings! After chilling the dough and scooping it into individual cookie balls, I place them on a parchment-lined baking sheet and flash freeze them until firm. Once frozen, I transfer the dough balls to an airtight freezer bag. You can store them for up to 2-3 months. To bake from frozen, simply place the frozen dough balls on a prepared baking sheet and add an extra 2-4 minutes to the baking time. You’ll have warm, freshly baked Peppermint Brownie Cookies whenever the mood strikes!
Final Thoughts
Well, there you have it! I truly hope you’re as excited as I am about these incredible Peppermint Brownie Cookies. I can honestly say that this recipe isn’t just another cookie; it’s a delightful celebration of flavors that come together in perfect harmony.
These Peppermint Brownie Cookies are an absolute must-try because they beautifully blend the deep, fudgy richness of a classic brownie with the exhilarating coolness of peppermint. It’s that unique combination that makes them stand out, offering a sophisticated yet wonderfully comforting treat that’s perfect for any occasion, from holiday gatherings to a simple cozy evening at home. I promise, the satisfaction of biting into that soft, chewy texture followed by a refreshing minty burst is simply unparalleled.
So, please, take a moment to whip up a batch of these glorious Peppermint Brownie Cookies. I guarantee they’ll bring a smile to your face and a wave of pure deliciousness to your palate. Happy baking, and even happier eating!
Peppermint Brownie Cookies: Chewy, Minty Chocolate Treats!
These Peppermint Brownie Cookies combine the rich, fudgy texture of brownies with a refreshing peppermint twist. Perfect for holiday gatherings or whenever a chocolate-peppermint craving strikes!
- Prep Time: 15 mins
- Cook Time: 12 mins
- Total Time: 27 minutes
- Yield: 24 cookies 1x
- Category: Dessert
- Method: Baking
- Cuisine: American
Ingredients
- 1 cup unsweetened cocoa powder
- 1/2 cup unsalted butter
- 1 cup granulated sugar
- 1/2 cup light brown sugar
- 2 large eggs
- 1 extra egg yolk
- 1/2 cup all-purpose flour
- 1/2 teaspoon peppermint extract
- 1 cup chocolate chips or chunks
- 1/4 cup crushed peppermint candies
- 1 teaspoon vanilla extract
- 1/4 teaspoon fine sea salt
Instructions
- Preheat your oven to 350°F (175°C) and line two large baking sheets with parchment paper or silicone baking mats.
- In a medium microwave-safe bowl, combine the unsalted butter and cocoa powder. Microwave in 30-second intervals, stirring well after each, until the butter is melted and the cocoa is dissolved, forming a thick paste. Set aside to cool slightly.
- In a large mixing bowl, whisk together the granulated sugar, light brown sugar, eggs, and extra egg yolk for about 2-3 minutes until light in color and thick. Stir in the vanilla extract and peppermint extract.
- Pour the cooled cocoa and butter mixture into the egg and sugar mixture and fold gently with a spatula until just combined.
- Sprinkle the all-purpose flour and salt over the wet ingredients and fold in gently until just a few streaks of flour remain.
- Fold in the chocolate chips or chunks until evenly distributed throughout the dough.
- Cover the bowl with plastic wrap and chill the dough in the refrigerator for at least 30-60 minutes.
- Use a medium cookie scoop to portion out the dough, placing scoops about 2 inches apart on the prepared baking sheets.
- Bake the cookies for 10-12 minutes, until the edges are set but the centers are still soft and gooey.
- Immediately sprinkle the hot cookies with crushed peppermint candies and let them cool on the baking sheets for 5-10 minutes before transferring to a wire rack to cool completely.
Nutrition
- Serving Size: 1 cookie
- Calories: 150
- Sugar: 12 g
- Sodium: 50 mg
- Fat: 7 g
- Saturated Fat: 4 g
- Unsaturated Fat: 2 g
- Trans Fat: 0 g
- Carbohydrates: 20 g
- Fiber: 1 g
- Protein: 2 g
- Cholesterol: 25 mg
Keywords: Chilling the dough is crucial for achieving fudgy brownie cookies that hold their shape. Use good quality cocoa powder and peppermint extract for the best flavor.

Leave a Comment