Gluten Free Blueberry Dessert Pierogi
Oh, prepare yourselves for a treat! As someone who absolutely adores the comforting hug of a good pierogi but also navigates the world of gluten-free eating, I’ve often dreamed of a dessert that hits all the right notes. That’s why I’m so excited to share my recipe for Gluten Free Blueberry Dessert Pierogi with you. This isn’t just any dessert; it’s a glorious, sweet twist on a beloved classic that proves gluten-free can be utterly indulgent and utterly delicious!
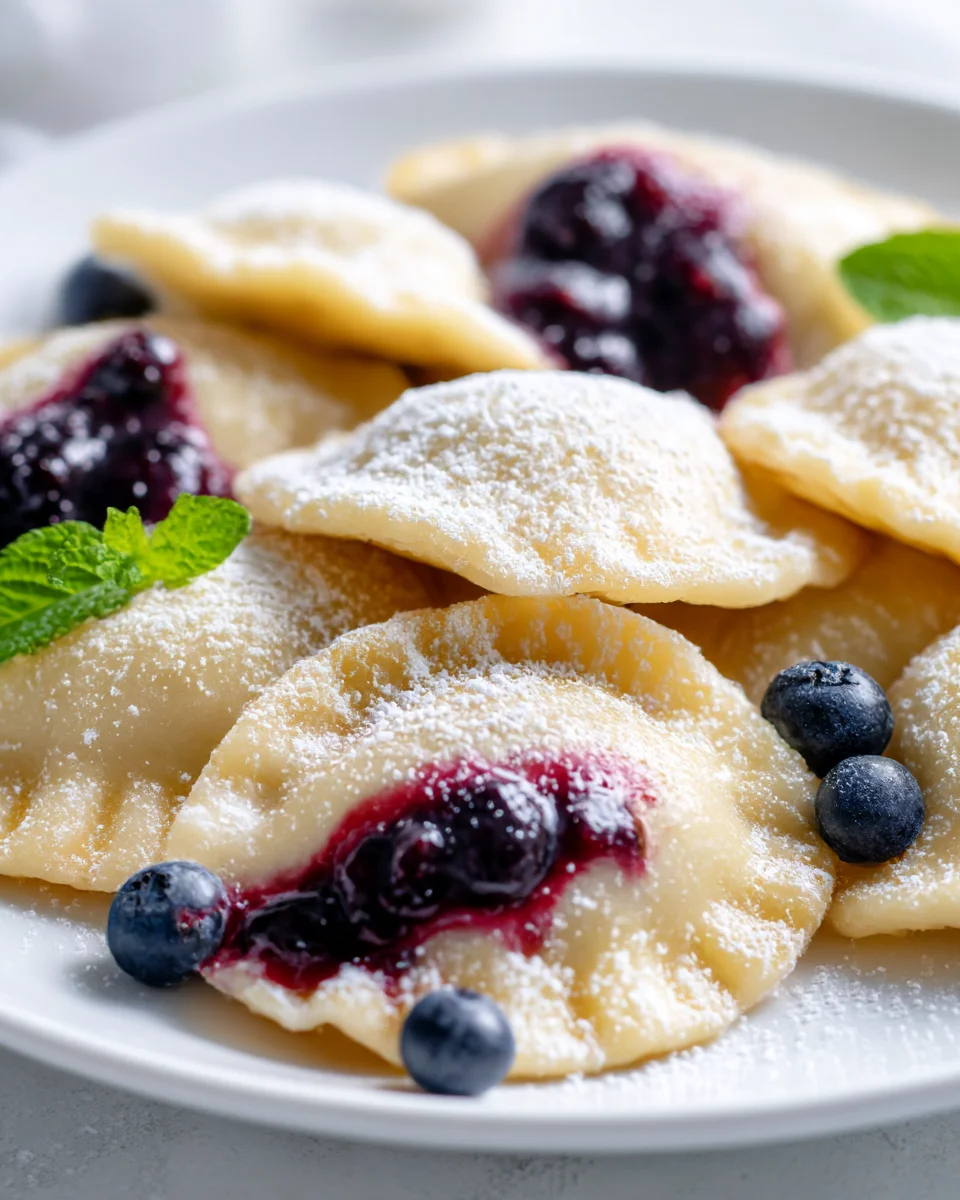
What makes these so special, you ask? Well, imagine tender, pillowy gluten-free dough, perfectly crafted to encase a warm, juicy burst of sweet blueberries. It’s a delightful surprise, transforming the traditional savory pierogi into an exquisite sweet treat that’s both familiar and excitingly new. You’ll love these because they bring all the comforting nostalgia of a homemade dumpling, but with a vibrant fruit filling that sings of summer, all while being wonderfully accommodating for those avoiding gluten. They’re a fantastic way to impress guests or simply treat yourself to a unique and satisfying sweet experience.
In essence, we’re talking about delicate, homemade dumplings, meticulously shaped and boiled to perfection, then generously filled with a simple yet sublime blueberry compote. Whether you dust them with powdered sugar, dollop them with a spoonful of crème fraîche, or simply enjoy them as they are, these Gluten Free Blueberry Dessert Pierogi are destined to become a new favorite in your dessert repertoire. Get ready to fall in love!

Ingredient Notes
Crafting delicious Gluten Free Blueberry Dessert Pierogi starts with understanding the unique qualities of its ingredients. I’ve found that getting these right makes all the difference in achieving that perfect balance of tender dough and sweet, juicy filling.
For the Gluten-Free Pierogi Dough:
- Gluten-Free All-Purpose Flour Blend: This is the cornerstone of our pierogi. I highly recommend using a commercial gluten-free all-purpose flour blend that contains xanthan gum. Many blends are available, often combining rice flour, tapioca starch, and potato starch. Using a blend specifically designed for baking can make the dough more pliable and easier to work with, mimicking the elasticity of traditional wheat flour. If your blend doesn’t include xanthan gum, add about 1 teaspoon per cup of flour to help with structure and elasticity. Avoid single-flour options like just rice flour, as they tend to be too crumbly on their own for pierogi.
- Eggs: Large eggs are essential for binding the dough and adding richness. They contribute to the dough’s tender texture. There isn’t a direct substitute for eggs that will yield the same result in this type of dough, but for those with egg allergies, a commercial egg replacer might work, though the texture may vary.
- Milk or Dairy-Free Alternative: I typically use whole milk for its fat content, which helps create a tender dough. However, unsweetened almond milk, soy milk, or oat milk can be excellent dairy-free alternatives without significantly altering the final texture. Just ensure it’s unflavored.
- Butter (Melted): Unsalted butter adds flavor and tenderness. For a dairy-free option, use a good quality plant-based butter substitute.
- Salt: A pinch of salt balances the sweetness and enhances the overall flavor of the dough.
For the Blueberry Filling:
- Fresh or Frozen Blueberries: Both work beautifully! If using frozen blueberries, there’s no need to thaw them beforehand; they’ll cook down just fine. Fresh blueberries will provide a slightly brighter, more vibrant flavor. You can substitute with other berries like raspberries or mixed berries if you prefer, but the classic blueberry is hard to beat for a dessert pierogi.
- Granulated Sugar: This sweetens our filling. Adjust the amount to your preference and the natural sweetness of your blueberries. You could use a sugar substitute designed for baking if you’re mindful of sugar intake, but I find classic granulated sugar gives the best texture.
- Cornstarch (or Tapioca Starch): This is crucial for thickening the blueberry filling, preventing it from being too watery and bursting out of the pierogi during cooking. Tapioca starch can also be used as a gluten-free alternative and often provides a slightly glossier finish. Start with the recommended amount and adjust if your berries are particularly juicy.
- Lemon Zest (Optional but Recommended): A touch of lemon zest brightens the blueberry flavor and adds a lovely aromatic note without making the filling taste overtly lemony.
Step-by-Step Instructions
Making Gluten Free Blueberry Dessert Pierogi might seem intimidating, but I promise it’s a rewarding process! Just follow these steps, and you’ll be enjoying these delightful dumplings in no time.
1. Prepare the Blueberry Filling:
- In a medium saucepan, combine the blueberries (fresh or frozen), granulated sugar, and lemon zest (if using).
- Cook over medium heat, stirring occasionally, until the blueberries begin to soften and release their juices, about 5-7 minutes.
- In a small bowl, whisk together the cornstarch (or tapioca starch) with 2 tablespoons of cold water to create a slurry.
- Pour the slurry into the bubbling blueberry mixture, stirring constantly. Continue to cook for another 1-2 minutes, or until the filling has thickened to a jam-like consistency. It should coat the back of a spoon.
- Remove the saucepan from the heat and transfer the filling to a shallow bowl or plate. Spread it out to help it cool down quickly. It’s absolutely critical that the filling is completely cool before you use it to prevent the dough from tearing and the pierogi from bursting. You can even chill it in the refrigerator for 30 minutes to an hour.
2. Make the Gluten-Free Pierogi Dough:
- In a large mixing bowl, whisk together the gluten-free all-purpose flour blend and salt.
- In a separate bowl, whisk together the eggs, milk (or dairy-free alternative), and melted butter until well combined.
- Pour the wet ingredients into the dry ingredients. Stir with a wooden spoon or your hands until a shaggy dough forms.
- Turn the dough out onto a lightly floured gluten-free surface. Knead gently for about 3-5 minutes, just until the dough comes together and is smooth enough to handle. Gluten-free dough doesn’t develop gluten like traditional dough, so avoid over-kneading, which can make it tough. The dough might feel slightly stickier than wheat dough; resist adding too much extra flour at this stage, as it can make the pierogi dry.
- Form the dough into a ball, cover it with plastic wrap or a damp kitchen towel, and let it rest at room temperature for at least 30 minutes. This allows the flours to fully hydrate, making the dough easier to roll.
3. Assemble the Pierogi:
- Divide the rested dough into two equal portions. Keep one portion covered while you work with the other.
- On a well-floured gluten-free surface, roll out one portion of dough to about 1/8-inch thickness. Gluten-free dough can be a bit more delicate, so handle it gently. If it tears, simply patch it up with a bit of dough and gently press.
- Using a 3-inch round cookie cutter or the rim of a glass, cut out circles from the dough. Gather the scraps, gently re-knead them, and roll them out again to cut more circles.
- Place about 1 teaspoon of the cooled blueberry filling in the center of each dough circle. Don’t overfill, as this can make sealing difficult and cause the pierogi to burst.
- Fold one side of the dough over the filling to meet the other side, forming a half-moon shape. Pinch the edges firmly to seal. For an extra secure seal and a decorative touch, you can crimp the edges with a fork. Ensure there are no gaps for the filling to escape.
- Place the assembled pierogi on a parchment-lined baking sheet dusted with gluten-free flour to prevent sticking. Repeat with the remaining dough and filling.
4. Cook the Pierogi:
- Bring a large pot of lightly salted water to a rolling boil.
- Carefully drop the pierogi into the boiling water, a few at a time, ensuring not to overcrowd the pot. They will sink at first.
- Cook for 3-5 minutes, or until the pierogi float to the surface and are cooked through. Gently remove them from the water with a slotted spoon.
- Serve immediately with your favorite toppings, or for an extra touch of deliciousness, pan-fry them lightly.
5. Optional Pan-Frying (Highly Recommended for Dessert Pierogi):
- Melt 2 tablespoons of butter (or plant-based butter) in a large non-stick skillet over medium heat.
- Add the boiled pierogi to the skillet in a single layer, ensuring not to overcrowd.
- Cook for 2-3 minutes per side, or until golden brown and slightly crispy.
- Remove from the skillet and serve warm.
Tips & Suggestions
Working with gluten-free dough can be a little different from traditional dough, but with a few pointers, you’ll be a pro at making these Gluten Free Blueberry Dessert Pierogi!
- Keep Your Surface Floured: Gluten-free dough, especially one designed to be pliable, can be stickier. Don’t be shy about dusting your work surface, rolling pin, and even your hands with gluten-free flour. This prevents sticking and makes handling much easier.
- Don’t Overfill: This is probably the most common mistake! While it’s tempting to load up on that delicious blueberry filling, overfilling will make it incredibly difficult to seal the pierogi properly, leading to potential bursts during boiling. A generous teaspoon is usually perfect.
- Ensure a Tight Seal: Take your time to really pinch those edges together firmly. You can even use a fork to crimp the edges, which not only looks nice but also provides an extra layer of sealing security for your gluten-free dough.
- Flavor Variations: Feel free to experiment with the filling! A pinch of cinnamon or a tiny dash of nutmeg can add warmth to the blueberry filling. For a different fruit, try a mixed berry filling or even a sweetened cherry filling.
- Serving Suggestions: These dessert pierogi are incredibly versatile. I love them simply dusted with powdered sugar and served with a dollop of sour cream or crème fraîche. A swirl of melted butter with a sprinkle of brown sugar is also divine. For an extra treat, serve them with a scoop of vanilla ice cream or a drizzle of maple syrup.
- Resting the Dough is Key: Don’t skip the resting step for the dough. It allows the gluten-free flours to absorb the liquids fully, making the dough more hydrated, less sticky, and much easier to roll out without cracking.
Storage
These Gluten Free Blueberry Dessert Pierogi are best enjoyed fresh, but they can certainly be made ahead or stored for later enjoyment. Here’s how I store mine:
- Cooked Pierogi (Refrigerated): If you have leftover cooked pierogi, whether boiled or pan-fried, allow them to cool completely. Store them in an airtight container in the refrigerator for up to 3-4 days. To reheat, you can gently pan-fry them again until warmed through and slightly crispy, or microwave them for a quicker option, though they won’t be as crispy.
- Cooked Pierogi (Frozen): Cooked pierogi freeze beautifully. Once they’ve cooled completely, arrange them in a single layer on a baking sheet and freeze until solid (this prevents them from sticking together). Once frozen solid, transfer them to a freezer-safe bag or airtight container. They’ll keep well for up to 2-3 months. To reheat from frozen, you can boil them briefly (about 5-7 minutes) or pan-fry them gently over medium heat until warmed through.
- Uncooked Pierogi (Frozen): If you’re planning to make a large batch, you can freeze uncooked pierogi. Place the freshly assembled pierogi in a single layer on a lightly floured, parchment-lined baking sheet. Freeze until solid. Once frozen, transfer them to a freezer-safe bag or container, separating layers with parchment paper if needed. They can be stored for up to 2 months. When you’re ready to cook them, simply drop the frozen pierogi directly into boiling water (do not thaw). They will take a few minutes longer to cook than fresh pierogi, typically 5-7 minutes, or until they float and are tender.
Final Thoughts
So there you have it – my delightful recipe for Gluten Free Blueberry Dessert Pierogi! I truly believe this dish is a game-changer, proving that going gluten-free doesn’t mean sacrificing an ounce of flavor or fun. The tender, pillowy dough encasing those bursts of sweet, juicy blueberries creates a truly unforgettable experience. It’s a comforting, unique dessert that surprises and delights every time, offering a wonderful twist on a beloved classic.
I absolutely encourage you to roll up your sleeves and give these Gluten Free Blueberry Dessert Pierogi a try. You’ll be amazed at how easily you can bring such a special and satisfying treat to your table, perfect for any occasion. Get ready to impress your taste buds and everyone around you with this incredible gluten-free masterpiece!
Gluten Free Blueberry Dessert Pierogi: Sweet & Easy Recipe

Indulge in these delightful Gluten Free Blueberry Dessert Pierogi, a sweet twist on a classic favorite. With tender, pillowy dough encasing a warm blueberry filling, this dessert is sure to impress!
- Prep Time: 15 mins
- Cook Time: 30 mins
- Total Time: 45 minutes
- Yield: 4 servings 1x
- Category: Dessert
- Method: Boiling and Pan-Frying
- Cuisine: Eastern European
Ingredients
- Gluten-Free All-Purpose Flour Blend
- Large Eggs
- Milk or Dairy-Free Alternative
- Unsalted Butter (Melted)
- Salt
- Fresh or Frozen Blueberries
- Granulated Sugar
- Cornstarch (or Tapioca Starch)
- Lemon Zest (Optional but Recommended)
- 2 tablespoons of cold water
- 2 tablespoons of butter (or plant-based butter) for pan-frying
Instructions
- In a medium saucepan, combine the blueberries (fresh or frozen), granulated sugar, and lemon zest (if using).
- Cook over medium heat, stirring occasionally, until the blueberries begin to soften and release their juices, about 5-7 minutes.
- In a small bowl, whisk together the cornstarch (or tapioca starch) with 2 tablespoons of cold water to create a slurry.
- Pour the slurry into the bubbling blueberry mixture, stirring constantly. Continue to cook for another 1-2 minutes, or until the filling has thickened to a jam-like consistency. It should coat the back of a spoon.
- Remove the saucepan from the heat and transfer the filling to a shallow bowl or plate. Spread it out to help it cool down quickly. It’s absolutely critical that the filling is completely cool before you use it to prevent the dough from tearing and the pierogi from bursting. You can even chill it in the refrigerator for 30 minutes to an hour.
- In a large mixing bowl, whisk together the gluten-free all-purpose flour blend and salt.
- In a separate bowl, whisk together the eggs, milk (or dairy-free alternative), and melted butter until well combined.
- Pour the wet ingredients into the dry ingredients. Stir with a wooden spoon or your hands until a shaggy dough forms.
- Turn the dough out onto a lightly floured gluten-free surface. Knead gently for about 3-5 minutes, just until the dough comes together and is smooth enough to handle. Gluten-free dough doesn't develop gluten like traditional dough, so avoid over-kneading, which can make it tough. The dough might feel slightly stickier than wheat dough; resist adding too much extra flour at this stage, as it can make the pierogi dry.
- Form the dough into a ball, cover it with plastic wrap or a damp kitchen towel, and let it rest at room temperature for at least 30 minutes.
- Divide the rested dough into two equal portions. Keep one portion covered while you work with the other.
- On a well-floured gluten-free surface, roll out one portion of dough to about 1/8-inch thickness.
- Using a 3-inch round cookie cutter or the rim of a glass, cut out circles from the dough. Gather the scraps, gently re-knead them, and roll them out again to cut more circles.
- Place about 1 teaspoon of the cooled blueberry filling in the center of each dough circle. Don't overfill, as this can make sealing difficult and cause the pierogi to burst.
- Fold one side of the dough over the filling to meet the other side, forming a half-moon shape. Pinch the edges firmly to seal.
- Place the assembled pierogi on a parchment-lined baking sheet dusted with gluten-free flour to prevent sticking. Repeat with the remaining dough and filling.
- Bring a large pot of lightly salted water to a rolling boil.
- Carefully drop the pierogi into the boiling water, a few at a time, ensuring not to overcrowd the pot. They will sink at first.
- Cook for 3-5 minutes, or until the pierogi float to the surface and are cooked through. Gently remove them from the water with a slotted spoon.
- Serve immediately with your favorite toppings, or for an extra touch of deliciousness, pan-fry them lightly.
- Melt 2 tablespoons of butter (or plant-based butter) in a large non-stick skillet over medium heat.
- Add the boiled pierogi to the skillet in a single layer, ensuring not to overcrowd.
- Cook for 2-3 minutes per side, or until golden brown and slightly crispy.
- Remove from the skillet and serve warm.
Nutrition
- Serving Size: 1 pierogi
- Calories: 150
- Sugar: 5 g
- Sodium: 50 mg
- Fat: 6 g
- Saturated Fat: 3 g
- Unsaturated Fat: 2 g
- Trans Fat: 0 g
- Carbohydrates: 22 g
- Fiber: 2 g
- Protein: 3 g
- Cholesterol: 50 mg
Keywords: Keep your surface floured to prevent sticking, don't overfill the pierogi, and ensure a tight seal. Experiment with different fillings and serve with powdered sugar or crème fraîche for added flavor.


Leave a Comment