Peanut Butter Granola Bars: the ultimate snack solution! Are you tired of reaching for processed, sugary snacks when that afternoon slump hits? Do you crave something wholesome, delicious, and packed with energy to power you through your day? Then look no further! These homemade granola bars are not only incredibly easy to make, but they’re also completely customizable to your taste preferences and dietary needs.
Granola bars have a surprisingly interesting history. While the concept of combining grains and sweeteners dates back centuries, the modern granola bar as we know it emerged in the late 20th century as a convenient and portable source of energy for hikers and outdoor enthusiasts. They quickly gained popularity as a healthy alternative to traditional candy bars, and their appeal continues to grow as people seek out more nutritious and convenient snack options.
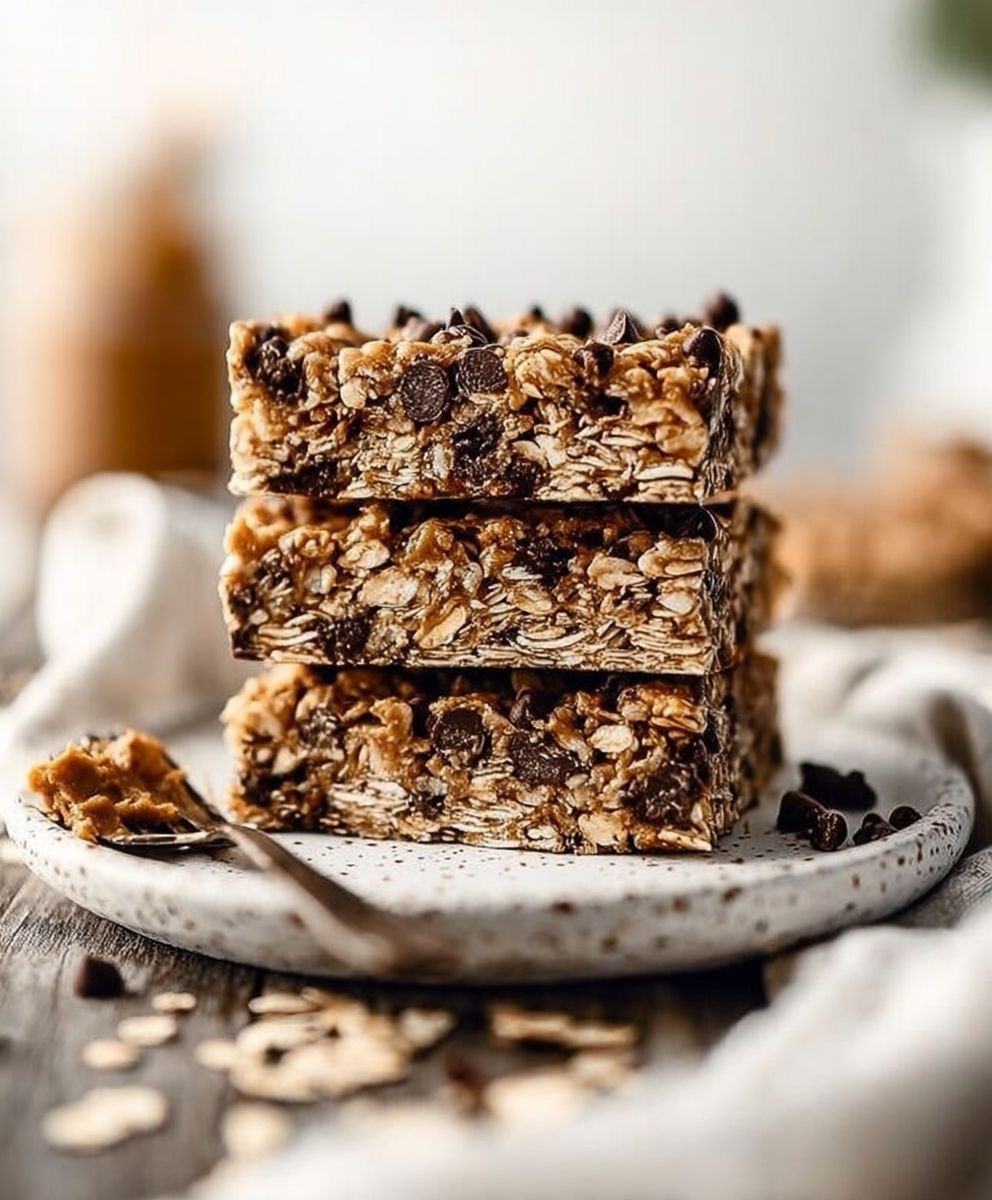
What makes Peanut Butter Granola Bars so irresistible? It’s the perfect combination of chewy oats, crunchy nuts, and the creamy, satisfying flavor of peanut butter. The natural sweetness from honey or maple syrup complements the nutty notes, creating a symphony of flavors that will tantalize your taste buds. Plus, they’re incredibly versatile! You can add chocolate chips, dried fruit, seeds, or any other ingredients you love to create your own signature granola bar. But the best part? You know exactly what’s going into them, so you can avoid artificial sweeteners, preservatives, and other unwanted additives. Get ready to ditch the store-bought bars and embrace the deliciousness of homemade!

Ingredients:
- 1 cup rolled oats (old-fashioned)
- 1 cup crisp rice cereal
- 1/2 cup unsweetened shredded coconut
- 1/4 cup flaxseed meal
- 1/4 cup chopped walnuts or pecans (optional)
- 1/2 cup creamy peanut butter
- 1/4 cup honey
- 1/4 cup maple syrup
- 1/4 cup packed brown sugar
- 1 teaspoon vanilla extract
- 1/4 teaspoon salt
- 1/4 cup mini chocolate chips (optional)
Preparing the Granola Mixture
Okay, let’s get started! First, we’re going to combine all the dry ingredients in a large bowl. This ensures everything is evenly distributed before we add the wet ingredients. Trust me, it makes a difference!
- Combine Dry Ingredients: In a large bowl, add the rolled oats, crisp rice cereal, shredded coconut, flaxseed meal, and chopped nuts (if using). Give it all a good stir to combine. Make sure the oats are evenly distributed throughout the mixture. We want every bite to be perfectly balanced!
Making the Peanut Butter Binding
Now for the magic ingredient – peanut butter! This is what holds everything together and gives these bars that irresistible peanut butter flavor. We’ll melt it down with some other goodies to create a sticky, delicious binding.
- Melt Peanut Butter Mixture: In a medium saucepan, combine the peanut butter, honey, maple syrup, brown sugar, vanilla extract, and salt. Place the saucepan over medium-low heat.
- Melt and Stir: Stir the mixture constantly until everything is melted and smooth. This usually takes about 3-5 minutes. Be careful not to let it burn! We want a nice, even consistency. The mixture should be bubbly around the edges.
- Simmer Briefly: Once melted, let the mixture simmer for about 1 minute, stirring constantly. This helps to thicken the mixture and create a better binding for the granola bars.
Combining and Mixing
This is where the fun begins! We’re going to pour the peanut butter mixture over the dry ingredients and mix everything together until it’s perfectly coated. Get ready to get your hands a little sticky!
- Pour and Combine: Pour the melted peanut butter mixture over the dry ingredients in the large bowl.
- Mix Thoroughly: Use a spatula or wooden spoon to mix everything together until the dry ingredients are completely coated with the peanut butter mixture. This might take a little elbow grease, but it’s important to make sure everything is evenly distributed. Don’t leave any dry spots!
- Add Chocolate Chips (Optional): If you’re using chocolate chips, now’s the time to add them! Gently fold them into the mixture until they’re evenly distributed.
Pressing and Setting
Now we need to press the mixture firmly into a pan and let it set. This is crucial for creating bars that hold their shape and don’t crumble. Patience is key here!
- Prepare the Pan: Line an 8×8 inch square baking pan with parchment paper. Make sure the parchment paper overhangs the sides of the pan. This will make it easier to lift the bars out later.
- Press into Pan: Transfer the peanut butter granola mixture to the prepared pan. Use a spatula or your hands (lightly dampened) to press the mixture firmly and evenly into the pan. The firmer you press, the better the bars will hold together. I like to use the bottom of a measuring cup to really pack it down.
- Chill: Cover the pan with plastic wrap and refrigerate for at least 2 hours, or preferably overnight. This allows the bars to set completely and makes them easier to cut.
Cutting and Serving
The final step! Once the bars are chilled and firm, we can cut them into squares and enjoy. These are perfect for a quick breakfast, a midday snack, or even a healthy dessert.
- Remove from Pan: Once the bars are firm, lift them out of the pan using the parchment paper overhang.
- Cut into Bars: Place the slab of granola on a cutting board. Use a sharp knife to cut the granola into bars. You can cut them into any size you like, but I usually go for about 12-16 bars.
- Store: Store the peanut butter granola bars in an airtight container at room temperature for up to a week, or in the refrigerator for up to two weeks. They also freeze well!
Tips and Variations
Want to customize your granola bars? Here are a few ideas to get you started:
- Nut Butter Options: Feel free to substitute the peanut butter with almond butter, cashew butter, or sunflower seed butter. Each will give the bars a slightly different flavor.
- Sweetener Variations: You can use all honey or all maple syrup instead of a combination. You can also experiment with other natural sweeteners like agave nectar.
- Add-Ins: Get creative with your add-ins! Try dried cranberries, raisins, chopped dates, sunflower seeds, pumpkin seeds, or even a sprinkle of sea salt on top.
- Protein Boost: Add a scoop of protein powder to the dry ingredients for an extra boost of protein.
- Chocolate Drizzle: For an extra decadent treat, melt some chocolate and drizzle it over the top of the bars after they’ve been cut.
- Chewy vs. Crunchy: For chewier bars, use more honey or maple syrup. For crunchier bars, use more crisp rice cereal or nuts.
- Baking for Extra Crunch: For an even crunchier texture, you can bake the granola mixture in a preheated oven at 325°F (160°C) for about 10-15 minutes before pressing it into the pan. This will toast the oats and nuts, giving them a deeper flavor and a crispier texture. Just be sure to let it cool slightly before pressing.
Troubleshooting
Sometimes things don’t go exactly as planned. Here are a few common issues and how to fix them:
- Bars are too crumbly: This usually means the mixture wasn’t pressed firmly enough into the pan, or there wasn’t enough binding. Next time, press the mixture more firmly and consider adding a little more honey or maple syrup.
- Bars are too sticky: This could be due to using too much honey or maple syrup. Try reducing the amount of sweetener next time.
- Bars are too hard: This could be due to over-baking (if you chose to bake them) or using too much brown sugar. Reduce the baking time or the amount of brown sugar next time.
- Bars don’t hold their shape: Make sure you chill the bars for at least 2 hours, or preferably overnight. This allows the peanut butter mixture to set and firm up.
Nutritional Information (Approximate)
Please note that the nutritional information is an estimate and may vary depending on the specific ingredients you use.
Per bar (based on 12 bars):
- Calories: Approximately 200-250
- Protein: 5-7 grams
- Fat: 10-15 grams
- Carbohydrates: 20-25 grams
- Fiber: 2-3 grams
Enjoy your homemade Peanut Butter Granola Bars! I hope you love them as much as I do!
Conclusion:
So there you have it! These Peanut Butter Granola Bars are more than just a snack; they’re a powerhouse of flavor and energy, perfectly tailored to your busy life. I truly believe this recipe is a must-try, and here’s why: it’s incredibly easy to make, requiring minimal ingredients and effort. Forget those store-bought bars loaded with preservatives and artificial sweeteners. With this recipe, you control exactly what goes into your body, ensuring a healthy and delicious treat. Plus, the satisfying crunch and chewy texture are simply irresistible!
But the best part? The versatility! While I’ve shared my go-to version, the possibilities are endless. Feel free to experiment with different nuts and seeds. Walnuts, almonds, or even sunflower seeds would be fantastic additions. Craving a little extra sweetness? Toss in some dried cranberries, chopped dates, or even a handful of chocolate chips (dark chocolate, of course, for a healthier twist!). For a protein boost, consider adding a scoop of your favorite protein powder to the mixture before baking. And if you’re feeling adventurous, try swapping the peanut butter for almond butter, cashew butter, or even sunflower seed butter for a unique flavor profile.
Serving Suggestions and Variations:
- Enjoy them straight from the oven (after they’ve cooled, of course!) for a warm and comforting treat.
- Pack them in your lunchbox for a midday energy boost.
- Take them on hikes or bike rides for a convenient and nutritious snack.
- Crumble them over yogurt or ice cream for added texture and flavor.
- Cut them into smaller squares and serve them as bite-sized appetizers at your next gathering.
- For a vegan version, ensure your chocolate chips (if using) are dairy-free and use maple syrup or agave nectar instead of honey.
I’m confident that once you try this recipe, you’ll be hooked. It’s the perfect solution for those moments when you need a quick and healthy snack, and it’s a great way to satisfy your sweet cravings without feeling guilty. The combination of peanut butter, oats, and other wholesome ingredients creates a symphony of flavors that will tantalize your taste buds. And the best part is, you can customize it to your liking, making it truly your own.
So, what are you waiting for? Gather your ingredients, preheat your oven, and get ready to embark on a delicious baking adventure. I promise you won’t be disappointed. And once you’ve tried this recipe, I’d love to hear about your experience! Did you make any modifications? What were your favorite additions? Share your photos and comments below. Let’s create a community of Peanut Butter Granola Bar enthusiasts and inspire each other with our culinary creations. Happy baking!
I can’t wait to see what you come up with! Don’t forget to tag me in your photos on social media so I can see your amazing creations. Enjoy!
Peanut Butter Granola Bars: The Ultimate Guide & Recipe
Easy no-bake peanut butter granola bars with oats, rice cereal, coconut, and a peanut butter binding. Customizable with your favorite add-ins!
Ingredients
- 1 cup rolled oats (old-fashioned)
- 1 cup crisp rice cereal
- 1/2 cup unsweetened shredded coconut
- 1/4 cup flaxseed meal
- 1/4 cup chopped walnuts or pecans (optional)
- 1/2 cup creamy peanut butter
- 1/4 cup honey
- 1/4 cup maple syrup
- 1/4 cup packed brown sugar
- 1 teaspoon vanilla extract
- 1/4 teaspoon salt
- 1/4 cup mini chocolate chips (optional)
Instructions
- Combine Dry Ingredients: In a large bowl, add the rolled oats, crisp rice cereal, shredded coconut, flaxseed meal, and chopped nuts (if using). Stir to combine.
- Melt Peanut Butter Mixture: In a medium saucepan, combine the peanut butter, honey, maple syrup, brown sugar, vanilla extract, and salt. Place the saucepan over medium-low heat.
- Melt and Stir: Stir the mixture constantly until everything is melted and smooth (about 3-5 minutes). Be careful not to let it burn! The mixture should be bubbly around the edges.
- Simmer Briefly: Once melted, let the mixture simmer for about 1 minute, stirring constantly.
- Pour and Combine: Pour the melted peanut butter mixture over the dry ingredients in the large bowl.
- Mix Thoroughly: Use a spatula or wooden spoon to mix everything together until the dry ingredients are completely coated with the peanut butter mixture.
- Add Chocolate Chips (Optional): If you’re using chocolate chips, now’s the time to add them! Gently fold them into the mixture until they’re evenly distributed.
- Prepare the Pan: Line an 8×8 inch square baking pan with parchment paper, ensuring the paper overhangs the sides.
- Press into Pan: Transfer the peanut butter granola mixture to the prepared pan. Use a spatula or your hands (lightly dampened) to press the mixture firmly and evenly into the pan.
- Chill: Cover the pan with plastic wrap and refrigerate for at least 2 hours, or preferably overnight.
- Remove from Pan: Once the bars are firm, lift them out of the pan using the parchment paper overhang.
- Cut into Bars: Place the slab of granola on a cutting board. Use a sharp knife to cut the granola into bars (about 12-16 bars).
- Store: Store the peanut butter granola bars in an airtight container at room temperature for up to a week, or in the refrigerator for up to two weeks. They also freeze well!
Notes
- Nut Butter Options: Substitute peanut butter with almond butter, cashew butter, or sunflower seed butter.
- Sweetener Variations: Use all honey or all maple syrup instead of a combination.
- Add-Ins: Try dried cranberries, raisins, chopped dates, sunflower seeds, pumpkin seeds, or a sprinkle of sea salt on top.
- Protein Boost: Add a scoop of protein powder to the dry ingredients.
- Chocolate Drizzle: Melt chocolate and drizzle it over the top of the bars after they’ve been cut.
- Chewy vs. Crunchy: For chewier bars, use more honey or maple syrup. For crunchier bars, use more crisp rice cereal or nuts.
- Baking for Extra Crunch: For an even crunchier texture, you can bake the granola mixture in a preheated oven at 325°F (160°C) for about 10-15 minutes before pressing it into the pan. This will toast the oats and nuts, giving them a deeper flavor and a crispier texture. Just be sure to let it cool slightly before pressing.
- Bars are too crumbly: Press the mixture more firmly and consider adding a little more honey or maple syrup.
- Bars are too sticky: Reduce the amount of sweetener next time.
- Bars are too hard: Reduce the baking time or the amount of brown sugar next time.
- Bars don’t hold their shape: Make sure you chill the bars for at least 2 hours, or preferably overnight.
Leave a Comment