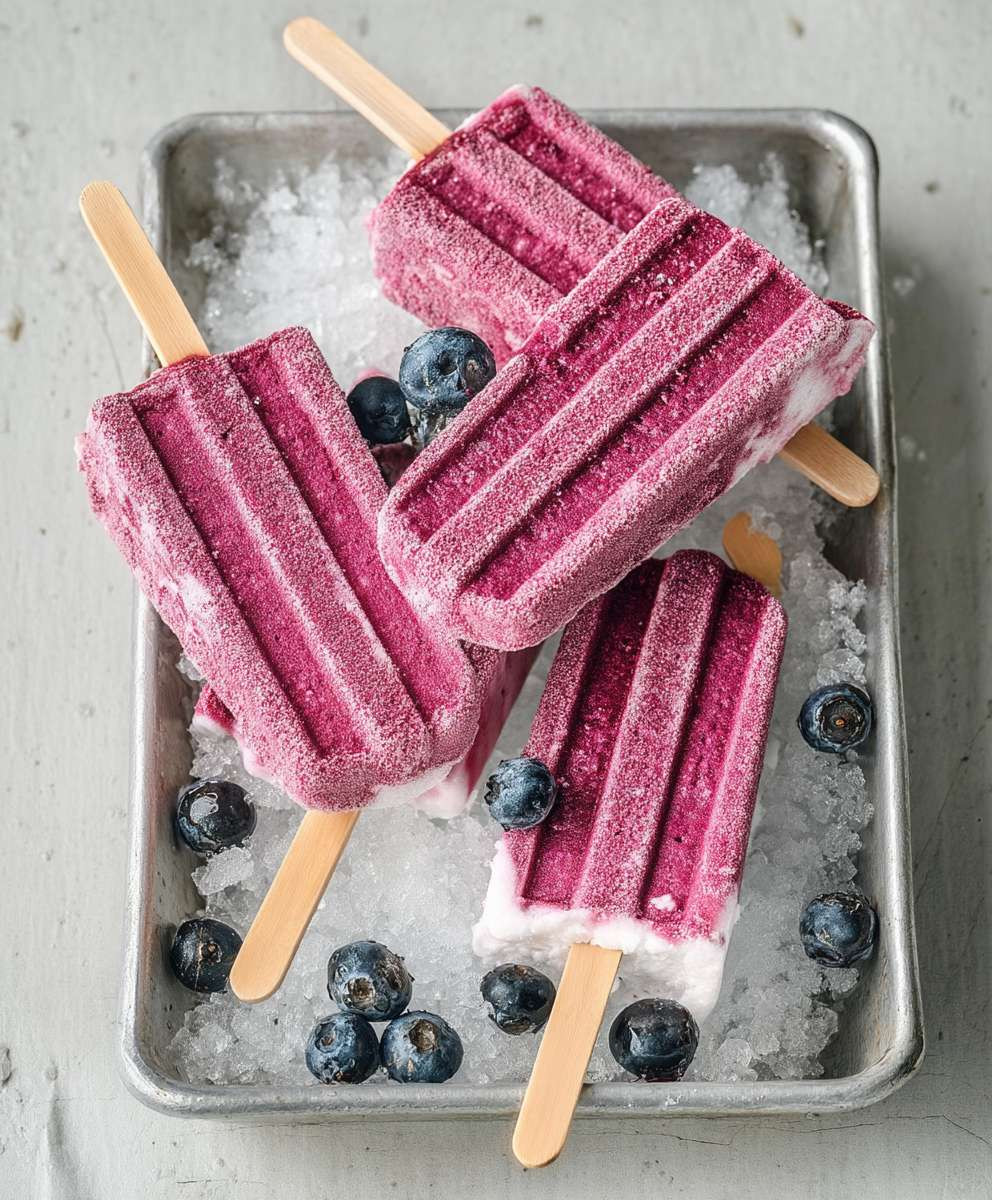
Greek Yogurt Popsicles: A Refreshing Summer Treat
Greek Yogurt Popsicles – just the name conjures up images of sun-drenched days and cool, refreshing treats. I’ve always loved popsicles, but finding healthy options that satisfy both my sweet tooth and my desire for nutritious snacks has been a challenge. That’s why I developed this recipe for Greek Yogurt Popsicles – a delightful and surprisingly simple way to enjoy a guilt-free frozen dessert.
While popsicles might seem like a modern invention, the concept of frozen treats dates back centuries. Ancient civilizations enjoyed various forms of frozen desserts, often using fruit and snow or ice. The modern popsicle, however, is a relatively recent innovation, and its evolution has led to countless variations. But few can rival the creamy texture and subtle tang of a homemade Greek Yogurt Popsicle.
What makes these popsicles so special? It’s the perfect blend of creamy Greek yogurt, bursting with the sweetness of your favorite fruits and a hint of honey or maple syrup. The texture is unbelievably smooth and refreshing, a welcome escape from the summer heat. They’re also incredibly convenient – perfect for a quick and healthy snack, a delightful dessert, or even a fun activity for the kids. Plus, they’re packed with protein, making them a satisfying and nutritious choice compared to many store-bought alternatives.
So, are you ready to embark on this delicious journey with me? Let’s dive into the recipe and create these amazing Greek Yogurt Popsicles together!

Ingredients:
- 2 cups plain Greek yogurt (full-fat recommended for creamier texture)
- 1/2 cup honey or maple syrup (adjust to your sweetness preference)
- 1 teaspoon vanilla extract
- 1/4 cup milk (any kind works, but whole milk adds richness)
- Pinch of salt
- Optional mix-ins: 1/2 cup fresh or frozen berries (strawberries, blueberries, raspberries), 1/4 cup chopped nuts (almonds, pecans, walnuts), 1/4 cup granola, 1 tablespoon cocoa powder (for chocolate popsicles), zest of 1 lemon or orange
Preparing the Yogurt Base:
- In a medium-sized bowl, I combine the Greek yogurt, honey (or maple syrup), vanilla extract, milk, and salt. Make sure your honey or maple syrup is well-mixed to avoid pockets of sweetness.
- I whisk everything together until it’s completely smooth and creamy. This is crucial for a consistent texture in your popsicles. Take your time and ensure there are no lumps of yogurt remaining.
- Now, it’s time to get creative! If you’re using any mix-ins, this is where I gently fold them into the yogurt mixture. Be careful not to overmix, as this can bruise the berries or make the mixture too watery.
- Once your mix-ins are incorporated, I give the mixture one last gentle stir to ensure everything is evenly distributed. Avoid over-mixing, as this can lead to a less creamy final product.
Pouring into Molds:
- I carefully pour the yogurt mixture into your popsicle molds. I usually fill them about ¾ full to allow for expansion during freezing. If you’re using reusable popsicle molds, make sure they are clean and dry.
- If you’re using disposable popsicle molds, ensure they are sturdy enough to hold the mixture without leaking. I’ve found that some cheaper molds can be prone to leaking, so it’s worth investing in a good quality set.
- Once the molds are filled, I insert the popsicle sticks, making sure they are firmly seated in the center of each mold. This prevents them from falling out during freezing.
Freezing Process & Storage:
- I place the filled popsicle molds in the freezer. The freezing time will depend on your freezer and the type of molds you are using. Generally, it takes at least 4-6 hours, but ideally, I leave them overnight (8-12 hours) for a completely solid popsicle.
- After the designated freezing time, I check to see if the popsicles are completely frozen. They should be firm to the touch. If they’re still slightly soft, I leave them in the freezer for a bit longer.
- Once frozen solid, I carefully remove the popsicles from the molds. If you’re using reusable molds, running them under warm water for a few seconds can help release the popsicles more easily. For disposable molds, I gently twist and pull.
- I store the popsicles in a freezer-safe container or bag. This helps to prevent freezer burn and keeps them fresh for longer. Proper storage is key to maintaining the quality and taste of your homemade popsicles.
Tips and Variations:
- For a smoother texture, I strain the yogurt mixture through a fine-mesh sieve before adding the mix-ins. This removes any lumps and creates a silkier consistency.
- Feel free to experiment with different flavor combinations! Try adding a pinch of cinnamon, cardamom, or nutmeg for a warm spice flavor. You can also incorporate different extracts like almond or peppermint.
- If you want a more intense flavor, you can use Greek yogurt with added flavorings, such as vanilla bean or lemon. Just remember to adjust the amount of sweetener accordingly.
- For a healthier option, you can reduce the amount of honey or maple syrup and add a touch of stevia or another natural sweetener.
- To make layered popsicles, I freeze the first layer for a couple of hours before adding another layer of a different flavor. This creates a visually appealing and delicious treat.
- If you don’t have popsicle molds, you can use small paper cups or even ice cube trays. Just be sure to insert a popsicle stick or a small wooden skewer before freezing.
- For a fun twist, try using different types of milk, such as coconut milk or almond milk, to create unique flavor profiles.
- Remember to always supervise children when they are eating popsicles, especially those with nuts or other potential choking hazards.
Conclusion:
So there you have it – my recipe for incredibly refreshing and healthy Greek Yogurt Popsicles! I truly believe this recipe is a must-try for several reasons. First, it’s incredibly easy. The simplicity of the ingredients and the straightforward instructions make it perfect for even the busiest weeknights, or a fun weekend activity with the kids. Second, it’s incredibly customizable. The base recipe is delicious on its own, but the possibilities for flavor combinations are endless. You can really let your creativity shine here!
Third, and perhaps most importantly, these popsicles are unbelievably healthy. Packed with protein from the Greek yogurt, they’re a guilt-free treat that satisfies your sweet tooth without the sugar crash. They’re a fantastic alternative to store-bought popsicles, which are often loaded with artificial ingredients and excessive sugar. Using Greek yogurt as the base gives them a naturally creamy texture that’s far superior to many other frozen treats.
Serving Suggestions & Variations:
These Greek Yogurt Popsicles are delightful on their own, but they’re even better with a few additions. For a truly decadent experience, consider drizzling a little honey or maple syrup over them before serving. A sprinkle of chopped nuts, like pistachios or almonds, adds a delightful crunch and extra nutritional value. A few fresh berries, like raspberries or blueberries, nestled into the mold before freezing, create a beautiful and flavorful swirl.
Feeling adventurous? Try these variations:
- Tropical Twist: Blend in some mango puree, pineapple chunks, and a squeeze of lime juice for a vibrant tropical flavor.
- Chocolate Delight: Stir in some cocoa powder and a touch of melted dark chocolate for a rich and decadent chocolate popsicle.
- Berry Blast: Use a mix of your favorite berries – strawberries, raspberries, blueberries – for a vibrant and fruity popsicle.
- Coffee Kick: Add a tablespoon or two of strong brewed coffee for a sophisticated adult treat. A touch of vanilla extract complements the coffee beautifully.
- Peanut Butter Power: Mix in some creamy peanut butter for a protein-packed and satisfying snack.
The beauty of this recipe is that you can truly tailor it to your own preferences and what you have on hand. Don’t be afraid to experiment with different fruits, extracts, and sweeteners to create your own signature flavor combinations.
Share Your Creations!
I’d love to see your creations! Once you’ve tried this recipe, please share your photos and feedback on social media using the hashtag #GreekYogurtPopsicles. I’m always excited to see what delicious variations my readers come up with. Let me know what your favorite flavor combination is – I might even feature it on my blog!
Ready to Make Your Own?
Don’t wait! Grab your ingredients and get started on these incredibly delicious and healthy Greek Yogurt Popsicles. They’re the perfect summer treat, a healthy snack for kids, or a refreshing dessert for any occasion. You won’t regret it! I guarantee these will become a staple in your freezer. Happy popsicle making!
Greek Yogurt Popsicles: A Refreshing Summer Treat
Refreshing and creamy Greek yogurt popsicles, easily customizable with your favorite mix-ins. A healthy and delicious summer treat!
Ingredients
- 2 cups plain Greek yogurt (full-fat recommended)
- 1/2 cup honey or maple syrup (adjust to taste)
- 1 teaspoon vanilla extract
- 1/4 cup milk (whole milk recommended)
- Pinch of salt
- 1/2 cup fresh or frozen berries (strawberries, blueberries, raspberries)
- 1/4 cup chopped nuts (almonds, pecans, walnuts)
- 1/4 cup granola
- 1 tablespoon cocoa powder (for chocolate popsicles)
- Zest of 1 lemon or orange
Instructions
- In a medium bowl, combine Greek yogurt, honey (or maple syrup), vanilla extract, milk, and salt. Ensure honey/maple syrup is well-mixed.
- Whisk until completely smooth and creamy. No yogurt lumps should remain.
- Gently fold in any desired mix-ins. Avoid overmixing.
- Stir gently to ensure even distribution. Avoid overmixing.
- Pour yogurt mixture into popsicle molds, filling about ¾ full.
- Insert popsicle sticks firmly into the center of each mold.
- Ensure molds are sturdy enough to prevent leaking.
- Freeze for at least 4-6 hours, or ideally 8-12 hours, until completely solid.
- Check for firmness; freeze longer if needed.
- Remove popsicles from molds (running under warm water may help with reusable molds).
- Store in a freezer-safe container or bag to prevent freezer burn.
Notes
- For a smoother texture, strain the yogurt mixture through a fine-mesh sieve before adding mix-ins.
- Experiment with different flavor combinations (cinnamon, cardamom, nutmeg, almond or peppermint extract).
- Adjust sweetener amount if using flavored yogurt or alternative sweeteners.
- For layered popsicles, freeze one layer before adding another.
- Alternative containers: small paper cups or ice cube trays with sticks.
- Always supervise children when eating popsicles, especially those with potential choking hazards.
Leave a Comment