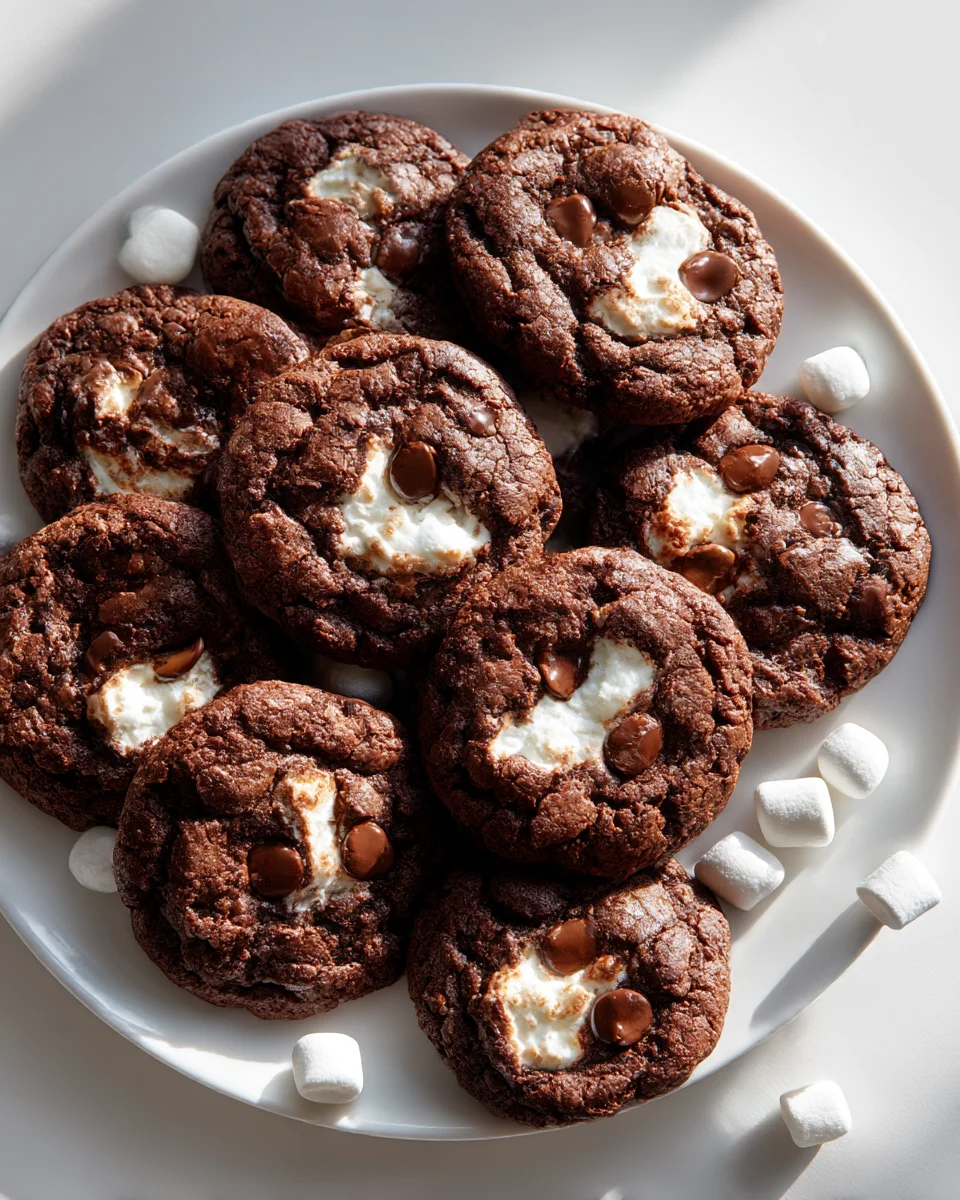
Marshmallow Chocolate Cookies
Oh my goodness, get ready for a dessert experience that’s going to make your taste buds sing! I’m so excited to share my recipe for these incredible Marshmallow Chocolate Cookies because they’re truly something special. What makes them stand out from every other chocolate chip cookie out there, you ask? It’s that magical, gooey center! Imagine a rich, chewy chocolate cookie, bursting with chocolate chips, and then – bam! – a pocket of perfectly melted, stretchy marshmallow, toasted just so. It’s like a campfire s’more met its sophisticated cookie cousin and decided to make the most delicious baby ever. You’ll absolutely love these because they’re the ultimate comfort food, easy enough for a weeknight treat, but impressive enough for any gathering. Every bite offers that delightful contrast of crisp edges, soft cookie, and warm, melting marshmallow, making them utterly irresistible. Get ready to bake up a batch of pure joy!

Ingredient Notes
Crafting the perfect batch of Marshmallow Chocolate Cookies really starts with understanding your ingredients. While it might seem like a straightforward cookie, each component plays a crucial role in achieving that delightfully chewy, gooey, and chocolatey experience we’re aiming for.
Butter: I always recommend using unsalted butter for baking. This allows you to control the exact amount of salt in your recipe. Make sure it’s softened to room temperature – not melted, not cold – so it creams beautifully with the sugars, creating a light and airy base for our dough. If you only have salted butter, you can use it but reduce the added salt in the recipe by about a quarter teaspoon.
Sugars: My recipe often calls for a combination of both granulated sugar and brown sugar. The granulated sugar contributes to that crisp edge and overall sweetness, while the brown sugar (especially light brown sugar) adds moisture, chewiness, and a lovely subtle molasses flavor. This duo is essential for the classic cookie texture we love. Dark brown sugar will give an even deeper molasses note and more chew if you prefer that.
Eggs: Large eggs, at room temperature, are best. They act as a binder, provide structure, and add richness. Room temperature eggs emulsify better with the butter and sugar, leading to a smoother, more uniform dough.
Flour: All-purpose flour is your go-to here. I usually don’t recommend substituting other flours unless you’re experienced in adjusting for different protein contents and hydration needs. If you need a gluten-free option, a good quality 1:1 gluten-free baking blend that contains xanthan gum should work well, though the texture might be slightly different.
Cocoa Powder: This is where the chocolate heart of our cookie comes from, beyond the chips! I prefer unsweetened natural cocoa powder for a deep, rich chocolate flavor without being overly sweet. Dutch-processed cocoa powder can also be used; it’s less acidic and creates a darker, sometimes milder chocolate flavor. Either works, but natural cocoa is what I typically use.
Baking Soda & Salt: Baking soda helps our cookies rise and spread, giving them that perfect soft texture. The salt, often overlooked, is a flavor enhancer – it balances the sweetness and brings out the chocolate notes beautifully. Don’t skip it!
Chocolate Chips/Chunks: For the ultimate chocolate experience, I like to use a mix of chocolate. Semi-sweet chocolate chips are classic, but consider adding some milk chocolate chips for extra sweetness or even some chopped dark chocolate for a more intense flavor. A combination provides wonderful textural and flavor complexity. High-quality chocolate makes a noticeable difference, so invest in good chocolate if you can!
Marshmallows: This is the star ingredient! Mini marshmallows are absolutely perfect because they melt beautifully into gooey pockets without overwhelming the cookie or burning too quickly. If you only have large marshmallows, you can snip them into smaller pieces with kitchen shears (lightly greasing the shears helps). I find that adding them towards the end of baking is key to getting that lovely gooey center without them disappearing completely or turning into a burnt, sticky mess.
Step-by-Step Instructions
Alright, let’s get baking! Follow these steps carefully, and you’ll be enjoying warm, gooey Marshmallow Chocolate Cookies in no time.
- Prepare Your Workspace: Preheat your oven to 375°F (190°C). Line two large baking sheets with parchment paper or silicone baking mats. This is crucial for preventing sticking and making cleanup a breeze, especially with those melty marshmallows.
- Cream Butter and Sugars: In a large mixing bowl, using an electric mixer (handheld or stand mixer fitted with the paddle attachment), beat the softened unsalted butter, granulated sugar, and brown sugar together on medium speed until the mixture is light, fluffy, and pale in color. This usually takes about 2-3 minutes. Scrape down the sides of the bowl as needed to ensure everything is well combined.
- Add Eggs and Vanilla: Beat in the eggs, one at a time, mixing well after each addition until fully incorporated. Once both eggs are mixed in, stir in the vanilla extract. The mixture should look smooth and creamy.
- Combine Dry Ingredients: In a separate medium bowl, whisk together the all-purpose flour, cocoa powder, baking soda, and salt. Make sure there are no lumps of cocoa powder. This ensures even distribution throughout the dough.
- Combine Wet and Dry: Gradually add the dry ingredients to the wet ingredients, mixing on low speed until just combined. Be careful not to overmix the dough, as this can lead to tough cookies. Mix only until no streaks of flour remain.
- Fold in Chocolate Chips: Gently fold in your chosen chocolate chips or chunks by hand with a spatula. You want them distributed throughout the dough, but avoid crushing them.
- Chill the Dough (Optional but Recommended): For best results, cover the bowl with plastic wrap and chill the dough in the refrigerator for at least 30 minutes, or up to 2 hours. Chilling helps prevent the cookies from spreading too much and intensifies the flavors. If you’re in a rush, you can skip this, but I highly recommend it!
- Scoop the Dough: Drop rounded tablespoons or use a 1.5-inch cookie scoop to place dough balls onto your prepared baking sheets, leaving about 2 inches between each cookie. This allows for proper spreading.
- Bake the Cookies (Initial Bake): Place the baking sheets in the preheated oven and bake for 8-9 minutes. The edges should be set, but the centers will still look soft and slightly underbaked. This is important for the marshmallow addition.
- Add Marshmallows: Carefully remove the baking sheets from the oven. Quickly place 3-4 mini marshmallows on top of each partially baked cookie. Gently press them down a little.
- Finish Baking: Return the cookies to the oven and continue baking for another 2-4 minutes, or until the marshmallows are puffed, lightly golden, and gooey, and the cookie edges are set. Keep a close eye on them, as marshmallows can burn quickly.
- Cool and Enjoy: Remove the baking sheets from the oven. Let the cookies cool on the baking sheets for 5-10 minutes before transferring them to a wire rack to cool completely. The marshmallows will be extremely hot and sticky, so resist the urge to move them too soon!
Tips & Suggestions
Achieving cookie perfection, especially with the unique challenge of marshmallows, often comes down to a few key tricks. Here are my top tips for making your Marshmallow Chocolate Cookies truly irresistible:
- Don’t Overbake! This is my number one rule for soft, chewy cookies. Remember, cookies continue to cook for a few minutes after they come out of the oven. For these cookies, you want the edges to be set, but the centers should still look slightly underbaked when you pull them out for the marshmallow step. The final bake is just to toast the marshmallows and finish setting the cookie.
- The Marshmallow Moment: Timing is everything for the marshmallows. Adding them too early means they’ll likely melt into the cookie and disappear completely, or worse, burn before the cookie is done. Adding them halfway through (after 8-9 minutes) ensures they get nice and gooey and slightly toasted without becoming crunchy or too dark.
- Room Temperature Ingredients are Key: I can’t stress this enough! Softened butter, room temperature eggs – they all emulsify better, creating a smoother, more consistent dough that bakes evenly. Plan ahead and take them out of the fridge an hour or two before you start.
- Chill Your Dough: While optional, chilling the dough for at least 30 minutes (or even longer) works wonders. It helps the flavors meld, makes the dough easier to handle, and, most importantly, prevents the cookies from spreading too much, resulting in thicker, chewier cookies.
- Quality Chocolate Matters: Since chocolate is a main flavor, using good quality chocolate chips or chopped chocolate will elevate your cookies significantly. Experiment with different types – semi-sweet, dark, milk chocolate, or a combination – to find your perfect balance.
- Cookie Size Consistency: Use a cookie scoop to ensure all your cookies are the same size. This guarantees even baking and a consistent look for your batch.
- Don’t Crowd the Pan: Leave enough space between cookies on the baking sheet. They will spread, and if they’re too close, they’ll merge into one giant cookie. Aim for at least 2 inches.
- Sea Salt Flakes (Optional but Recommended): A tiny sprinkle of flaky sea salt on top of the warm, just-baked cookies (after the marshmallows are set) can truly enhance the chocolate flavor and add a sophisticated touch. The saltiness beautifully contrasts the sweetness.
- Watch Your Oven: Every oven is different. Get to know yours! If your cookies are browning too quickly on the bottom, you might want to try using a double baking sheet or moving the rack up a notch.
Storage
Once you’ve baked these delightful Marshmallow Chocolate Cookies, you’ll want to make sure they stay fresh and delicious for as long as possible. Here’s how I recommend storing them:
At Room Temperature:
- Airtight Container: The best way to store baked Marshmallow Chocolate Cookies is in an airtight container at room temperature. This prevents them from drying out.
- Separator: If you’re stacking them, you might want to place a piece of parchment paper between layers, especially if the marshmallows are still slightly sticky.
- Shelf Life: They are best enjoyed within 2-3 days. While they will still be good after that, the marshmallows tend to firm up a bit, losing some of their initial gooeyness. A quick zap in the microwave can revive them!
In the Refrigerator:
- I generally don’t recommend refrigerating baked cookies unless absolutely necessary, as it can dry them out faster. If you must, place them in an airtight container. They’ll last up to 5 days, but the texture might be firmer. Again, warming them up will help.
Freezing Baked Cookies:
- Flash Freeze: If you want to store them for longer, you can freeze the baked cookies. Place them on a baking sheet in a single layer and flash freeze them for about an hour until solid. This prevents them from sticking together.
- Airtight Bag/Container: Once frozen, transfer the cookies to a freezer-safe airtight container or heavy-duty freezer bag. They can be stored for up to 2-3 months.
- Thawing: To enjoy, simply let them thaw at room temperature for an hour or so, or gently warm them in the microwave for 10-20 seconds for that fresh-baked, gooey marshmallow experience.
Freezing Cookie Dough:
- This is a fantastic option for having fresh cookies on demand!
- Scoop and Freeze: Scoop the cookie dough into individual balls (without the marshmallows yet) and place them on a parchment-lined baking sheet.
- Flash Freeze: Freeze the dough balls until solid, about 1-2 hours.
- Store: Transfer the frozen dough balls to a freezer-safe airtight container or freezer bag. They will keep for up to 3 months.
- Baking from Frozen: When you’re ready to bake, place the frozen dough balls on a prepared baking sheet. You might need to add an extra 2-4 minutes to the initial baking time before adding the marshmallows, but no need to thaw them first!
Enjoy your Marshmallow Chocolate Cookies!
Final Thoughts
Well, there you have it! My absolute favorite way to combine two classic treats. These Marshmallow Chocolate Cookies aren’t just any cookie; they’re an experience waiting to happen. The way the marshmallows transform into a perfectly gooey, slightly caramelized topping, melting beautifully into the rich, chocolatey base, creates a texture and flavor explosion that’s truly irresistible. I promise you, once you try these Marshmallow Chocolate Cookies, you’ll understand why they’re such a must-try. They’re perfect for bringing smiles, for a cozy night in, or simply when you need a little moment of pure, sweet joy. Go ahead, bake a batch, and let yourself indulge in this wonderfully delicious creation!
Best Marshmallow Chocolate Cookies – Gooey, Soft Recipe
Get ready for a dessert experience with these incredible Marshmallow Chocolate Cookies! With a rich, chewy chocolate cookie and a gooey marshmallow center, they are the ultimate comfort food.
- Prep Time: 15 mins
- Cook Time: 15 mins
- Total Time: 30 minutes
- Yield: 24 cookies 1x
- Category: Dessert
- Method: Baking
- Cuisine: American
Ingredients
- 1 cup unsalted butter, softened
- 3/4 cup granulated sugar
- 3/4 cup brown sugar (light or dark)
- 2 large eggs, at room temperature
- 1 teaspoon vanilla extract
- 2 cups all-purpose flour
- 3/4 cup unsweetened cocoa powder
- 1 teaspoon baking soda
- 1/2 teaspoon salt
- 1 cup semi-sweet chocolate chips
- 1 cup milk chocolate chips (optional)
- 1 cup chopped dark chocolate (optional)
- 1 1/2 cups mini marshmallows
Instructions
- Preheat your oven to 375°F (190°C). Line two large baking sheets with parchment paper or silicone baking mats.
- In a large mixing bowl, using an electric mixer, beat the softened unsalted butter, granulated sugar, and brown sugar together on medium speed until light, fluffy, and pale in color, about 2-3 minutes.
- Beat in the eggs, one at a time, mixing well after each addition. Stir in the vanilla extract until the mixture is smooth and creamy.
- In a separate medium bowl, whisk together the all-purpose flour, cocoa powder, baking soda, and salt until there are no lumps.
- Gradually add the dry ingredients to the wet ingredients, mixing on low speed until just combined.
- Gently fold in your chosen chocolate chips or chunks by hand with a spatula.
- For best results, cover the bowl with plastic wrap and chill the dough in the refrigerator for at least 30 minutes.
- Drop rounded tablespoons or use a 1.5-inch cookie scoop to place dough balls onto your prepared baking sheets, leaving about 2 inches between each cookie.
- Bake for 8-9 minutes, until the edges are set but the centers look soft.
- Carefully remove the baking sheets from the oven and quickly place 3-4 mini marshmallows on top of each partially baked cookie, gently pressing them down.
- Return the cookies to the oven and continue baking for another 2-4 minutes, until the marshmallows are puffed, lightly golden, and gooey.
- Remove the baking sheets from the oven and let the cookies cool on the sheets for 5-10 minutes before transferring them to a wire rack to cool completely.
Nutrition
- Serving Size: 1 cookie
- Calories: 150
- Sugar: 10 g
- Sodium: 100 mg
- Fat: 7 g
- Saturated Fat: 4 g
- Unsaturated Fat: 2 g
- Trans Fat: 0 g
- Carbohydrates: 20 g
- Fiber: 1 g
- Protein: 2 g
- Cholesterol: 25 mg
Keywords: Don't overbake! The cookies will continue to cook after being removed from the oven. Use room temperature ingredients for better emulsification, and consider chilling the dough for thicker, chewier cookies.


Leave a Comment