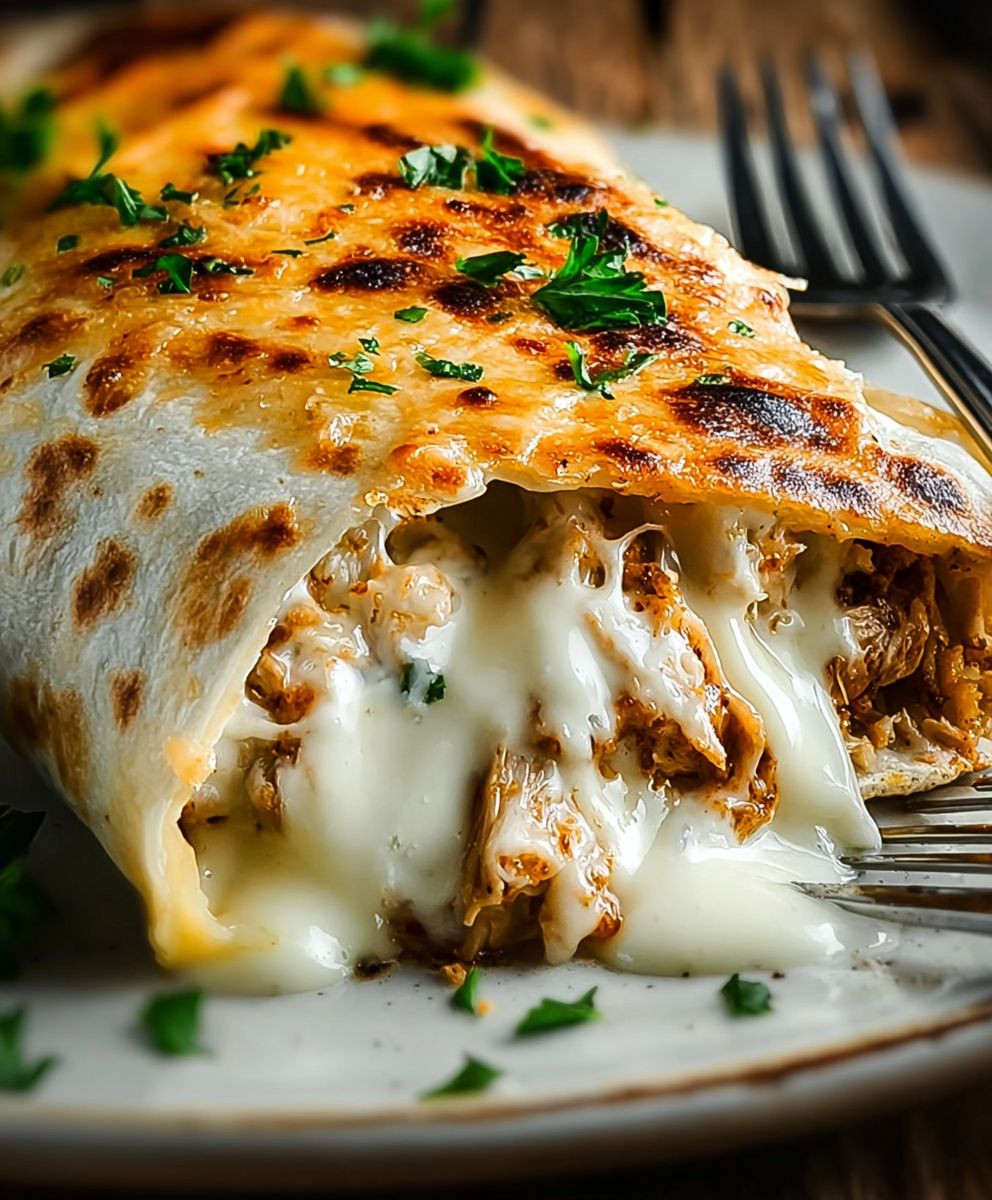
Cheesy Garlic Chicken Wraps: Prepare to be amazed by this incredibly flavorful and satisfying meal that’s ready in minutes! Imagine tender, juicy chicken bursting with garlic and smothered in melted cheese, all nestled in a warm, soft tortilla. Sounds divine, right?
While the exact origins of chicken wraps are somewhat modern, the concept of wrapping savory fillings in flatbreads has ancient roots across various cultures. From Middle Eastern shawarma to Mexican burritos, the idea of portable, delicious meals wrapped in bread is a timeless culinary tradition. Our Cheesy Garlic Chicken Wraps take inspiration from these global favorites, adding a uniquely cheesy and garlicky twist that’s simply irresistible.
What makes these wraps so beloved? It’s the perfect combination of flavors and textures. The savory garlic chicken, the gooey melted cheese, and the soft tortilla create a symphony of deliciousness in every bite. Plus, they are incredibly convenient! Whether you’re looking for a quick weeknight dinner, a satisfying lunch on the go, or a crowd-pleasing appetizer, these Cheesy Garlic Chicken Wraps are always a winner. They are easy to customize with your favorite toppings and sauces, making them a versatile option for any palate. Get ready to experience a flavor explosion that will leave you craving more!

Ingredients:
- 1.5 lbs boneless, skinless chicken breasts, cut into 1-inch cubes
- 1 tablespoon olive oil
- 2 cloves garlic, minced
- 1 teaspoon Italian seasoning
- 1/2 teaspoon paprika
- 1/4 teaspoon red pepper flakes (optional, for a little heat)
- Salt and pepper to taste
- 8 large flour tortillas (burrito size)
- 1 cup shredded mozzarella cheese
- 1/2 cup shredded cheddar cheese
- 1/4 cup grated Parmesan cheese
- 1/4 cup butter, melted
- 2 cloves garlic, minced (for garlic butter)
- 1 tablespoon chopped fresh parsley (for garnish)
- Optional toppings: sour cream, salsa, guacamole, chopped tomatoes, shredded lettuce
Preparing the Chicken:
Alright, let’s get started with the heart of our wraps – the chicken! This is where we build the flavor, so pay attention to the details.
- Prepare the Chicken: First, take your chicken breasts and cut them into bite-sized cubes, about 1-inch in size. This ensures they cook evenly and are easy to eat in the wraps.
- Season the Chicken: In a medium bowl, combine the cubed chicken with olive oil, minced garlic, Italian seasoning, paprika, red pepper flakes (if you’re using them), salt, and pepper. Make sure the chicken is evenly coated with the spices. I like to use my hands to really massage the flavors in there!
- Cook the Chicken: Heat a large skillet over medium-high heat. Once the skillet is hot, add the seasoned chicken. Cook for about 6-8 minutes, or until the chicken is cooked through and no longer pink inside. Be sure to stir occasionally to prevent burning and ensure even cooking. Use a meat thermometer to confirm the internal temperature reaches 165°F (74°C).
- Set Aside: Once the chicken is cooked, remove it from the skillet and set it aside in a bowl. We’ll need it later for assembling the wraps.
Making the Garlic Butter:
Now, let’s whip up some delicious garlic butter. This is what takes these wraps from good to absolutely amazing!
- Melt the Butter: In a small bowl, melt the butter. You can do this in the microwave in 30-second intervals, or in a small saucepan over low heat. Just be careful not to burn it!
- Add Garlic: Once the butter is melted, add the minced garlic. Stir well to combine. The heat from the butter will infuse the garlic flavor beautifully.
- Set Aside: Set the garlic butter aside. We’ll use it to brush the wraps before baking.
Assembling the Wraps:
This is where the magic happens! Get ready to assemble your cheesy, garlicky chicken wraps.
- Warm the Tortillas: Lightly warm the tortillas in a dry skillet or microwave for a few seconds. This makes them more pliable and easier to roll without tearing.
- Add Cheese: Lay a tortilla flat on a clean surface. Sprinkle a generous amount of mozzarella cheese, cheddar cheese, and Parmesan cheese in the center of the tortilla. Don’t overfill it, or it will be difficult to roll.
- Add Chicken: Top the cheese with a portion of the cooked chicken. Again, be careful not to overfill.
- Roll the Wrap: Fold in the sides of the tortilla, then tightly roll it up from the bottom. Make sure to tuck in the filling as you roll to keep everything secure.
- Repeat: Repeat steps 2-4 with the remaining tortillas, cheese, and chicken.
Baking the Wraps:
Time to bake these beauties and get that cheese nice and melty!
- Preheat Oven: Preheat your oven to 375°F (190°C).
- Prepare Baking Sheet: Line a baking sheet with parchment paper. This will prevent the wraps from sticking and make cleanup a breeze.
- Place Wraps on Baking Sheet: Arrange the assembled wraps on the prepared baking sheet, seam-side down. This will help them stay closed during baking.
- Brush with Garlic Butter: Generously brush the tops of the wraps with the garlic butter. This will give them a beautiful golden color and incredible flavor.
- Bake: Bake for 10-12 minutes, or until the wraps are golden brown and the cheese is melted and bubbly. Keep an eye on them to prevent burning.
Serving and Enjoying:
The moment we’ve all been waiting for! Let’s serve up these delicious cheesy garlic chicken wraps.
- Garnish: Remove the wraps from the oven and sprinkle with chopped fresh parsley.
- Cut and Serve: Let the wraps cool slightly before cutting them in half. This will prevent the filling from spilling out.
- Add Toppings (Optional): Serve with your favorite toppings, such as sour cream, salsa, guacamole, chopped tomatoes, or shredded lettuce.
- Enjoy! Dig in and enjoy your cheesy garlic chicken wraps! They’re perfect for a quick and easy weeknight meal, a party appetizer, or even a lunchbox treat.
Tips and Variations:
Want to customize these wraps to your liking? Here are a few ideas:
- Spice it Up: Add more red pepper flakes or a dash of hot sauce to the chicken for extra heat.
- Add Veggies: Include some chopped bell peppers, onions, or mushrooms in the chicken mixture for added nutrients and flavor.
- Use Different Cheese: Experiment with different types of cheese, such as pepper jack, Monterey Jack, or provolone.
- Make it Vegetarian: Substitute the chicken with black beans, refried beans, or grilled vegetables for a vegetarian option.
- Grill the Wraps: Instead of baking, you can grill the wraps for a smoky flavor. Grill over medium heat for 2-3 minutes per side, or until golden brown and the cheese is melted.
- Air Fry the Wraps: For a quicker cooking time, air fry the wraps at 375°F (190°C) for 6-8 minutes, flipping halfway through.
Storage Instructions:
Got leftovers? Here’s how to store them:
- Refrigerate: Store leftover wraps in an airtight container in the refrigerator for up to 3 days.
- Reheat: Reheat the wraps in the oven, microwave, or skillet until heated through.
- Freeze: For longer storage, wrap the individual wraps tightly in plastic wrap and then place them in a freezer bag. Freeze for up to 2 months. Thaw in the refrigerator before reheating.
Nutritional Information (Approximate):
Please note that the nutritional information is an estimate and may vary depending on the specific ingredients and portion sizes used.
- Calories: Approximately 450-550 per wrap
- Protein: 30-40 grams
- Fat: 20-30 grams
- Carbohydrates: 40-50 grams
Why This Recipe Works:
This recipe is a winner for several reasons:
- Flavorful Chicken: The combination of Italian seasoning, paprika, and garlic creates a delicious and aromatic chicken filling.
- Cheesy Goodness: The blend of mozzarella, cheddar, and Parmesan cheese provides a rich and satisfying cheesy flavor.
- Garlic Butter Magic: The garlic butter adds a touch of richness and enhances the overall flavor of the wraps.
- Easy to Customize: This recipe is highly adaptable, allowing you to customize it to your liking with different toppings, cheeses, and vegetables.
- Quick and Easy: These wraps are quick and easy to make, making them perfect for busy weeknights.
Serving Suggestions:
These cheesy garlic chicken wraps are delicious on their own, but here are a few serving suggestions to elevate your meal:
- Side Salad: Serve with a fresh side salad for a light and refreshing complement.
- Chips and Salsa: Pair with tortilla chips and your favorite salsa for a classic Mexican-inspired meal.
- Guacamole: Add a dollop of guacamole for a creamy and flavorful topping.
- Sour Cream: Serve with a side of sour cream for dipping.
- Rice and Beans: Make it a complete meal by serving with rice and beans.
Conclusion:
And there you have it! These Cheesy Garlic Chicken Wraps are more than just a quick lunch; they’re a flavor explosion waiting to happen. I truly believe this recipe is a must-try because it perfectly balances ease of preparation with incredible taste. Forget boring sandwiches – these wraps are packed with juicy, garlicky chicken, melty cheese, and all nestled in a warm, comforting tortilla. What’s not to love?
Why is this recipe a game-changer? Because it’s incredibly versatile! You can easily adapt it to your own preferences and dietary needs. Short on time? Use pre-cooked rotisserie chicken to cut down on prep. Want to add some veggies? Sliced bell peppers, onions, or spinach would be fantastic additions. Craving a little heat? A dash of red pepper flakes or a drizzle of hot sauce will do the trick. The possibilities are truly endless!
Beyond the basic recipe, consider these serving suggestions to elevate your Cheesy Garlic Chicken Wraps experience:
* Make it a meal: Serve these wraps with a side of crispy sweet potato fries, a fresh garden salad, or a creamy coleslaw.
* Spice it up: Add a dollop of sour cream or Greek yogurt for a cool and tangy contrast to the rich flavors.
* Get creative with the cheese: Experiment with different types of cheese! Pepper jack for a spicy kick, provolone for a mild and creamy flavor, or even a sprinkle of parmesan for a salty bite.
* Wrap it up differently: While flour tortillas are my go-to, you can also use whole wheat tortillas for a healthier option, or even lettuce wraps for a low-carb alternative.
* Grill them for extra flavor: After assembling the wraps, grill them for a few minutes on each side until golden brown and the cheese is melted and gooey. This adds a delicious smoky flavor and a satisfying crunch.
I’ve poured my heart into perfecting this recipe, and I’m confident that you’ll love it as much as I do. It’s the perfect solution for busy weeknights, quick lunches, or even a fun and interactive party snack. Imagine serving a platter of these Cheesy Garlic Chicken Wraps at your next gathering – your guests will be raving about them!
But don’t just take my word for it – I encourage you to try this recipe yourself! I’m so excited to hear about your culinary adventures and see how you make these wraps your own. Did you add any special ingredients? Did you try a different type of cheese? Did you serve them with a unique side dish?
Please, please, please share your experience in the comments below! I’m eager to learn from you and see your creative variations. Your feedback is invaluable, and it helps me continue to improve and create even more delicious recipes for you to enjoy. So go ahead, give these Cheesy Garlic Chicken Wraps a try – you won’t regret it! Happy cooking!
Cheesy Garlic Chicken Wraps: The Ultimate Recipe You'll Love
Flavorful chicken, melted cheese, and garlic butter combine in these easy, customizable wraps. Perfect for a quick weeknight meal!
Ingredients
- 1.5 lbs boneless, skinless chicken breasts, cut into 1-inch cubes
- 1 tablespoon olive oil
- 2 cloves garlic, minced
- 1 teaspoon Italian seasoning
- 1/2 teaspoon paprika
- 1/4 teaspoon red pepper flakes (optional, for a little heat)
- Salt and pepper to taste
- 8 large flour tortillas (burrito size)
- 1 cup shredded mozzarella cheese
- 1/2 cup shredded cheddar cheese
- 1/4 cup grated Parmesan cheese
- 1/4 cup butter, melted
- 2 cloves garlic, minced (for garlic butter)
- 1 tablespoon chopped fresh parsley (for garnish)
- Optional toppings: sour cream, salsa, guacamole, chopped tomatoes, shredded lettuce
Instructions
- Cut chicken into 1-inch cubes. In a bowl, combine chicken with olive oil, minced garlic, Italian seasoning, paprika, red pepper flakes (if using), salt, and pepper. Mix well.
- Heat a large skillet over medium-high heat. Add seasoned chicken and cook for 6-8 minutes, or until cooked through (internal temperature reaches 165°F/74°C). Stir occasionally. Remove from skillet and set aside.
- In a small bowl, melt butter. Add minced garlic and stir well. Set aside.
- Warm tortillas lightly. Lay a tortilla flat and sprinkle with mozzarella, cheddar, and Parmesan cheese. Top with cooked chicken. Fold in the sides of the tortilla, then tightly roll it up from the bottom. Repeat with remaining ingredients.
- Preheat oven to 375°F (190°C). Line a baking sheet with parchment paper. Place assembled wraps on the baking sheet, seam-side down. Brush the tops of the wraps generously with garlic butter.
- Bake for 10-12 minutes, or until golden brown and the cheese is melted and bubbly.
- Remove from oven and sprinkle with chopped fresh parsley. Let cool slightly before cutting in half. Serve with optional toppings like sour cream, salsa, guacamole, chopped tomatoes, or shredded lettuce.
Notes
- Spice it Up: Add more red pepper flakes or hot sauce to the chicken for extra heat.
- Add Veggies: Include chopped bell peppers, onions, or mushrooms in the chicken mixture.
- Use Different Cheese: Experiment with pepper jack, Monterey Jack, or provolone.
- Make it Vegetarian: Substitute chicken with black beans, refried beans, or grilled vegetables.
- Grill the Wraps: Grill over medium heat for 2-3 minutes per side instead of baking.
- Air Fry the Wraps: Air fry at 375°F (190°C) for 6-8 minutes, flipping halfway through.
- Storage: Store leftover wraps in an airtight container in the refrigerator for up to 3 days. Freeze for up to 2 months.


Leave a Comment