Dandelion Jelly Filled Hand Pies
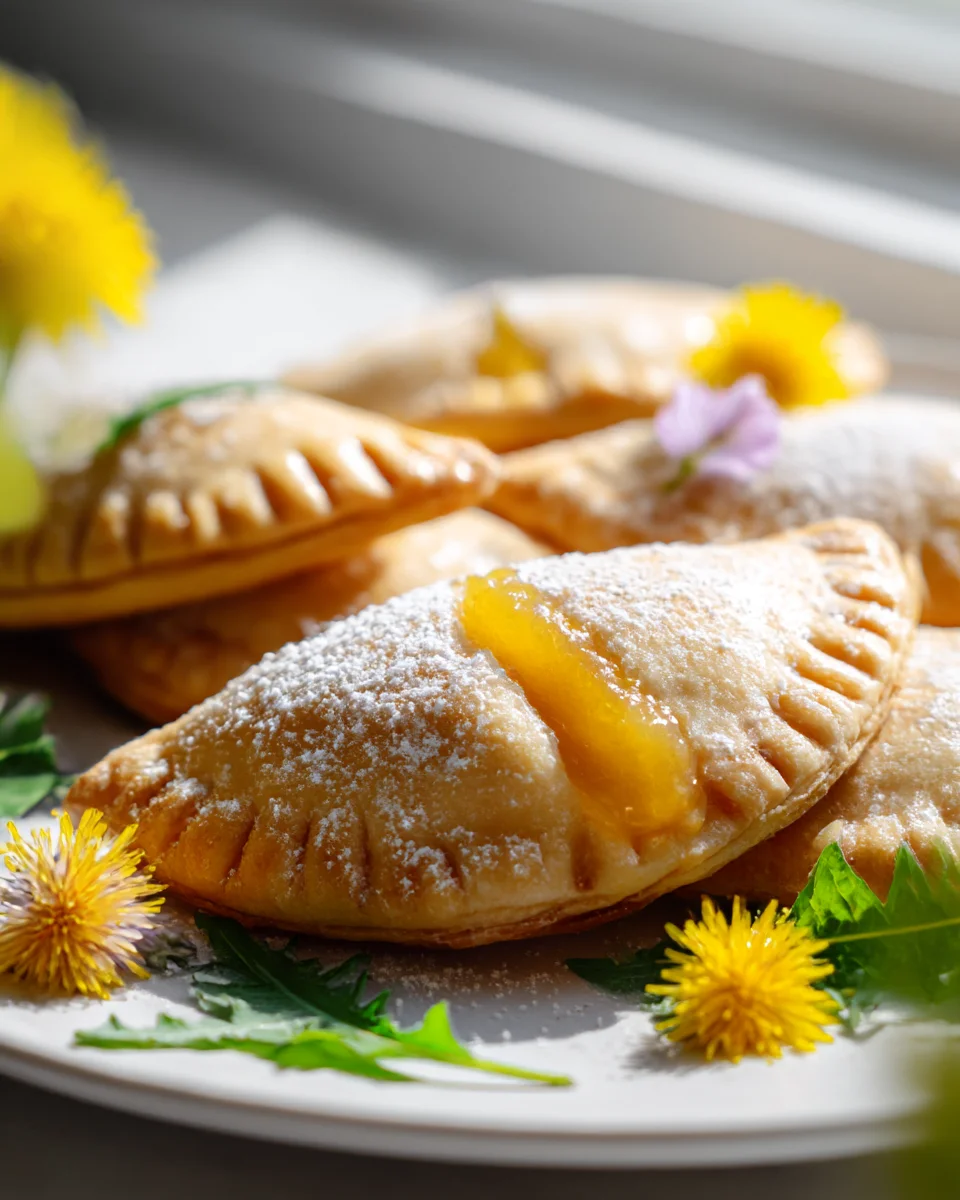
Oh, my goodness, are you ready to embark on a truly delightful culinary adventure? I am so excited to share these Dandelion Jelly Filled Hand Pies with you! What makes this recipe so incredibly special, you ask? Well, we’re taking those cheerful, sun-kissed dandelions that grace our spring lawns and transforming them into a subtly sweet, vibrantly floral jelly – a taste of pure sunshine, bottled! Then, we lovingly tuck that unique, golden jelly into perfectly portioned, flaky, buttery pastry pockets.
You are absolutely going to adore these hand pies because they offer an unexpected burst of springtime joy in every bite. Imagine a delicate, golden crust giving way to a wonderfully sweet and slightly herbaceous filling that’s unlike anything you’ve ever tried. It’s a little bit whimsical, a lot comforting, and utterly charming. These Dandelion Jelly Filled Hand Pies are individual parcels of pure bliss, perfect for a picnic, a special brunch, or simply as a lovely afternoon treat that celebrates the overlooked beauty of nature. They’re easy to hold, incredibly satisfying, and sure to impress anyone lucky enough to try one!

Ingredient Notes
Making Dandelion Jelly Filled Hand Pies truly celebrates spring, bringing a little sunshine to your plate! While the star ingredient, dandelion jelly, might sound unique, it creates a wonderfully delicate and floral filling that you simply won’t find anywhere else. Here’s a rundown of the key ingredients I rely on for these delightful treats, along with some helpful notes and substitutions.
- Dandelion Jelly: This is, of course, the heart and soul of our hand pies. Its sweet, honey-like, and slightly grassy flavor is truly enchanting. I highly recommend making your own dandelion jelly if you have access to chemical-free dandelions; it’s a rewarding process! If homemade isn’t an option, you can sometimes find artisanal dandelion jelly at farmers’ markets or specialty food stores. If you absolutely cannot source it, a light, floral jam or jelly like elderflower, honey jelly, or even a very good quality apple jelly could be a distant substitute, but know that the unique magic of dandelion will be missed.
- Pie Dough: For hand pies, I find a really good, flaky pie dough is non-negotiable. You can absolutely use your favorite homemade all-butter pie crust recipe – it truly makes a difference in flavor and texture. If you’re short on time, don’t hesitate to use a good quality store-bought pie crust, often found in the refrigerated section. Look for brands that list butter or a combination of butter and vegetable shortening as primary fats, as these tend to bake up flakier. For a gluten-free option, ensure your store-bought dough is certified gluten-free, or adapt your favorite gluten-free pie crust recipe.
- All-Purpose Flour: Essential for rolling out your pie dough to prevent sticking. Always keep a little extra on hand for dusting your work surface and rolling pin. If you’re using a gluten-free dough, use a gluten-free all-purpose blend for dusting.
- Unsalted Butter: If you’re making your own pie dough, unsalted butter is key for controlling the salt content and achieving that rich, flaky texture. If you only have salted butter, simply reduce the amount of added salt in your dough recipe slightly. For a vegan option, use a high-quality plant-based butter substitute specifically designed for baking; look for ones that are firm when cold.
- Granulated Sugar: A little sugar in the dough helps with browning and tenderness. We’ll also use a sprinkle of turbinado or granulated sugar on top of the pies before baking for a lovely crunch and sparkle.
- Salt: Just a pinch to enhance the flavors in the dough.
- Ice Water: Crucial for bringing your pie dough together without developing too much gluten, ensuring a tender, flaky crust.
- Egg: Whisked with a little water or milk, an egg wash gives our hand pies that beautiful golden-brown, glossy finish. For an egg-free alternative, you can brush the pies with milk (dairy or non-dairy), a little melted butter (or plant-based butter), or a mixture of plant-based milk and maple syrup.
Step-by-Step Instructions
Crafting these Dandelion Jelly Filled Hand Pies is a joyful process, and I promise you, the results are worth every step. Here’s how I bring these sunny treats to life in my kitchen:
- Prepare Your Dough: If you’re making homemade pie dough, ensure it’s well-chilled for at least 30 minutes (or according to your recipe’s instructions). If using store-bought dough, let it sit at room temperature for about 10-15 minutes before unrolling, just enough to make it pliable without getting sticky.
- Roll and Cut: Lightly flour your work surface. Roll out your pie dough to about 1/8-inch thickness. Now, for the fun part! Using a 3-4 inch round or square cookie cutter (or even a sharp knife for squares), cut out your pie shapes. I usually aim for an even number so I have a top and bottom for each hand pie. Gather the scraps, gently re-roll them, and cut out more shapes until you’ve used most of the dough.
- Fill the Pies: Place half of your cut-out dough shapes on a parchment-lined baking sheet. Spoon about 1-1.5 teaspoons of dandelion jelly into the center of each dough shape. Be careful not to overfill, as this can lead to messy leaks during baking. You want a good dollop, but with plenty of space around the edges for sealing.
- Seal Them Up: For the remaining half of your dough shapes, use a small paring knife or a toothpick to cut a few small slits in the center of each – this allows steam to escape while baking and prevents your pies from bursting. Carefully place these vented dough tops over the jelly-filled bottoms.
- Crimping and Sealing: Gently press the edges of the top and bottom dough together. Then, use the tines of a fork to crimp all around the edges, creating a decorative seal and ensuring the jelly stays put. A good seal is crucial!
- The Egg Wash & Sugar Sprinkle: In a small bowl, whisk together your egg with a teaspoon of water or milk to create an egg wash. Lightly brush the tops of each hand pie with this mixture. This will give them that gorgeous golden sheen. Immediately sprinkle a little coarse turbinado sugar (or granulated sugar) over the tops for added crunch and sparkle.
- Chill (Optional but Recommended): If your kitchen is warm or if you find your dough getting a bit soft, I recommend chilling the assembled hand pies in the refrigerator for 15-20 minutes before baking. This helps the butter in the dough firm up, contributing to a flakier crust.
- Preheat Oven & Bake: Preheat your oven to 375°F (190°C). Bake the hand pies for 18-25 minutes, or until the crust is beautifully golden brown and the jelly is bubbly and set. Baking times can vary depending on your oven and the size of your hand pies, so keep an eye on them.
- Cool: Once baked, transfer the hand pies to a wire rack and let them cool completely. I know, it’s hard to wait, but allowing them to cool lets the jelly set properly and prevents burns!
Tips & Suggestions
Having made countless batches of these Dandelion Jelly Filled Hand Pies, I’ve picked up a few tricks along the way that I’d love to share. These tips will help ensure your hand pies turn out perfectly flaky, golden, and utterly delicious every single time!
- Keep Your Dough Cold: This is probably the most crucial tip for flaky pastry. Work quickly when handling the dough, and if it starts to get soft or sticky, pop it back into the fridge for 10-15 minutes. Cold butter creates steam in the oven, which leads to those lovely flaky layers.
- Don’t Overfill: It’s tempting to load up on that gorgeous dandelion jelly, but too much filling is the number one cause of leaky hand pies. Stick to the recommended amount (1-1.5 teaspoons) to ensure a good seal.
- Seal Thoroughly: When crimping the edges with a fork, press down firmly to create a tight seal. This prevents the jelly from oozing out during baking, which can lead to burnt bottoms and a sticky mess. If you’re worried, you can even brush a tiny bit of water around the edges of the bottom crust before placing the top on, just to help it adhere.
- Ventilation is Key: Don’t forget to cut a few small slits in the top crust of each hand pie. These vents allow steam to escape, preventing the pies from puffing up excessively and bursting open as they bake.
- Get Creative with Shapes: While rounds and squares are classic, feel free to experiment with other cookie cutter shapes! Hearts, stars, or even mini rectangles can make these hand pies extra special and fun, especially if you’re serving them for a brunch or a spring gathering.
- Serving Suggestions: These hand pies are absolutely divine on their own, but if you want to elevate the experience, I love serving them slightly warm with a scoop of vanilla bean ice cream or a dollop of freshly whipped cream. They also make a fantastic addition to a picnic basket or a brunch spread.
- Make Your Jelly Ahead: If you’re making your own dandelion jelly, prepare it well in advance. Having the jelly ready to go makes the hand pie assembly much quicker and less stressful.
- Consider a Glaze: For an extra touch of sweetness and shine, once cooled, you could drizzle your hand pies with a simple powdered sugar glaze (powdered sugar mixed with a tiny bit of milk or lemon juice).
Storage
Once you’ve baked a batch of these beautiful Dandelion Jelly Filled Hand Pies, you’ll want to make sure they stay fresh and delicious. Here’s how I typically store mine:
- Room Temperature: Fully cooled hand pies can be stored in an airtight container at room temperature for up to 2-3 days. While they’re perfectly fine, I find the crust is at its flakiest on the first day.
- Refrigeration: If you want to extend their freshness, especially in warmer climates or if your filling is particularly moist, you can store them in an airtight container in the refrigerator for up to 5 days.
- Freezing: These hand pies freeze beautifully! Once completely cooled, arrange them in a single layer on a baking sheet and freeze until solid (about 1-2 hours). Then, transfer them to a freezer-safe bag or container, separating layers with parchment paper to prevent sticking. They will keep well in the freezer for up to 2-3 months.
- Reheating: From room temperature, you can gently warm them in a preheated oven at 300°F (150°C) for about 5-10 minutes, or until just warmed through. If reheating from frozen, you can bake them directly from the freezer at the same temperature for 15-20 minutes, or until heated through and the crust is crisp again. Avoid microwaving, as it can make the crust soggy.
Final Thoughts
And there you have it! I truly hope you’re excited to try your hand at making these delightful Dandelion Jelly Filled Hand Pies. There’s something so incredibly satisfying about turning a cheerful spring blossom into a sweet, golden jelly, then encasing it in a flaky, portable pastry. It’s a taste of sunshine, a little piece of nature’s bounty transformed into a comforting treat that’s perfect for picnics, an afternoon snack, or even a unique dessert.
These Dandelion Jelly Filled Hand Pies aren’t just a recipe; they’re an experience, connecting you to the natural world in a delicious way. The gentle floral notes of the dandelion jelly perfectly complement the rich, buttery crust, creating a flavor profile that is truly one-of-a-kind. I promise, once you take that first bite into the warm, gooey center, you’ll understand why these humble blossoms deserve a place of honor in your kitchen. So go on, gather your ingredients, and let the magic unfold. Happy baking!
Dandelion Jelly Hand Pies: Sweet & Unique Spring Treat!

Embark on a delightful culinary adventure with these Dandelion Jelly Filled Hand Pies, featuring a subtly sweet, floral jelly tucked into flaky pastry pockets. Perfect for a picnic or a lovely afternoon treat, these hand pies celebrate the beauty of spring.
- Prep Time: 30 mins
- Cook Time: 25 mins
- Total Time: 55 minutes
- Yield: 12 hand pies
- Category: Dessert
- Method: Baking
- Cuisine: American
Ingredients
- Dandelion Jelly
- Pie Dough
- All-Purpose Flour
- Unsalted Butter
- Granulated Sugar
- Salt
- Ice Water
- Egg
Instructions
- Prepare Your Dough: If you’re making homemade pie dough, ensure it’s well-chilled for at least 30 minutes. If using store-bought dough, let it sit at room temperature for about 10-15 minutes before unrolling.
- Roll and Cut: Lightly flour your work surface. Roll out your pie dough to about 1/8-inch thickness. Cut out your pie shapes using a 3-4 inch round or square cookie cutter.
- Fill the Pies: Place half of your cut-out dough shapes on a parchment-lined baking sheet. Spoon about 1-1.5 teaspoons of dandelion jelly into the center of each dough shape.
- Seal Them Up: For the remaining half of your dough shapes, cut a few small slits in the center of each to allow steam to escape. Place these vented dough tops over the jelly-filled bottoms.
- Crimping and Sealing: Gently press the edges of the top and bottom dough together. Use the tines of a fork to crimp all around the edges.
- The Egg Wash & Sugar Sprinkle: In a small bowl, whisk together your egg with a teaspoon of water or milk. Brush the tops of each hand pie with this mixture and sprinkle a little coarse sugar over the tops.
- Chill (Optional but Recommended): Chill the assembled hand pies in the refrigerator for 15-20 minutes before baking.
- Preheat Oven & Bake: Preheat your oven to 375°F (190°C). Bake the hand pies for 18-25 minutes, or until the crust is golden brown.
- Cool: Transfer the hand pies to a wire rack and let them cool completely.
Nutrition
- Serving Size: 1 hand pie
- Calories: 200
- Sugar: 10 g
- Sodium: 150 mg
- Fat: 10 g
- Saturated Fat: 5 g
- Unsaturated Fat: 4 g
- Trans Fat: 0 g
- Carbohydrates: 25 g
- Fiber: 1 g
- Protein: 2 g
- Cholesterol: 30 mg
Keywords: Keep your dough cold for flaky pastry, don't overfill the pies, and ensure a thorough seal to prevent leaks. Experiment with shapes and serve with ice cream or whipped cream for an elevated experience.


Leave a Comment