Pumpkin Pie Twists offer a delightful reinterpretation of a beloved autumnal classic, promising all the comforting flavors of fall in a wonderfully convenient, handheld form. I remember growing up, the aroma of a baking pumpkin pie was the true signal that the holiday season was upon us, a tradition deeply embedded in American culture since early colonial times, especially synonymous with Thanksgiving feasts. However, sometimes the thought of preparing an entire pie can be a little daunting, or perhaps you’re simply looking for a novel way to enjoy those iconic tastes. This is precisely where these incredible Pumpkin Pie Twists shine!
People adore this dish for its ingenious blend of flaky, buttery pastry and the warm, spiced notes of pumpkin pie filling. It’s the perfect harmony of textures – a crisp exterior giving way to a soft, flavorful center – making each bite an absolute joy. They’re not only incredibly delicious but also remarkably simple to make, often using store-bought puff pastry to dramatically cut down on preparation time. Whether you’re serving them at a festive gathering, enjoying a cozy afternoon treat with a cup of coffee, or simply craving that unmistakable taste of pumpkin pie without the commitment of a full dessert, I am confident these twists will become a cherished new tradition in your home.

Ingredients:
-
For the Pumpkin Pie Filling:
- 1 (15-ounce) can pure pumpkin puree (not pumpkin pie filling) – I always opt for pure pumpkin for the best, most authentic flavor in our Pumpkin Pie Twists.
- ½ cup granulated sugar – For that essential sweetness.
- ¼ cup packed light brown sugar – Adds a wonderful depth and molasses note.
- 1 teaspoon ground cinnamon – The heart of pumpkin pie spice!
- ½ teaspoon ground nutmeg – Offers a warm, slightly sweet aroma.
- ½ teaspoon ground ginger – A touch of zing to brighten the flavor.
- ¼ teaspoon ground cloves – Just a hint for that classic, cozy feeling.
- ¼ teaspoon salt – Crucial for balancing all those sweet and warm spices.
- 1 large egg yolk – Acts as a binder and helps achieve a richer texture.
- 1 tablespoon unsalted butter, melted – Adds a touch of richness to the filling, making our Pumpkin Pie Twists even more decadent.
-
For the Pastry and Assembly:
- 2 sheets (one 17.3-ounce package) frozen puff pastry, thawed – This is our secret weapon for incredibly flaky Pumpkin Pie Twists. Make sure it’s fully thawed but still cold.
- 1 large egg, whisked with 1 tablespoon water (for egg wash) – This gives our twists a beautiful golden-brown sheen.
- 2 tablespoons turbinado sugar (or coarse sugar), for sprinkling – Adds a lovely crunch and sparkle.
-
For the Vanilla Glaze:
- 1 cup powdered sugar – The base for our sweet drizzle.
- 2-3 tablespoons milk (dairy or non-dairy, your preference) – To achieve the perfect drizzling consistency.
- ½ teaspoon pure vanilla extract – Essential for a classic, aromatic glaze.
Phase 1: Preparing the Pumpkin Pie Filling for our Twists
This is where the magic begins, creating that luscious, spiced center that defines our incredible Pumpkin Pie Twists. It’s a straightforward process, but paying attention to detail here will ensure your twists are bursting with flavor.
- Gather Your Spices and Pumpkin: First things first, I like to get all my ingredients laid out. It makes the whole process smoother! In a medium-sized bowl, I combine the entire can of pure pumpkin puree. It’s important to use pure pumpkin, not the pre-spiced pumpkin pie filling, as we’re building our own custom flavor profile here.
- Sweeten and Spice: Next, I add the granulated sugar and the packed light brown sugar to the pumpkin. The combination of these two sugars creates a balanced sweetness and a lovely depth of flavor. Now for the stars of the show: the spices! I carefully measure in the ground cinnamon, ground nutmeg, ground ginger, ground cloves, and that all-important pinch of salt. The salt really helps to elevate and balance the sweetness and warmth of the other ingredients, preventing the filling from tasting flat. Don’t skip it!
- Mix Until Homogeneous: With a sturdy whisk or a rubber spatula, I thoroughly mix all these ingredients together. My goal here is a perfectly smooth, uniform mixture with no visible lumps of sugar or spices. I make sure to scrape down the sides of the bowl to incorporate everything fully. This usually takes a good 2-3 minutes of steady mixing. The aroma at this stage is absolutely heavenly, hinting at the delicious Pumpkin Pie Twists to come!
- Add the Egg Yolk and Melted Butter: Once the pumpkin and spices are beautifully blended, I crack open an egg and carefully separate the yolk, discarding or saving the white for another recipe. I add the single egg yolk to the pumpkin mixture. The egg yolk acts as a binder, helping the filling set up nicely when baked, and also adds a touch of richness. Then, I drizzle in the melted unsalted butter. I give it another good stir, ensuring the egg yolk and butter are completely incorporated into the pumpkin mixture.
- Taste and Adjust (Optional but Recommended!): This is one of my favorite steps! I like to taste a tiny bit of the raw filling at this point (just a little, remember it has raw egg yolk, so don’t go overboard). If I feel it needs a little more spice, or perhaps a touch more sweetness, now is the time to adjust. Maybe another tiny pinch of cinnamon, or a whisper more brown sugar. This ensures the filling for our Pumpkin Pie Twists is absolutely perfect for your palate.
- Chill the Filling: Once the filling is mixed to perfection, I cover the bowl with plastic wrap and pop it into the refrigerator. Allowing the filling to chill for at least 30 minutes, or even longer, helps the flavors meld together beautifully and also slightly thickens the mixture, making it easier to spread onto the puff pastry later. This is a crucial step for the best Pumpkin Pie Twists!
Phase 2: Assembling Your Delicious Pumpkin Pie Twists
This phase is all about turning simple puff pastry and our glorious pumpkin filling into those beautiful, enticing twists. Precision and a light touch are key to achieving flaky, well-defined Pumpkin Pie Twists.
- Preheat Oven and Prep Baking Sheets: While the filling is chilling, I preheat my oven to 400°F (200°C). This ensures the oven is at the correct temperature when the twists are ready to go in, promoting a perfect puff. I also line two large baking sheets with parchment paper. This prevents sticking and makes cleanup a breeze.
- Prepare the Egg Wash: In a small bowl, I whisk together the large egg and 1 tablespoon of water until well combined. This is our egg wash, which will give the Pumpkin Pie Twists that irresistible golden-brown shine.
- Unroll and Prepare Puff Pastry: Now for the puff pastry! I carefully unroll one sheet of thawed puff pastry onto a lightly floured surface or directly onto a piece of parchment paper. If the pastry seems a little stiff from the fridge, I let it sit for another minute or two until it’s pliable but still cold. I gently roll it out just enough to smooth out any creases and ensure it’s an even rectangle, usually to about a 10×12-inch dimension. It’s important not to overwork the pastry, as we want to preserve those delicate layers.
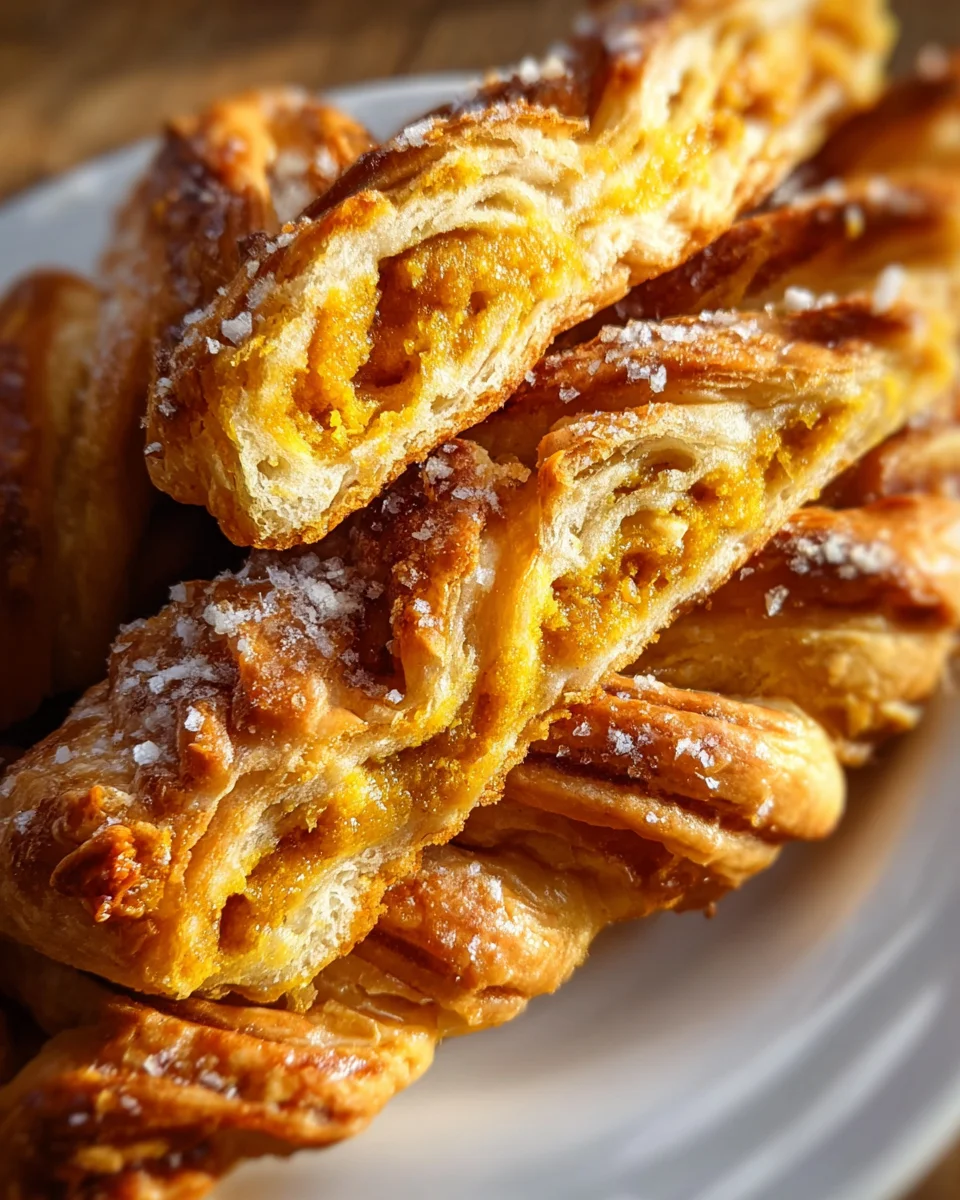
- Spread the Pumpkin Filling: With a spatula or the back of a spoon, I spread half of the chilled pumpkin pie filling evenly over the entire surface of the puff pastry, leaving a small border (about ½ inch) along one of the longer edges. This border will help seal the twist later. I make sure the layer of filling isn’t too thick, about ¼ inch, otherwise, it can ooze out during baking. This beautiful orange canvas is the heart of our Pumpkin Pie Twists!
- Top with Second Pastry Sheet: Carefully, I unroll the second sheet of puff pastry and place it directly on top of the pumpkin filling, aligning the edges as best as I can. I gently press down on the top sheet of pastry, especially along the edges, to adhere it to the filling. A very light touch with a rolling pin can help to lightly seal the layers together and ensure the filling is evenly distributed between them.
- Trim and Cut into Strips: Using a sharp knife or a pizza cutter (which I find works wonderfully here), I trim any uneven edges to create a neat rectangle. Then, I cut the large rectangle lengthwise into strips, each about ¾ to 1 inch wide. The exact width doesn’t matter as much as consistency; try to make them all roughly the same size for even baking. For a 10×12-inch pastry, this usually yields about 10-12 strips. These strips are about to become our amazing Pumpkin Pie Twists!
-
Twist the Strips: This is the fun part! I carefully pick up one pastry strip. Holding one end, I gently twist the strip several times, usually about 3-4 twists, to create that signature spiral shape. The key is to twist firmly enough to hold the shape, but not so tightly that you tear the pastry or squeeze out the filling.
Tip for Twisting:
For perfectly formed Pumpkin Pie Twists, I find it easiest to hold one end of the strip steady with one hand while twisting the other end with my dominant hand. You can also lay the strip on your work surface, hold one end, and twist the other end, then carefully pick it up.
- Arrange on Baking Sheets: As each strip is twisted, I carefully place it onto one of the prepared baking sheets, leaving about 1 to 2 inches of space between each twist to allow for expansion during baking. I don’t want them touching, as this will prevent them from becoming beautifully golden and flaky all around.
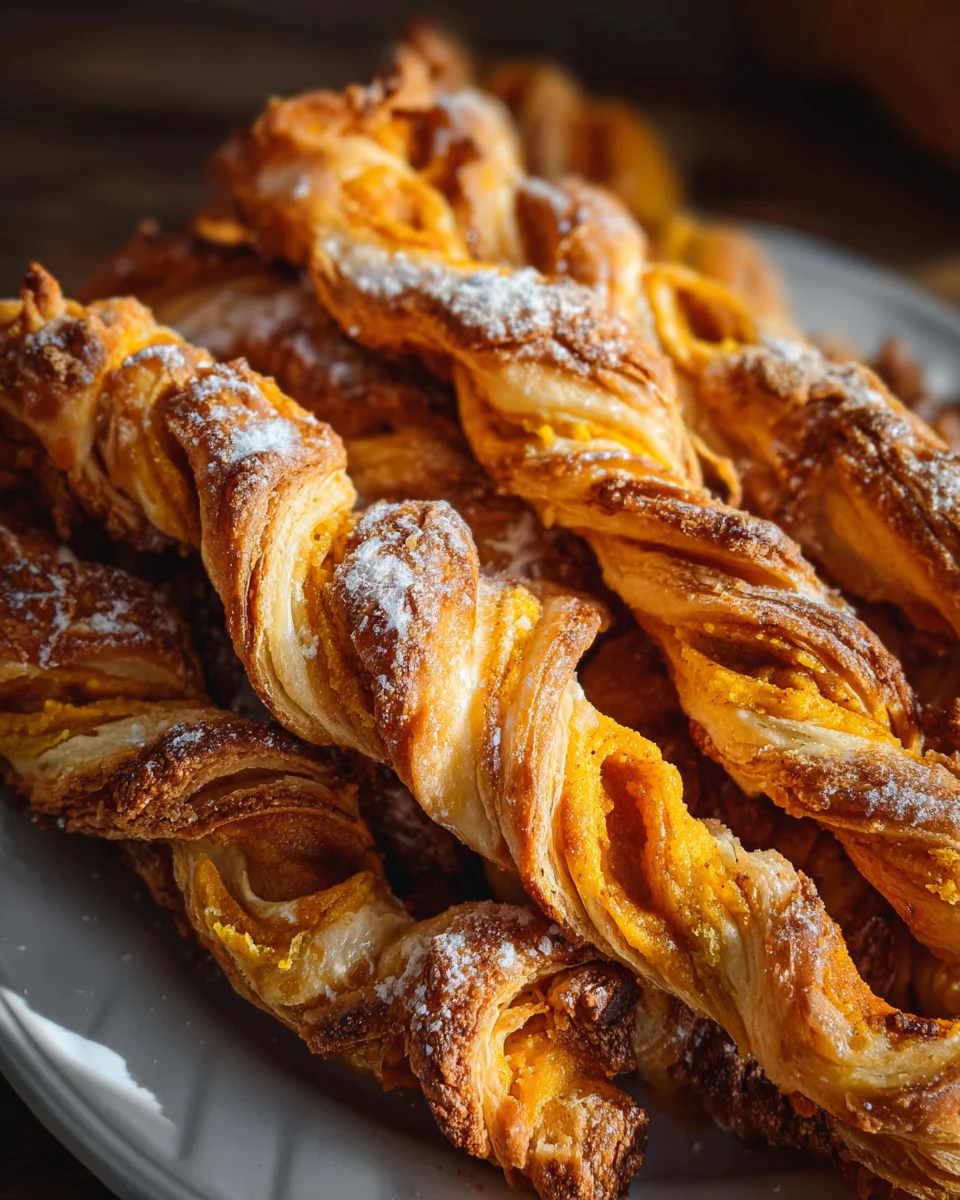
- Egg Wash and Sugar Sprinkle: Once all the Pumpkin Pie Twists are arranged, I generously brush the tops and sides of each twist with the egg wash. This will give them a lovely sheen and help the turbinado sugar adhere. Immediately after the egg wash, I sprinkle the tops of the twists with turbinado sugar. This adds a delightful crunch and sparkle, making them even more visually appealing.
- Quick Chill (Optional, but Recommended): If I have the space, I like to pop the baking sheets with the prepared Pumpkin Pie Twists into the freezer for about 10-15 minutes, or the refrigerator for 20-30 minutes. This helps to firm up the pastry and the filling, which can lead to a flakier texture and better-defined twists when baked. It’s a small step that makes a noticeable difference.
Phase 3: Baking the Perfect Pumpkin Pie Twists
Baking is where the magic truly happens, transforming our prepared strips into golden, flaky Pumpkin Pie Twists. A properly preheated oven and careful monitoring are essential for success.
-
Bake Until Golden: I carefully transfer the baking sheets to the preheated 400°F (200°C) oven. I typically bake one sheet at a time, or rotate them halfway through if both sheets fit comfortably without overcrowding the oven. The twists will need to bake for 18-25 minutes.
What to Look For During Baking:
During this time, I keep a close eye on them. The puff pastry will beautifully puff up, creating wonderful layers. The pumpkin filling will become fragrant, and the twists will turn a gorgeous golden brown. The turbinado sugar on top will caramelize slightly, adding to their irresistible appearance. I aim for a deep golden color; pale twists often mean they aren’t fully cooked through and won’t be as crisp.
- Rotate Baking Sheets: If I’m baking two sheets at once, I make sure to rotate them halfway through the baking time (after about 10-12 minutes). I switch their positions from top to bottom rack and front to back. This ensures even baking across all the Pumpkin Pie Twists and prevents some from over-browning while others are still pale.
- Cool on a Rack: Once the Pumpkin Pie Twists are beautifully golden and puffed, I carefully remove the baking sheets from the oven. I immediately transfer the hot twists to a wire cooling rack. It’s important to cool them on a rack to allow air circulation all around, which helps prevent the bottoms from becoming soggy and keeps them wonderfully crisp. They will be quite delicate when hot, so I use a wide spatula for this step.
- Allow to Cool Completely (or mostly): While it’s tempting to dive right into these warm, aromatic Pumpkin Pie Twists, I recommend letting them cool for at least 15-20 minutes, or even completely, before glazing. This allows the filling to set up further and prevents the glaze from melting too quickly and running off. Plus, the flavors deepen a bit as they cool.
Phase 4: Crafting the Sweet Glaze and Finishing Touches for your Pumpkin Pie Twists
The final flourish! A simple vanilla glaze adds a touch of sweetness and an elegant finish, making our Pumpkin Pie Twists utterly irresistible.
- Prepare the Vanilla Glaze: While the Pumpkin Pie Twists are cooling, I prepare the simple vanilla glaze. In a small bowl, I combine the powdered sugar, starting with 2 tablespoons of milk, and the pure vanilla extract.
-
Whisk Until Smooth: I whisk these ingredients together vigorously until a smooth, pourable glaze forms. The consistency is key here. I’m looking for a glaze that is thick enough to coat the back of a spoon but thin enough to drizzle beautifully. If it’s too thick, I add a tiny bit more milk, about ½ teaspoon at a time, until I reach the desired consistency. If by chance it becomes too thin, I simply whisk in a little more powdered sugar until it’s just right.
Achieving the Perfect Glaze Consistency:
I aim for a consistency similar to thick honey – it should slowly drip from the whisk, not run off like water. This ensures a nice, even coating on our Pumpkin Pie Twists.
- Glaze the Cooled Twists: Once the Pumpkin Pie Twists are mostly or completely cooled, I can choose how to glaze them. My preferred method is to either drizzle the glaze generously over the cooled twists using a spoon or a whisk. For a more professional look, I sometimes transfer the glaze to a small piping bag with a very small snip at the end or even a ziplock bag with a corner snipped off, and then artfully drizzle it back and forth over the twists. Another option is to dip one side of each twist directly into the glaze.
- Allow Glaze to Set: After glazing, I let the Pumpkin Pie Twists sit on the wire rack for another 10-15 minutes to allow the glaze to set slightly. This prevents sticky fingers and ensures a beautiful presentation.
- Serve and Enjoy!: And there you have it! Your magnificent batch of homemade Pumpkin Pie Twists are ready to be devoured. They are absolutely delightful served slightly warm or at room temperature. These treats are perfect for a cozy afternoon snack, a festive breakfast, or as a charming dessert for any autumn gathering. The flaky pastry, the creamy spiced pumpkin filling, and that sweet vanilla glaze create an unparalleled symphony of flavors and textures. I promise, these Pumpkin Pie Twists will be a new fall favorite in your home, just as they are in mine! They keep well in an airtight container at room temperature for up to 2-3 days, though I doubt they’ll last that long!
Conclusion:
And there you have it, my friends! We’ve journeyed through the simple steps, the delightful ingredients, and the promise of an utterly irresistible treat. I truly believe that these incredible Pumpkin Pie Twists are not just another recipe; they are an experience, a moment of pure, unadulterated joy waiting to happen in your kitchen. From the moment the warm, spicy aroma fills your home to that first satisfying bite of flaky pastry embracing a perfectly spiced pumpkin filling, you’ll understand exactly why I can’t stop raving about them. They encapsulate everything wonderful about the season – warmth, comfort, and a touch of nostalgic sweetness – all wrapped up in a convenient, handheld package.
What makes these Pumpkin Pie Twists an absolute must-try, you ask? Well, for starters, their deceptive simplicity. You don’t need to be a seasoned baker to achieve spectacular results; the recipe is incredibly forgiving and designed for success. The combination of store-bought puff pastry and a homemade pumpkin filling cuts down on prep time without sacrificing a speck of flavor or quality. You get that rich, creamy pumpkin pie taste, but with an exciting, novel texture that makes them stand out from the traditional slice. They are simultaneously sophisticated enough for a dessert table yet casual enough for a cozy afternoon snack. Trust me, once you make them, they’ll quickly become a cherished staple in your seasonal baking repertoire.
Serving Suggestions for Your Perfect Pumpkin Pie Twists:
While these delightful twists are utterly fantastic straight out of the oven, perhaps with just a dusting of powdered sugar, their versatility allows for numerous serving possibilities. Imagine them:
- Warm alongside your morning coffee or a steaming mug of chai tea – a truly indulgent breakfast treat.
- Topped with a generous dollop of freshly whipped cream or a scoop of vanilla bean ice cream for an elevated dessert experience. The contrast of warm pastry with cold cream is simply divine!
- As a portable, elegant addition to any potluck or holiday gathering. They travel well and are always a crowd-pleaser.
- Drizzled with a simple maple glaze or a cream cheese frosting for an extra layer of sweetness and texture.
- Served alongside a cheese board, offering a sweet counterpoint to savory elements.
Unleash Your Creativity: Variations to Explore!
This recipe is a fantastic foundation, but don’t hesitate to make it your own! Here are a few ideas to spark your culinary imagination:
- Spice It Up: Experiment with different spice blends. Add a pinch of cardamom, a touch of ground cloves, or even a hint of ginger to your pumpkin filling for a unique flavor profile.
- Glaze Galore: Instead of a simple sugar dusting, try a brown butter glaze, a lemon zest glaze for a tangy kick, or even a spiced rum glaze for an adult twist.
- Nutty Crunch: Before baking, sprinkle some finely chopped pecans or walnuts over the twists for added texture and a nutty flavor.
- Chocolate Lover’s Dream: Mix in a handful of mini chocolate chips into your pumpkin filling for a delicious chocolate-pumpkin combination.
- Cream Cheese Swirl: For an even richer experience, spread a thin layer of sweetened cream cheese (like a cheesecake filling) over the puff pastry before adding the pumpkin mixture.
- Savory Sweet: A very daring variation could involve a touch of smoky paprika or a pinch of cayenne pepper in the pumpkin filling for a subtle heat.
Now, it’s your turn! I genuinely hope you feel inspired to head into your kitchen and give these incredible Pumpkin Pie Twists a try. There’s an unparalleled satisfaction that comes from creating something so delicious with your own hands, and I promise you, the effort will be richly rewarded with every bite. Don’t be shy; embrace the process, savor the aromas, and enjoy the delectable results. Your taste buds will thank you!
Once you’ve experienced the magic, I would absolutely love to hear all about it. Share your baking adventures with me and our community! Did you try a fun variation? What was your favorite part of making them? Did they disappear as quickly from your table as they do from mine? Please, don’t hold back! I can’t wait to see your beautiful creations and read about your experiences. Happy baking, everyone!
Pumpkin Pie Twists
Pumpkin Pie Twists offer a delightful reinterpretation of a beloved autumnal classic, promising all the comforting flavors of fall in a wonderfully convenient, handheld form. They’re an ingenious blend of flaky pastry and warm, spiced pumpkin filling, making them a perfect treat for festive gatherings or a cozy afternoon.
Ingredients
-
1 sheet of puff pastry, thawed
-
1⁄2 cup canned pumpkin puree
-
3 tablespoons granulated sugar
-
1 tablespoon brown sugar
-
1 teaspoon cinnamon
-
1⁄2 teaspoon nutmeg
-
1⁄2 teaspoon ginger
-
1⁄4 teaspoon ground cloves
-
1 egg, beaten (for egg wash)
-
Powdered sugar for dusting (optional)
Instructions
-
Step 1
In a bowl, combine 1/2 cup pumpkin puree, 3 tbsp granulated sugar, 1 tbsp brown sugar, 1 tsp cinnamon, 1/2 tsp nutmeg, 1/2 tsp ginger, and 1/4 tsp ground cloves. Mix until smooth. -
Step 2
Preheat oven to 400°F (200°C). Line a baking sheet with parchment paper. Unroll 1 thawed puff pastry sheet. Spread pumpkin filling evenly over the pastry, leaving a small border on one long edge. -
Step 3
Cut the pastry lengthwise into approximately 1-inch strips. Gently twist each strip 2-3 times to form spirals. -
Step 4
Arrange twisted strips on the prepared baking sheet, leaving space between them. Brush tops with the beaten egg. Bake for 18-25 minutes, or until golden brown and puffed. -
Step 5
Transfer twists to a wire rack to cool. Dust with powdered sugar before serving, if desired.
Important Information
Nutrition Facts (Per Serving)
It is important to consider this information as approximate and not to use it as definitive health advice.
Allergy Information
Please check ingredients for potential allergens and consult a health professional if in doubt.


Leave a Comment