French Mille Feuille Napoleon – just the name conjures images of delicate layers, rich cream, and an undeniable touch of Parisian elegance. Have you ever dreamed of creating a dessert so exquisitely beautiful and utterly delicious that it seems straight out of a patisserie window? Today, I invite you into my kitchen to demystify this classic masterpiece, proving that this stunning creation is well within your reach.
This iconic dessert, whose name literally translates to “a thousand leaves,” is a testament to the artistry of French baking. While its exact origins are debated, its presence in French culinary history dates back centuries, solidifying its place as a beloved staple in bakeries and homes alike. People fall head over heels for the French Mille Feuille Napoleon not just for its stunning appearance, but for the incredible symphony of textures and flavors it delivers. Imagine biting through crisp, buttery puff pastry layers that shatter delightfully, giving way to smooth, luscious crème pâtissière, all crowned with a delicate sugar glaze or a dusting of confectioners’ sugar. It’s a treat that promises both sophisticated flavor and a satisfying textural experience, making every bite an unforgettable moment of pure indulgence. Preparing this dish is a rewarding journey, transforming simple ingredients into a show-stopping dessert that will impress anyone lucky enough to taste it.

Ingredients:
- For the Crispy Puff Pastry:
- 2 sheets (approximately 14 oz / 400g each) all-butter puff pastry, high-quality, thawed according to package directions (I always recommend all-butter for the best flavor and flakiness for your French Mille Feuille Napoleon).
- 2 tablespoons granulated sugar, for caramelization.
- For the Velvety Crème Pâtissière (Pastry Cream):
- 2 cups (480ml) whole milk (the fat content helps with richness).
- 1 vanilla bean, split lengthwise and scraped, or 2 teaspoons pure vanilla extract (I adore the specks from a real vanilla bean!).
- 6 large egg yolks (save the whites for another recipe!).
- ½ cup (100g) granulated sugar, plus 2 tablespoons.
- ¼ cup (30g) cornstarch, sifted (this is key for thickness without a floury taste).
- 2 tablespoons (28g) unsalted butter, cut into small pieces, cold.
- For the Signature Glaze and Garnish:
- 2 cups (240g) powdered sugar (confectioners’ sugar), sifted.
- 3-4 tablespoons hot water, or milk (adjust as needed for consistency).
- 2 oz (55g) dark chocolate (60-70% cacao), finely chopped or in chips.
- ½ teaspoon vegetable oil or coconut oil (optional, for gloss and flow of chocolate).
Preparing the Puff Pastry for Your French Mille Feuille Napoleon
-
Thaw and Prepare the Pastry Sheets:
First things first, you’ll want to take your frozen puff pastry sheets out of the freezer and let them thaw in the refrigerator overnight, or at room temperature for about 30-40 minutes. It’s crucial that they are pliable but still cold when you work with them. If they become too warm, the butter layers can start to melt, which will prevent that beautiful rise and flakiness we’re looking for in a classic French Mille Feuille Napoleon. Once thawed, carefully unroll each sheet onto a lightly floured surface. I always lay down a large piece of parchment paper first to minimize cleanup and prevent sticking.
-
Roll and Prick for Even Baking:
Using a rolling pin, gently roll each sheet of puff pastry into a rectangle, aiming for a size of approximately 10×14 inches (25×35 cm) and about 1/8 inch (3mm) thick. The goal here isn’t to make it much thinner, but rather to ensure an even thickness across the entire sheet. This uniformity is vital for consistent baking. Now, here’s a very important step: using a fork, liberally prick the entire surface of both pastry sheets. I mean, go wild with it! Prick them every half inch or so. Why do we do this? This prevents the pastry from puffing up excessively like a balloon during baking. For a Mille Feuille, we want distinct, flat layers rather than a giant airy puff.
-
Baking Under Weight for Flatness:
Preheat your oven to a robust 400°F (200°C). Line two large baking sheets with parchment paper. Place one pricked pastry sheet on each prepared baking sheet. Now, to ensure the pastry bakes flat and evenly, we’re going to use a baking trick: take another sheet of parchment paper and place it directly on top of each pastry sheet. Then, place a second, empty baking sheet directly on top of the parchment paper-covered pastry. This creates a gentle weight that allows the pastry to crisp up and develop its layers without rising too much. Trust me, this step is non-negotiable for that signature flat, flaky structure.
-
First Bake and Caramelization:
Bake the pastry sheets (still weighted down) for about 15-20 minutes. At this point, the pastry should be golden brown underneath and slightly firm. Carefully remove the top baking sheet and the top layer of parchment paper. Now, here’s where we get that glorious caramelized crunch! Evenly sprinkle about 1 tablespoon of granulated sugar over the surface of each pastry sheet. Return them to the oven, without the top baking sheet, and bake for another 5-10 minutes, or until the sugar has melted, bubbled, and caramelized into a deep golden-brown, shiny crust. Keep a close eye on it during this stage, as sugar can burn quickly. This caramelization adds an incredible depth of flavor and a beautiful shattering crispness that is quintessential for a French Mille Feuille Napoleon.
-
Cooling and Trimming:
Once beautifully caramelized, remove the pastry from the oven and carefully slide it (still on the parchment paper) onto a wire rack to cool completely. It’s imperative that the pastry cools entirely before you attempt to handle it or assemble the dessert, as it will continue to crisp up as it cools. Once cool, use a very sharp, serrated knife or a ruler and a straight edge to trim the pastry into three perfectly identical rectangles. I typically aim for rectangles about 4×12 inches (10×30 cm), but you can adjust based on your desired serving size. The trimmed edges are perfect for a little chef’s snack! Set these perfect pastry layers aside.
Crafting the Velvety Crème Pâtissière
-
Infusing the Milk:
In a medium saucepan, combine the whole milk with the split vanilla bean and its scraped seeds (or vanilla extract, if using). Place the saucepan over medium heat and bring it just to a simmer. You’ll see tiny bubbles forming around the edges, but don’t let it boil vigorously. As soon as it simmers, remove it from the heat, cover it, and let the vanilla infuse for at least 15 minutes. This step is crucial for drawing out all that beautiful vanilla flavor into the milk, which forms the base of our pastry cream. If using a vanilla bean, remove it before proceeding.
-
Whisking the Yolks and Sugar:
While the milk is infusing, in a separate medium bowl, whisk together the egg yolks and ½ cup of granulated sugar until the mixture is pale yellow and creamy. It should form a “ribbon” when you lift the whisk, meaning it falls back into the bowl in a thick ribbon that slowly dissolves. This thorough whisking incorporates air and helps create a smooth texture.
-
Incorporating the Cornstarch:
Sift the ¼ cup of cornstarch directly over the egg yolk mixture. Sifting prevents lumps, and believe me, you want your pastry cream to be perfectly smooth! Gently whisk until the cornstarch is fully incorporated and the mixture is smooth. Avoid over-whisking at this stage, just mix until combined.
-
Tempering the Eggs (The Critical Step!):
This is perhaps the most important step for a silky-smooth pastry cream. Gradually, and I mean gradually, pour about half of the hot milk into the egg yolk mixture while continuously whisking vigorously. This process, known as tempering, slowly raises the temperature of the egg yolks without scrambling them. If you add the hot milk too quickly, you’ll end up with scrambled eggs, not crème pâtissière! Once half the milk is incorporated, pour the tempered egg yolk mixture back into the saucepan with the remaining hot milk.
-
Cooking the Crème Pâtissière:
Return the saucepan to medium heat and whisk continuously. Do not stop whisking! The mixture will slowly begin to thicken. It might seem like nothing is happening for a few minutes, then suddenly it will start to visibly thicken. Continue to whisk vigorously, ensuring you scrape the bottom and sides of the pan to prevent scorching. Bring the cream to a boil and continue to cook, whisking constantly, for 1-2 minutes. Why boil? Boiling activates the cornstarch fully, ensuring maximum thickening power, and cooks out any starchy taste. You’ll notice it becomes very thick and glossy.
-
Adding Butter and Straining for Smoothness:
Remove the saucepan from the heat. Add the cold butter pieces and whisk them into the hot pastry cream until they are completely melted and incorporated, creating an even richer, smoother, and more luxurious texture. Now, for the ultimate smooth crème pâtissière, I highly recommend pushing the entire batch through a fine-mesh sieve into a clean bowl. This removes any potential lumps or bits of cooked egg that might have formed despite your best whisking efforts.
-
Cooling Properly:
Place a piece of plastic wrap directly onto the surface of the hot pastry cream, ensuring it makes full contact. This prevents a “skin” from forming as it cools, which can ruin the texture. Let it cool slightly at room temperature, then transfer it to the refrigerator for at least 2-3 hours, or preferably overnight, until it is thoroughly chilled and set. Before using, give it a good whisk or use an immersion blender to bring it back to a smooth, spreadable consistency. This ensures your pastry cream is perfectly airy yet stable for layering your French Mille Feuille Napoleon.
Mastering the Signature Glaze and Garnish
-
Preparing the Fondant-Style Glaze:
In a medium bowl, sift your powdered sugar. Gradually add the hot water or milk, one tablespoon at a time, while whisking constantly. You’re aiming for a thick but pourable consistency that will evenly coat the back of a spoon. It should be opaque and smooth. If it’s too thick, add a tiny bit more liquid; if it’s too thin, sift in a little more powdered sugar. This is the classic shiny, white glaze for your French Mille Feuille Napoleon. Keep it covered with plastic wrap until ready to use to prevent it from drying out.
-
Melting and Preparing the Chocolate:
Chop your dark chocolate finely, if not using chips. Place the chocolate in a small, heatproof bowl. You can melt it gently over a double boiler (a bowl set over a saucepan of simmering water, ensuring the bowl doesn’t touch the water) or in the microwave in 15-second intervals, stirring well after each interval, until smooth. If using, stir in the ½ teaspoon of vegetable or coconut oil; this helps make the chocolate more fluid and glossy, making it easier to pipe and create those fine lines. Transfer the melted chocolate to a small piping bag or a ziplock bag with a tiny corner snipped off. You want a very fine opening for precision.
Assembling Your Exquisite French Mille Feuille Napoleon
-
First Layer of Pastry and Cream:
Lay one of your perfectly baked and cooled puff pastry rectangles on your serving platter or a cutting board. If you plan to cut them into individual portions later, it might be easier to assemble on a board. Using an offset spatula, spread half of the chilled and re-whisked crème pâtissière evenly over the first pastry layer, going all the way to the edges. Ensure the layer is smooth and consistent.
-
Second Layer and Cream:
Carefully place the second puff pastry rectangle directly on top of the first cream layer, aligning the edges as precisely as possible. Gently press down to ensure it adheres. Now, spread the remaining half of the crème pâtissière evenly over this second pastry layer, again making sure it’s a smooth, consistent layer that extends to all edges.
-
The Grand Finale Layer:
Carefully place the third and final puff pastry rectangle on top of the second cream layer. Gently press down. At this point, I often place a very light cutting board on top for a few minutes to ensure even adhesion and straight layers. Now, you’ll want to take your ready-made white glaze and pour it over the top pastry layer. Using an offset spatula, quickly spread it into an even, thin layer, ensuring it covers the entire surface and goes right to the edges. Work swiftly, as the glaze sets quite fast. This perfectly smooth, bright white surface is the canvas for our iconic decoration.
-
Creating the Classic Chocolate Garnish:
Immediately, while the white glaze is still wet, take your piping bag filled with melted chocolate. Pipe thin, parallel lines across the entire surface of the glazed Mille Feuille, about 1 inch (2.5 cm) apart. Don’t stress too much about perfection here, but try to make them as straight as possible. Now for the magic! Take a wooden skewer, a toothpick, or the tip of a small, sharp knife. Drag it perpendicular to the chocolate lines, alternating direction with each pass. For example, drag it from top to bottom, then next to that line, drag it from bottom to top, creating that classic feathered, chevron pattern. This intricate design is instantly recognizable and makes your French Mille Feuille Napoleon truly special.
-
Chilling and Serving:
Once decorated, carefully transfer your magnificent French Mille Feuille Napoleon to the refrigerator. Let it chill for at least 30 minutes, or up to 2 hours, to allow the pastry cream to fully set, the glaze to firm up, and the flavors to meld beautifully. This chilling also makes it much easier to cut. When you’re ready to serve, use a very sharp, long serrated knife. Use a gentle sawing motion rather than pressing down, which can crush the delicate pastry layers. If you want individual portions, trim the edges first (those are your chef’s bonus!) and then cut into smaller, elegant rectangles or squares. Serve immediately and enjoy the exquisite layers of crisp pastry, rich vanilla cream, and sweet, decorative glaze! You’ve just created a masterpiece!

Conclusion:
Well, my friends, we’ve journeyed through the intricate yet utterly rewarding process of creating something truly magnificent. If you’ve followed along, you now understand why this particular confection isn’t just a dessert; it’s a celebration of textures, flavors, and culinary artistry. I truly believe that trying this recipe is an absolute must for anyone who appreciates the finer things in life, or simply loves the joy of baking. There’s a unique satisfaction that comes from assembling those layers of golden, crisp pastry with the silken, rich cream, culminating in a dessert that looks like it stepped right out of a Parisian patisserie. The combination of the shattering crunch of the puff pastry, the velvety smooth pastry cream, and the delicate sweetness is, quite frankly, divine. It’s a symphony for the senses, a testament to the fact that sometimes, the best things in life require a little patience and a lot of love.
The beauty of this French Mille Feuille Napoleon lies not just in its impeccable taste but also in its incredible versatility. While the classic presentation with a simple dusting of powdered sugar or an elegant fondant glaze is always a showstopper, don’t hesitate to make it your own. For a refreshing twist that really brightens the whole experience, I often like to serve individual slices alongside a vibrant medley of fresh berries – think plump raspberries, juicy strawberries, and glistening blueberries. The slight tartness of the fruit beautifully cuts through the richness of the cream, creating a perfect balance that’s both indulgent and light. You could also experiment with a hint of orange zest or a splash of Grand Marnier in your pastry cream for an extra layer of aromatic complexity, transforming the flavor profile subtly. And if you’re feeling particularly indulgent, a delicate drizzle of homemade caramel or a dark chocolate ganache could elevate your creation to an even more luxurious realm. Imagine a sprinkle of toasted slivered almonds or finely chopped pistachios on top for an added textural dimension and a pop of color! For a slightly less formal, but equally delicious approach, you can assemble the layers more casually, almost like a deconstructed trifle, allowing guests to scoop up their preferred ratio of crisp and cream.
I know that the thought of tackling a recipe like this might seem a little daunting at first, perhaps even a bit ambitious, but I promise you, the effort is worth every single moment. Don’t be intimidated by the multiple steps; each one is straightforward, and the result is nothing short of spectacular. This isn’t just about baking a dessert; it’s about creating an experience, a memory, and a showpiece that will undoubtedly impress anyone lucky enough to share it with you. The process itself is incredibly therapeutic, a wonderful way to spend an afternoon in the kitchen, and the aroma filling your home will be reward enough before you even take the first bite. I urge you, absolutely implore you, to set aside some dedicated time, gather your ingredients, and immerse yourself in the delightful process. You’ll be so incredibly proud of what you accomplish, not just in the beautiful finished product, but in the skill you’ve cultivated!
Once you’ve successfully crafted your own masterpiece, I would absolutely love to hear all about it! Did you stick to the classic recipe, or did you venture into creative variations with different fruits or unique flavorings for the cream? How did your guests react to this stunning dessert? There’s nothing more satisfying for me than seeing your culinary triumphs, so please, when you do make this incredible dessert, share your photos and tell me all about your journey, your challenges, and your ultimate success. Let’s celebrate the joy of baking together. This truly is a recipe that deserves a place of honor in your baking repertoire, and I’m so excited for you to discover the magic of making your very own, absolutely perfect French Mille Feuille Napoleon. Happy baking, and I can’t wait to hear from you!
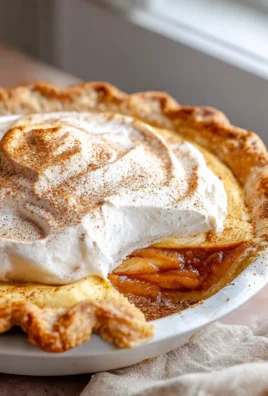
French Mille Feuille Napoleon
A classic French dessert featuring delicate layers of crispy, caramelized puff pastry filled with smooth, velvety vanilla pastry cream and topped with an elegant glaze, adorned with a classic chocolate feathering pattern.
Ingredients
Instructions
Important Information
Nutrition Facts (Per Serving)
It is important to consider this information as approximate and not to use it as definitive health advice.
Allergy Information
Please check ingredients for potential allergens and consult a health professional if in doubt.

Leave a Comment