Spicy Salmon Sushi Bake Recipe
Oh my goodness, get ready to discover your new favorite weeknight meal or party showstopper: the Spicy Salmon Sushi Bake Recipe! I’m absolutely obsessed with this dish, and I just know you’re going to fall head over heels for it too. What makes this recipe so incredibly special, you ask? Well, it’s all the glorious flavor of your favorite spicy salmon sushi roll, but without any of the fuss or fancy rolling techniques!
Forget about struggling with bamboo mats and tearing nori. This brilliant creation takes all the delicious components—perfectly seasoned sushi rice, a decadent creamy and spicy salmon mixture, and an optional sprinkle of toppings—and layers them into a single baking dish. Then, it gets a magical trip to the oven, emerging golden, bubbly, and incredibly aromatic. It’s warm, comforting, and undeniably satisfying.
You’ll love how ridiculously easy it is to assemble and how it transforms humble ingredients into something truly extraordinary. It’s the ultimate crowd-pleaser for potlucks, a fantastic option for a cozy family dinner, or even a fun solo meal when you’re craving something special. Scoop it onto crispy nori sheets with fresh avocado and cucumber slices, and prepare for an explosion of creamy, spicy, savory, and umami flavors. Trust me, once you try this sushi bake, there’s no going back!

Oh, prepare yourself for a dish that’s an absolute game-changer in your kitchen: the Spicy Salmon Sushi Bake! I first stumbled upon this concept during a craving for sushi but with minimal effort, and let me tell you, it delivered beyond expectations. It’s warm, comforting, incredibly flavorful, and brings all the sushi vibes without the intricate rolling. This recipe quickly became a staple in my household, perfect for a casual dinner, a potluck, or just when you want a delicious and satisfying meal that feels a bit special. It’s truly a celebration of flavors and textures, with the warm, seasoned rice, creamy, spicy salmon, and crisp nori sheets for scooping. Trust me, once you try this, you’ll be hooked!
Ingredient Notes
Crafting the perfect Spicy Salmon Sushi Bake relies on a few key ingredients that truly make the dish sing. I’ve found that using quality ingredients makes all the difference, but I’ll also share some excellent substitutes if you need them!
- Fresh Salmon Fillets: This is the star of our show, so don’t skimp! I usually go for about 1 to 1.5 pounds of skin-on or skin-off salmon fillets. Fresh is always best for flavor and texture, but good quality frozen salmon (thawed completely) works wonderfully too. I prefer baking or poaching my salmon gently before flaking to keep it moist and tender.
- Sushi Rice: Absolutely crucial! You need short-grain Japanese sushi rice for that signature sticky, slightly chewy texture that holds everything together. Regular long-grain rice just won’t cut it here. I always rinse my rice thoroughly until the water runs clear to remove excess starch, which helps achieve the perfect consistency.
- Rice Vinegar, Sugar, and Salt: These are for seasoning the cooked sushi rice, giving it that distinct sushi flavor. Don’t skip this step! It transforms plain cooked rice into sushi-grade deliciousness. I use standard unseasoned rice vinegar.
- Kewpie Mayonnaise: In my opinion, this is non-negotiable for an authentic sushi bake. Kewpie mayo has a richer, tangier, and more umami-rich flavor profile compared to regular American mayonnaise, thanks to its use of egg yolks only and a blend of vinegars. It makes the salmon mixture incredibly creamy and flavorful. If you absolutely can’t find it, use good quality regular mayonnaise, but you might want to add a tiny squeeze of lemon juice to mimic the tang.
- Sriracha: For that essential spicy kick! You can adjust the amount to your preference. I like things medium-hot, so I use a generous amount. If you’re sensitive to spice, start with less and add more to taste. Other chili sauces like gochujang or chili garlic sauce can also work if Sriracha isn’t on hand.
- Cream Cheese: This is my secret weapon for an extra rich and creamy salmon layer! It adds a lovely tang and body that makes the salmon mixture incredibly luxurious. Make sure it’s softened at room temperature for easy mixing. Full-fat cream cheese works best. For a lighter alternative, you could try a dollop of sour cream or Greek yogurt, but the texture will be slightly different.
- Non-Alcohol Mirin: Often used in the rice seasoning or a little drizzle over the top, non-alcohol mirin adds a subtle sweetness and glaze. Always opt for the non-alcohol version for this recipe. If you don’t have it, a tiny pinch of sugar can substitute the sweetness.
- Soy Sauce: For savory depth, both in the rice seasoning and sometimes as a drizzle. Use a good quality light or low-sodium soy sauce. Tamari is a great gluten-free alternative.
- Toasted Sesame Seeds & Green Onions: These are perfect for garnish, adding both flavor and visual appeal. Toasted sesame seeds bring a lovely nutty crunch, and fresh green onions provide a refreshing bite.
- Nori Seaweed Sheets: Essential for serving! You cut these into small rectangles, perfect for scooping up the baked sushi. They add that authentic sushi flavor and a satisfying crunch.
- Optional Toppings: Feel free to get creative! Thinly sliced avocado, cucumber, masago (fish roe), furikake (Japanese rice seasoning), or even a drizzle of extra spicy mayo after baking are all fantastic additions.
Step-by-Step Instructions
Get ready to create a masterpiece! This Spicy Salmon Sushi Bake comes together with simple, straightforward steps. Here’s how I make mine:
- Prepare the Sushi Rice: First things first, cook your sushi rice. I rinse 2 cups of sushi rice thoroughly under cold water until the water runs clear. Then, I cook it according to package directions, typically in a rice cooker or on the stovetop with 2 cups of water. Once cooked, transfer the hot rice to a large, non-metallic bowl. In a small bowl, whisk together ¼ cup rice vinegar, 2 tablespoons sugar, ½ teaspoon salt, and 1 teaspoon non-alcohol mirin until the sugar and salt dissolve. Pour this seasoning over the hot rice and gently fold it in with a rice paddle or wooden spoon until well combined. Cover the bowl with a damp cloth and let the rice cool slightly while you prepare the salmon.
- Cook and Flake the Salmon: Preheat your oven to 375°F (190°C). Place your salmon fillets on a baking sheet lined with parchment paper, skin-side down if applicable. Drizzle with a tiny bit of soy sauce, salt, and pepper. Bake for 12-15 minutes, or until the salmon is cooked through and easily flakes with a fork. Once cooked, let it cool slightly, then remove any skin and bones. Flake the salmon into small pieces in a medium-sized mixing bowl.
- Make the Spicy Salmon Mixture: To the flaked salmon, add ½ cup Kewpie mayonnaise, ¼ cup softened cream cheese, 2-4 tablespoons Sriracha (depending on your desired spice level), and a pinch of salt and pepper. Mix everything together thoroughly until the salmon is evenly coated and creamy. Taste and adjust seasoning or Sriracha as needed. This is where the magic happens!
- Assemble the Sushi Bake: Lightly grease a 9×13-inch baking dish. Take your seasoned sushi rice and press it evenly into the bottom of the prepared baking dish, creating a compact layer. I like to use a spatula or the back of a spoon, sometimes dampened with a little water, to ensure it’s firmly packed. Next, spread the creamy spicy salmon mixture evenly over the rice layer, making sure it goes all the way to the edges. For extra flavor and visual appeal, I sometimes drizzle a thin zigzag of extra Kewpie mayo and Sriracha over the top of the salmon layer before baking.
- Bake to Perfection: Place the assembled sushi bake in your preheated oven. Bake for 20-25 minutes, or until the top is golden brown, bubbly, and slightly crispy around the edges. Keep an eye on it to prevent over-browning. The aroma filling your kitchen will be incredible!
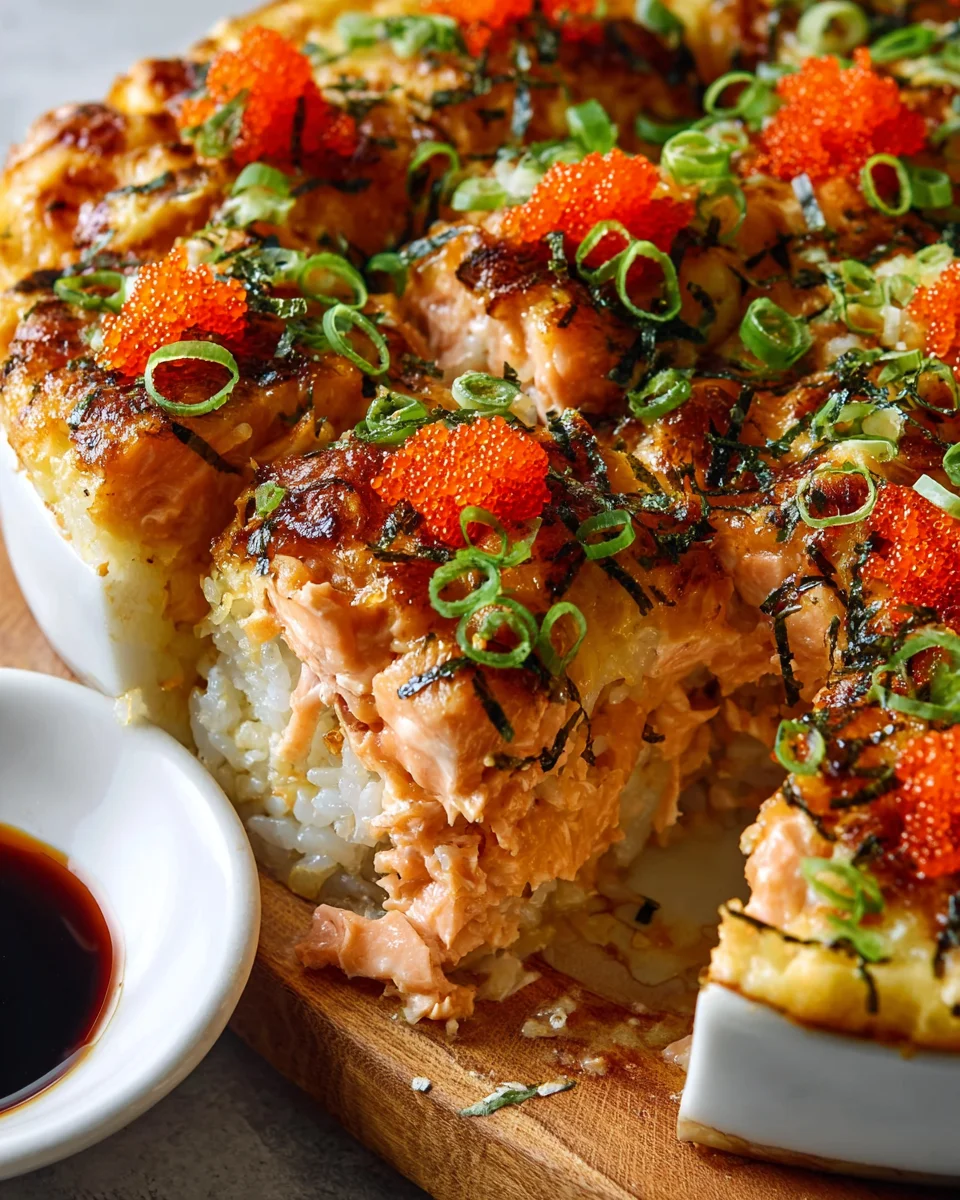
- Garnish and Serve: Once out of the oven, let the sushi bake cool for a few minutes. Sprinkle generously with toasted sesame seeds and thinly sliced green onions. You can also add fresh avocado slices or other toppings at this stage. To serve, I simply cut the bake into squares directly in the dish. Provide plenty of crisp nori seaweed sheets (cut into smaller rectangles) for scooping. Each bite with the warm bake and crunchy nori is pure bliss!
Tips & Suggestions
To really elevate your Spicy Salmon Sushi Bake experience, I’ve gathered some of my favorite tips and suggestions. These small tweaks can make a big difference in flavor, texture, and overall enjoyment:
- Don’t Overcook the Salmon: For the most tender and flavorful salmon mixture, avoid overcooking your salmon fillets. They should be just cooked through and easily flakable. Overcooked salmon can become dry and tough.
- Perfect Your Rice: The sushi rice is the foundation of this dish. Invest in good quality short-grain sushi rice, and make sure to rinse it well. Properly seasoned rice makes a huge impact on the final taste. If your rice feels a bit dry, you can lightly mist it with a little water before pressing it into the dish.
- Adjust the Spice to Your Liking: The amount of Sriracha is completely up to your preference. If you love heat, go wild! If you prefer a milder flavor, start with less. You can always add a drizzle of extra Sriracha directly to your serving for individual customization.
- Layering for Texture: Some people like to add a thin layer of sliced avocado or cucumber between the rice and salmon, or even on top before baking. While I usually add fresh toppings after baking, a layer of avocado pre-bake can add a creamy, fresh element. Experiment and see what you like!
- Serving Temperature: While delicious fresh out of the oven, I find the flavors really meld and the bake firms up beautifully after cooling for about 5-10 minutes. It’s best served warm, not piping hot.
- Get Creative with Toppings: Beyond sesame seeds and green onions, consider adding a sprinkle of furikake (Japanese rice seasoning), a spoonful of masago or tobiko (fish roe) for a burst of oceanic flavor, or even a drizzle of eel sauce (unagi sauce) for a sweet and savory contrast. Fresh cilantro or a squeeze of lime juice can also brighten things up.
- Make it a Meal: This sushi bake is quite hearty on its own, but it pairs wonderfully with a simple side salad with a ginger dressing, a bowl of miso soup, or some edamame for a complete Japanese-inspired meal.
Storage
While this Spicy Salmon Sushi Bake is undeniably at its best enjoyed fresh and warm from the oven, you can certainly enjoy leftovers. Here’s how I handle storage and reheating:
- Refrigeration: Any leftover sushi bake should be stored in an airtight container in the refrigerator within two hours of cooking. It will keep well for up to 2-3 days. The texture of the rice might firm up a bit more, but the flavors will still be delicious.
- Reheating in the Oven: I find that reheating in the oven is the best way to maintain the texture and crispiness of the bake. Preheat your oven to 350°F (175°C). Place your desired portion of sushi bake in an oven-safe dish and cover it loosely with foil to prevent drying out. Heat for 15-20 minutes, or until warmed through. The foil helps keep the rice moist while the top gets a chance to crisp up slightly.
- Reheating in the Microwave: While convenient, the microwave can sometimes make the rice a bit chewy and the salmon dry. If using a microwave, heat individual portions on a microwave-safe plate for 1-2 minutes, or until heated through. I recommend placing a damp paper towel over the top to help retain moisture.
- Freezing: I generally do not recommend freezing sushi bake. The texture of the rice can become mushy, and the salmon mixture might separate upon thawing and reheating. It’s best enjoyed fresh or within a few days from the refrigerator.
- Serving Leftovers: When serving refrigerated leftovers, I often refresh them with new garnishes like fresh green onions and a sprinkle of sesame seeds. Sometimes, a fresh drizzle of spicy mayo can also perk them up!
Final Thoughts
There’s something truly magical about the Spicy Salmon Sushi Bake Recipe. I love how it captures all the vibrant flavors and comforting textures of your favorite sushi rolls, but in a fuss-free, shareable format that anyone can master. The creamy, spicy salmon topping baked over perfectly seasoned rice is just divine, offering that perfect balance of heat, umami, and savory goodness in every glorious spoonful. It’s truly a must-try because it completely takes the intimidating aspect out of sushi-making while delivering an explosion of flavor that’s perfect for a cozy night in, a potluck, or a lively gathering with friends and family.
I promise you, once you experience the convenience and incredible taste of this delightful dish, the Spicy Salmon Sushi Bake Recipe will quickly become a cherished favorite in your culinary repertoire. Go ahead, gather your ingredients and give it a try – I know you’ll absolutely adore it!
Easy Spicy Salmon Sushi Bake Recipe – Perfect Weeknight Meal

Discover your new favorite weeknight meal with this Spicy Salmon Sushi Bake! It’s a deliciously easy way to enjoy all the flavors of sushi without the fuss of rolling.
- Prep Time: 15 mins
- Cook Time: 30 mins
- Total Time: 45 minutes
- Yield: 4 servings 1x
- Category: Dinner
- Method: Baking
- Cuisine: Japanese
Ingredients
- 1 to 1.5 pounds fresh salmon fillets
- 2 cups sushi rice
- ¼ cup rice vinegar
- 2 tablespoons sugar
- ½ teaspoon salt
- 1 teaspoon non-alcohol mirin
- ½ cup Kewpie mayonnaise
- ¼ cup softened cream cheese
- 2–4 tablespoons Sriracha
- Salt and pepper to taste
- Soy sauce for drizzling
- Toasted sesame seeds for garnish
- Thinly sliced green onions for garnish
- Nori seaweed sheets for serving
- Optional toppings: thinly sliced avocado, cucumber, masago, furikake, extra spicy mayo
Instructions
- Prepare the Sushi Rice: Rinse 2 cups of sushi rice thoroughly under cold water until the water runs clear. Cook according to package directions, typically in a rice cooker or on the stovetop with 2 cups of water. Transfer the hot rice to a large, non-metallic bowl. In a small bowl, whisk together ¼ cup rice vinegar, 2 tablespoons sugar, ½ teaspoon salt, and 1 teaspoon non-alcohol mirin until dissolved. Pour this seasoning over the hot rice and gently fold it in. Cover the bowl with a damp cloth and let the rice cool slightly.
- Cook and Flake the Salmon: Preheat your oven to 375°F (190°C). Place salmon fillets on a baking sheet lined with parchment paper, skin-side down. Drizzle with a tiny bit of soy sauce, salt, and pepper. Bake for 12-15 minutes, or until cooked through and easily flaked. Let it cool slightly, then remove skin and bones. Flake the salmon into small pieces in a medium-sized mixing bowl.
- Make the Spicy Salmon Mixture: To the flaked salmon, add ½ cup Kewpie mayonnaise, ¼ cup softened cream cheese, 2-4 tablespoons Sriracha, and a pinch of salt and pepper. Mix thoroughly until the salmon is evenly coated and creamy. Adjust seasoning or Sriracha as needed.
- Assemble the Sushi Bake: Lightly grease a 9×13-inch baking dish. Press the seasoned sushi rice evenly into the bottom of the dish. Spread the creamy spicy salmon mixture evenly over the rice layer. Optionally, drizzle extra Kewpie mayo and Sriracha over the top before baking.
- Bake to Perfection: Place the assembled sushi bake in the preheated oven. Bake for 20-25 minutes, or until the top is golden brown and bubbly. Keep an eye on it to prevent over-browning.
- Garnish and Serve: Let the sushi bake cool for a few minutes. Sprinkle generously with toasted sesame seeds and thinly sliced green onions. Serve with crisp nori seaweed sheets for scooping.
Nutrition
- Serving Size: 1 square
- Calories: 450
- Sugar: 2 g
- Sodium: 600 mg
- Fat: 25 g
- Saturated Fat: 7 g
- Unsaturated Fat: 15 g
- Trans Fat: 0 g
- Carbohydrates: 40 g
- Fiber: 2 g
- Protein: 20 g
- Cholesterol: 70 mg
Keywords: Avoid overcooking the salmon for the best texture. Rinse the sushi rice well and season properly for optimal flavor. Adjust the spice level of Sriracha to your preference.


Leave a Comment