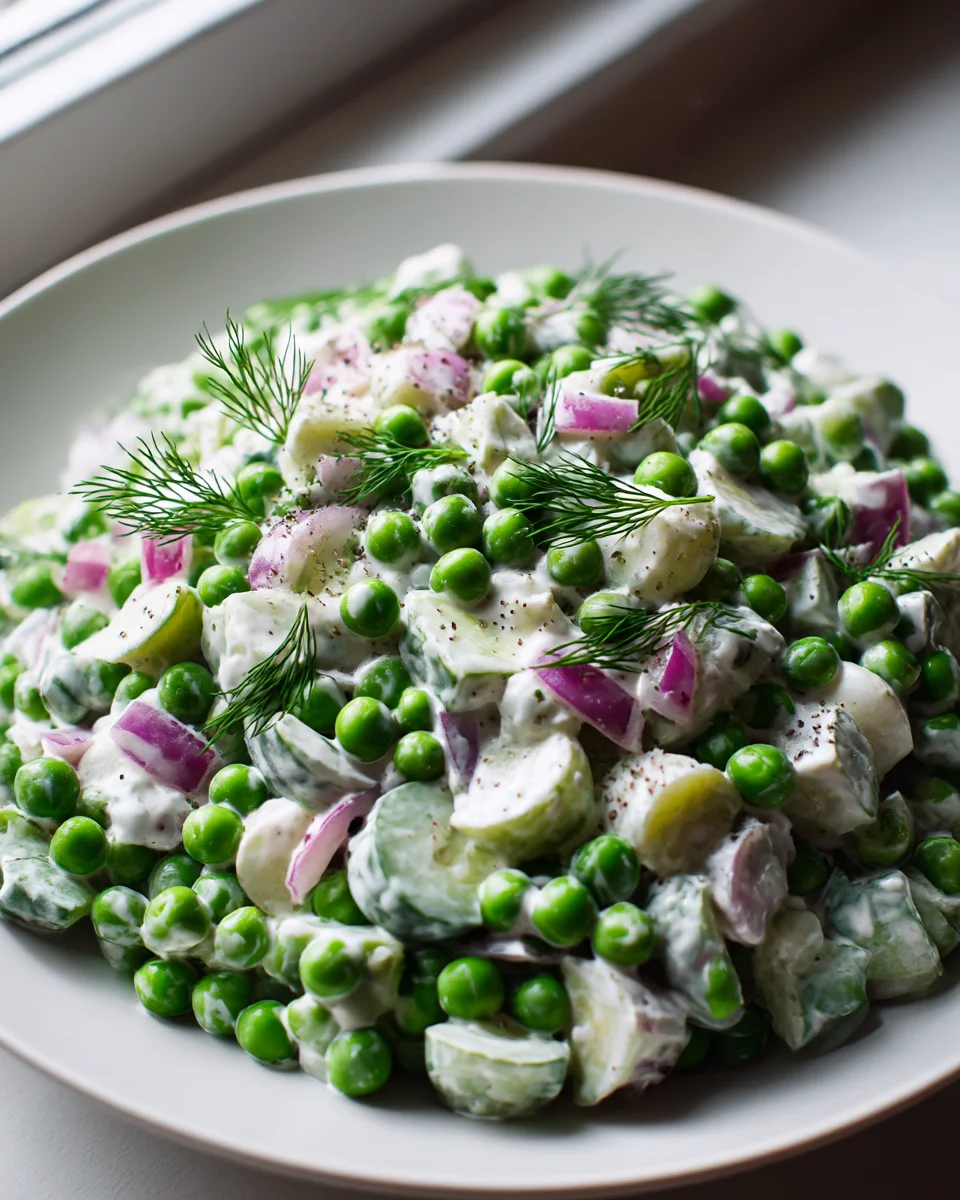
Fresh & Creamy Pea Salad Recipe For Spring
Oh, I am so excited to share my go-to recipe for the most delightful side dish that just screams “spring has sprung!” This Fresh & Creamy Pea Salad Recipe For Spring is truly a showstopper. What makes it so special, you ask? Well, it’s that perfect harmony of sweet, tender peas, crisp red onion, and a ridiculously luscious, tangy dressing that coats every single bite. It’s not your grandma’s pea salad (unless your grandma was super cool and innovative!), but a vibrant, refreshing take on a beloved classic that I know you’ll fall head over heels for.
You’re going to absolutely love how easy this dish is to whip up, making it the ideal companion for any spring picnic, backyard barbecue, or even just a weeknight dinner when you want something bright and flavorful. Forget heavy, complicated sides – this salad is all about fresh flavors and effortless elegance. We’ll be combining those vibrant green peas with a creamy, dreamy dressing, a hint of crunch from fresh veggies, and a savory touch (perhaps some crispy beef crumbles for an extra layer of flavor!) that elevates it from simple to sublime. It’s light, it’s refreshing, and it’s destined to become your new favorite spring side. Let’s get cooking!

Ingredient Notes
There’s something incredibly comforting yet vibrantly fresh about a classic pea salad, and this version takes it up a notch with its creamy texture and bursts of spring flavor. Getting the right ingredients is key to achieving that perfect balance. Here’s a rundown of what you’ll need and some thoughts on substitutions to make this recipe truly yours.
- Frozen Sweet Peas: These are the star of our show! I always opt for frozen sweet peas because they’re picked at their peak freshness and flash-frozen, locking in all their natural sweetness and vibrant green color. There’s no need to cook them; simply thaw them in a colander under cool running water or let them sit at room temperature for about 30 minutes. If you have access to fresh peas, you’re in for a treat! Just give them a quick blanch for 1-2 minutes until crisp-tender, then plunge into an ice bath to stop the cooking and preserve that gorgeous green.
- Creamy Base: For that irresistible creaminess, I love a blend of good quality mayonnaise and a touch of sour cream. The mayonnaise provides richness, while the sour cream adds a pleasant tang that cuts through the richness beautifully.
- Substitution: For a lighter option, you can use Greek yogurt in place of or in combination with the sour cream. Light mayonnaise also works well.
- Red Onion: A finely diced red onion brings a subtle, refreshing bite and a hint of sharpness that complements the sweetness of the peas.
- Celery: For that essential crunch and a refreshing, slightly herbaceous note, finely diced celery is a must.
- Hard-Boiled Eggs: These are a classic addition to pea salad, adding richness, protein, and a lovely texture contrast. I usually aim for perfectly cooked, slightly firm yolks.
- Sharp Cheddar Cheese: Cubed or shredded sharp cheddar cheese provides a fantastic salty, tangy counterpoint to the peas and a wonderful texture.
- Fresh Dill: This is where the “spring” really shines through! Fresh dill offers an aromatic, slightly anise-like flavor that is simply magical with peas and creamy dressings. Don’t skip it!
- Substitution: If dill isn’t your favorite, fresh mint or finely chopped chives would also be delightful. A mix of fresh parsley and chives works too.
- Apple Cider Vinegar: A splash of apple cider vinegar brightens up the dressing and adds a crucial tangy note.
- Granulated Sugar: Just a pinch! This isn’t about making the salad sweet, but rather balancing the acidity of the vinegar and the sharpness of the onion. It enhances the natural sweetness of the peas.
- Salt and Freshly Ground Black Pepper: Essential for seasoning, as always. Taste and adjust to your preference!
- Crispy Beef Bacon Bits (Optional): While optional, a sprinkle of crispy beef bacon bits adds an incredible smoky, savory depth and a textural contrast that truly elevates this salad. It’s a fantastic way to add a little indulgence.
- Substitution: For a vegetarian option, you could toast some chopped pecans or walnuts for a similar crunch and nutty flavor.
Step-by-Step Instructions
Making this Fresh & Creamy Pea Salad is incredibly straightforward, which is one of the reasons I love it so much for spring gatherings. Follow these simple steps, and you’ll have a vibrant, delicious side dish ready in no time!
- Prepare Your Peas: First things first, get those peas ready. If you’re using frozen peas (which I usually do), simply transfer them to a colander and rinse them under cool running water for a couple of minutes until they’re thawed. Shake off any excess water thoroughly. If you’re using fresh peas, give them a quick blanch in boiling water for 1-2 minutes until they’re crisp-tender and vibrant green, then immediately plunge them into an ice bath to stop the cooking. Once cooled, drain them very well. Patting them dry with a clean kitchen towel can also help prevent a watery salad.
- Chop Your Ingredients: While your peas are getting ready, it’s time for the chopping!
- Finely dice your red onion. We want small pieces so the flavor is distributed without being overpowering.
- Finely dice your celery for that perfect crunch.
- Chop your hard-boiled eggs into a medium dice.
- Cube or shred your sharp cheddar cheese. I find small cubes or a coarser shred work best here for texture.
- Finely chop your fresh dill. The fresher the better for maximum aroma!
- Whisk the Dressing: In a medium-sized bowl, combine the mayonnaise, sour cream (or Greek yogurt), apple cider vinegar, granulated sugar, salt, and freshly ground black pepper. Whisk everything together until the dressing is smooth and well combined. Taste it and adjust the seasoning if needed – maybe a little more salt, pepper, or a tiny pinch of sugar to balance. Stir in the chopped fresh dill last.
- Combine and Gently Fold: In a large mixing bowl, gently add your thawed/blanched peas, diced red onion, diced celery, chopped hard-boiled eggs, and cheddar cheese.
- Dress the Salad: Pour the creamy dill dressing over the pea mixture. Using a large spoon or spatula, gently fold everything together until all the ingredients are evenly coated with the dressing. Be careful not to mash the peas or break up the eggs too much; we want to maintain some texture.
- Chill to Perfection: This step is crucial for the flavors to meld and for the salad to be wonderfully refreshing. Cover the bowl tightly with plastic wrap and refrigerate for at least 1 hour, or preferably 2-3 hours. I often make this salad a few hours in advance or even the night before!
- Serve and Garnish: Before serving, give the salad another gentle stir. Transfer it to a serving bowl. If you’re using crispy beef bacon bits, sprinkle them generously over the top just before serving for the best texture. You can also garnish with a few extra sprigs of fresh dill for a pretty presentation.
Tips & Suggestions
While this Fresh & Creamy Pea Salad is quite simple, a few extra tips can ensure it turns out perfectly every time and truly shines as a highlight of your spring table.
- Don’t Overcook the Peas: If you’re blanching fresh peas, be quick! You want them crisp-tender and brightly colored, not mushy. For frozen peas, simply thawing them is usually enough; their texture is generally perfect straight out of the bag once thawed. Overcooking dulls their color and compromises their texture.
- Thoroughly Drain Your Peas: Excess water from the peas can dilute your dressing and make your salad watery. After thawing or blanching, make sure to drain them very well, even patting them dry with a clean kitchen towel if necessary.
- Taste and Adjust the Dressing: This is my golden rule for almost any recipe, but especially for salads where the dressing is so key. Before combining with the other ingredients, taste your dressing. Do you want it a little tangier? Add a splash more apple cider vinegar. A touch sweeter? Add a tiny pinch more sugar. Trust your palate!
- Embrace Fresh Herbs: Fresh dill is truly a game-changer in this recipe, bringing that quintessential spring freshness. Don’t be shy with it! If you’re not a dill fan, experiment with other fresh herbs like chives, parsley, or even a hint of fresh mint for a different, equally delightful twist.
- Add a Savory Crunch: While optional, crispy beef bacon bits add an incredible depth of flavor and a wonderful textural contrast. If you’re making this vegetarian, toasted pecans or walnuts can provide a similar satisfying crunch and a nutty undertone.
- Consider Other Add-ins: Feel free to customize! Finely diced bell peppers (red or yellow for color), water chestnuts for extra crunch, or even a touch of finely grated horseradish for a subtle kick can be fun additions.
- Make Ahead for Best Flavor: This salad actually tastes better after it’s had some time to chill and for the flavors to meld. I recommend making it at least 2-3 hours in advance, or even the night before, for optimal flavor development. Just hold off on adding the crispy beef bacon until just before serving to keep it from getting soggy.
- Serving Suggestions: This Fresh & Creamy Pea Salad is incredibly versatile. It’s a perfect side dish for springtime picnics, barbecues, potlucks, or light lunches. It pairs beautifully with grilled chicken, baked salmon, beef burgers, or alongside a simple sandwich.
- Presentation Matters: A sprinkle of fresh dill, a dash of paprika for color, or a few extra crispy beef bacon bits on top just before serving can make your salad look as good as it tastes!
Storage
One of the great things about this Fresh & Creamy Pea Salad is that it holds up wonderfully in the refrigerator, making it an excellent make-ahead dish for parties or meal prep.
- Refrigeration: Leftovers should be stored in an airtight container in the refrigerator. This helps to keep the salad fresh and prevents it from absorbing any unwanted odors from other foods in your fridge.
- Shelf Life: When properly stored, your Fresh & Creamy Pea Salad will stay delicious for about 3 to 4 days in the refrigerator. After this point, the vegetables may start to soften, and the dressing might thin out a bit.
- Freezing: I strongly advise against freezing this pea salad. The creamy dressing, once frozen and thawed, tends to separate and become watery, resulting in an unappetizing texture. Additionally, the fresh vegetables like celery and peas can become mushy and lose their crispness when frozen and thawed. This salad is definitely best enjoyed fresh from the fridge!
- Best Practices: If you plan to add crispy beef bacon bits, I recommend adding them just before serving each portion, rather than mixing them into the whole salad if you anticipate having leftovers. This helps to keep the bacon bits crisp. Give the salad a gentle stir before serving any stored portions.
Final Thoughts
There you have it! I truly hope you give this Fresh & Creamy Pea Salad Recipe For Spring a try. It’s more than just a simple side dish; it’s a vibrant celebration of everything wonderful about the season. With its delightful pop of sweet green peas, a satisfying crunch from the crisp additions, and that irresistibly smooth and creamy dressing, it truly stands out as a refreshing and comforting addition to any meal.
I find myself reaching for this recipe time and again because it’s so incredibly easy to whip up, yet it delivers such impressive flavor and texture. Whether you’re planning a spring picnic, a backyard barbecue, a light lunch, or just want something bright and delicious on your plate, the Fresh & Creamy Pea Salad Recipe For Spring is an absolute winner. It’s fresh, it’s comforting, and it perfectly captures the essence of spring in every spoonful. Trust me, your taste buds will thank you for this delightful seasonal treat!
Fresh & Creamy Pea Salad: Your Perfect Spring Side Dish!
This Fresh & Creamy Pea Salad is a delightful side dish that captures the essence of spring with its vibrant flavors and creamy texture. It’s easy to prepare and perfect for any spring gathering or weeknight dinner.
- Prep Time: 15 mins
- Cook Time: 0 mins
- Total Time: 15 minutes
- Yield: 4 servings 1x
- Category: Side Dish
- Method: No cooking required
- Cuisine: American
Ingredients
- 2 cups Frozen Sweet Peas
- 1/2 cup Mayonnaise
- 1/4 cup Sour Cream or Greek Yogurt
- 1 tablespoon Apple Cider Vinegar
- 1 tablespoon Granulated Sugar
- 1/2 teaspoon Salt
- 1/4 teaspoon Freshly Ground Black Pepper
- 1/2 cup finely diced Red Onion
- 1/2 cup finely diced Celery
- 2 Hard-Boiled Eggs, chopped
- 1 cup cubed or shredded Sharp Cheddar Cheese
- 2 tablespoons finely chopped Fresh Dill
- Crispy Beef Bacon Bits (Optional)
Instructions
- Prepare Your Peas: If using frozen peas, rinse them under cool running water until thawed. If using fresh peas, blanch them in boiling water for 1-2 minutes, then plunge into an ice bath to stop the cooking. Drain well.
- Chop Your Ingredients: Finely dice the red onion and celery, chop the hard-boiled eggs, and cube or shred the cheddar cheese. Finely chop the fresh dill.
- Whisk the Dressing: In a medium bowl, combine mayonnaise, sour cream (or Greek yogurt), apple cider vinegar, granulated sugar, salt, and pepper. Whisk until smooth and adjust seasoning as needed. Stir in the chopped dill.
- Combine and Gently Fold: In a large mixing bowl, add the thawed or blanched peas, diced red onion, diced celery, chopped eggs, and cheddar cheese.
- Dress the Salad: Pour the creamy dressing over the pea mixture and gently fold until evenly coated, being careful not to mash the peas.
- Chill to Perfection: Cover the bowl with plastic wrap and refrigerate for at least 1 hour, preferably 2-3 hours.
- Serve and Garnish: Before serving, stir the salad gently and transfer it to a serving bowl. If using, sprinkle crispy beef bacon bits on top just before serving.
Nutrition
- Serving Size: 1 bowl
- Calories: 250
- Sugar: 3 g
- Sodium: 300 mg
- Fat: 18 g
- Saturated Fat: 4 g
- Unsaturated Fat: 12 g
- Trans Fat: 0 g
- Carbohydrates: 15 g
- Fiber: 4 g
- Protein: 8 g
- Cholesterol: 70 mg
Keywords: For a lighter option, substitute Greek yogurt for sour cream. Ensure to thoroughly drain the peas to avoid a watery salad. Fresh dill is essential for flavor, but you can substitute with fresh mint or chives if desired.

Leave a Comment