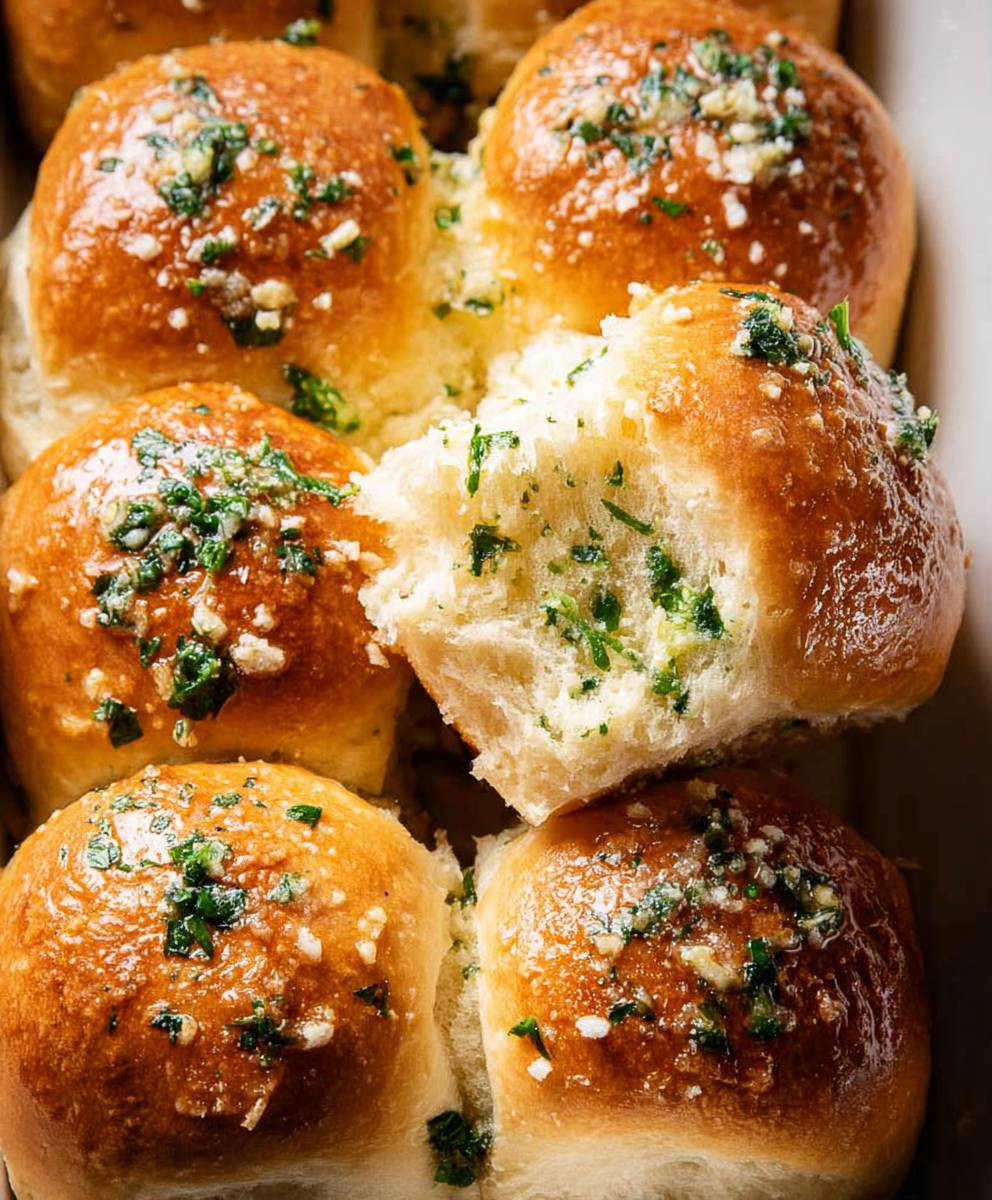
Garlic Bread Rolls: Is there anything more comforting than the aroma of warm, garlicky bread wafting through your kitchen? I think not! These aren’t just your average rolls; they’re a flavor explosion in every bite, a perfect blend of soft, pillowy dough and an irresistible garlic-herb butter that will have everyone reaching for seconds (and thirds!).
Garlic bread, in its various forms, has been a staple in many cultures for centuries. From the simple pleasures of toasted bread rubbed with garlic to the more elaborate versions we enjoy today, it’s a testament to the power of simple ingredients combined with culinary creativity. While the exact origins are debated, the love for garlic and bread is universal, making garlic bread rolls a welcome addition to any table.
What makes these rolls so beloved? It’s the perfect combination of textures – the soft, yielding interior of the roll contrasting with the slightly crisp, buttery crust. The taste, of course, is the star of the show. The pungent garlic, mellowed by butter and enhanced by fresh herbs, creates a symphony of flavors that’s both comforting and exciting. Plus, they’re incredibly versatile! Serve them as a side with pasta, soup, or salad, or enjoy them as a satisfying snack on their own. I find that they are also incredibly easy to make, which is always a win in my book!

Ingredients:
- 1 package (0.25 ounce) active dry yeast
- 1/4 cup warm water (105-115°F)
- 1 cup warm milk (105-115°F)
- 1/4 cup granulated sugar
- 1 teaspoon salt
- 1/4 cup melted unsalted butter, plus more for brushing
- 3 1/4 – 3 3/4 cups all-purpose flour, plus more for dusting
- 4 cloves garlic, minced
- 1/4 cup chopped fresh parsley
- 1/4 cup grated Parmesan cheese
- 1/4 teaspoon garlic powder
- Pinch of red pepper flakes (optional)
Preparing the Dough:
- Activate the Yeast: In a large bowl, dissolve the yeast in the warm water. Let it stand for 5-10 minutes, or until foamy. This indicates that the yeast is active and ready to use. If it doesn’t foam, your yeast might be old and you’ll need to start with a fresh packet.
- Combine Wet Ingredients: Add the warm milk, sugar, salt, and melted butter to the yeast mixture. Stir well to combine all the ingredients. The sugar helps feed the yeast and contributes to the bread’s flavor and browning.
- Gradually Add Flour: Begin adding the flour, one cup at a time, mixing well after each addition. Start with 3 1/4 cups and gradually add more until the dough starts to come together and pull away from the sides of the bowl. You might not need all 3 3/4 cups, depending on the humidity and the type of flour you’re using.
- Knead the Dough: Turn the dough out onto a lightly floured surface. Knead for 6-8 minutes, or until the dough is smooth and elastic. If the dough is too sticky, add a little more flour, a tablespoon at a time. Kneading develops the gluten in the flour, which gives the bread its structure and chewiness.
- First Rise: Place the dough in a lightly oiled bowl, turning to coat all sides. Cover the bowl with plastic wrap or a clean kitchen towel. Let it rise in a warm place for 1-1.5 hours, or until doubled in size. A warm environment helps the yeast work its magic and allows the dough to rise properly.
Making the Garlic Butter:
- Combine Ingredients: While the dough is rising, prepare the garlic butter. In a small bowl, combine the minced garlic, chopped parsley, Parmesan cheese, garlic powder, and red pepper flakes (if using) with the remaining melted butter. Mix well until everything is evenly distributed.
- Set Aside: Set the garlic butter aside until you’re ready to assemble the rolls. The flavors will meld together as it sits, creating a more intense garlic flavor.
Assembling and Baking the Rolls:
- Punch Down the Dough: Once the dough has doubled in size, gently punch it down to release the air. This helps to redistribute the yeast and prevents the bread from having large air pockets.
- Divide the Dough: Turn the dough out onto a lightly floured surface. Divide the dough into 12 equal pieces. You can use a kitchen scale to ensure they are all the same size for even baking.
- Shape the Rolls: Roll each piece of dough into a ball. Place the rolls in a greased 9×13 inch baking dish. Make sure to leave a little space between each roll to allow for expansion during the second rise.
- Second Rise: Cover the baking dish with plastic wrap or a clean kitchen towel. Let the rolls rise in a warm place for 30-45 minutes, or until they are puffy and almost doubled in size. This second rise is crucial for creating light and airy rolls.
- Preheat Oven: Preheat your oven to 375°F (190°C). Make sure your oven is properly preheated before baking to ensure even cooking.
- Brush with Garlic Butter: Once the rolls have risen, brush them generously with the prepared garlic butter. Make sure to get the butter into all the nooks and crannies for maximum flavor.
- Bake: Bake for 20-25 minutes, or until the rolls are golden brown and cooked through. A toothpick inserted into the center of a roll should come out clean.
- Optional: Broil for Extra Color: If you want a deeper golden brown color, you can broil the rolls for the last 1-2 minutes of baking. Watch them closely to prevent burning!
- Serve: Remove the rolls from the oven and let them cool slightly before serving. These garlic bread rolls are best served warm.
Tips and Variations:
- Cheese Lovers: Add shredded mozzarella or provolone cheese on top of the rolls before baking for an extra cheesy treat.
- Herb Infusion: Experiment with different herbs in the garlic butter, such as oregano, thyme, or rosemary.
- Spicy Kick: Add a pinch of cayenne pepper to the garlic butter for a spicy kick.
- Make Ahead: You can prepare the dough ahead of time and store it in the refrigerator overnight. Let it come to room temperature before shaping and baking.
- Freezing: Baked garlic bread rolls can be frozen for up to 2 months. Wrap them tightly in plastic wrap and then in foil. Reheat in the oven at 350°F (175°C) until warmed through.
- Using a Stand Mixer: If you have a stand mixer, you can use it to make the dough. Use the dough hook attachment and knead for 6-8 minutes on medium speed.
- Garlic Infused Oil: For a more subtle garlic flavor, you can infuse the butter with garlic by gently heating minced garlic in the butter over low heat for a few minutes before adding the other ingredients. Be careful not to burn the garlic.
- Different Flours: While all-purpose flour works great, you can also experiment with using bread flour for a slightly chewier texture.
- Serving Suggestions: These garlic bread rolls are perfect as a side dish for pasta, soups, salads, or grilled meats. They’re also great on their own as a snack.
Troubleshooting:
- Dough Not Rising: If your dough isn’t rising, make sure your yeast is fresh and that the water and milk are at the correct temperature (105-115°F). Also, ensure that the room is warm enough.
- Rolls Too Dense: If your rolls are too dense, you may have added too much flour or not kneaded the dough enough. Be careful not to overwork the dough, but make sure it’s smooth and elastic.
- Rolls Burning: If your rolls are burning on top, lower the oven temperature slightly or cover them loosely with foil during the last few minutes of baking.
Enjoy your homemade garlic bread rolls! They’re sure to be a hit with your family and friends.
Conclusion:
And there you have it! These Garlic Bread Rolls are more than just a side dish; they’re an experience. From the intoxicating aroma that fills your kitchen to the satisfyingly soft and garlicky bite, this recipe is a guaranteed crowd-pleaser. I truly believe that once you try these, you’ll never reach for store-bought garlic bread again. The homemade touch makes all the difference, and the simple steps ensure that even novice bakers can achieve bakery-worthy results.
But why is this recipe a must-try? It’s all about the perfect balance of flavors and textures. The soft, pillowy rolls are infused with a generous amount of garlic butter, creating a symphony of savory goodness. The slight crispness on the outside gives way to a tender, melt-in-your-mouth interior. Plus, the recipe is incredibly versatile. You can easily adapt it to your own preferences and dietary needs.
Speaking of versatility, let’s talk serving suggestions and variations! These Garlic Bread Rolls are fantastic alongside pasta dishes, soups, salads, or even as a standalone snack. Imagine dipping them into a creamy tomato soup on a chilly evening – pure comfort food! For a heartier meal, try serving them with grilled chicken or steak.
Want to get creative? Consider adding a sprinkle of Parmesan cheese before baking for an extra layer of flavor. Or, if you’re feeling adventurous, incorporate some chopped fresh herbs like parsley, oregano, or rosemary into the garlic butter. For a spicier kick, add a pinch of red pepper flakes. If you’re dairy-free, simply substitute the butter with a plant-based alternative. The possibilities are endless!
Another great variation is to add a cheesy surprise! Before baking, create a small well in the center of each roll and fill it with a cube of mozzarella or provolone cheese. As the rolls bake, the cheese will melt and create a gooey, cheesy center that’s simply irresistible. This is especially popular with kids (and adults who are kids at heart!).
These rolls are also perfect for potlucks and gatherings. They’re easy to transport and always a hit with guests. You can even bake them ahead of time and reheat them just before serving. To reheat, simply wrap them in foil and warm them in a low oven (around 300°F) for about 10-15 minutes.
I’ve poured my heart into perfecting this recipe, and I’m confident that you’ll love it as much as I do. It’s a simple yet satisfying way to elevate any meal and bring a touch of homemade goodness to your table.
So, what are you waiting for? Gather your ingredients, preheat your oven, and get ready to bake some seriously delicious Garlic Bread Rolls. I can’t wait to hear about your experience! Please, share your photos and feedback in the comments below. Let me know what variations you tried and how they turned out. Your insights are invaluable and help me continue to improve and share even more amazing recipes. Happy baking! I hope you enjoy this recipe as much as I do.
Garlic Bread Rolls: The Ultimate Guide to Baking Delicious Rolls
Soft, fluffy garlic bread rolls, perfect as a side dish or snack. Easy to make with simple ingredients!
Ingredients
- 1 package (0.25 ounce) active dry yeast
- 1/4 cup warm water (105-115°F)
- 1 cup warm milk (105-115°F)
- 1/4 cup granulated sugar
- 1 teaspoon salt
- 1/4 cup melted unsalted butter, plus more for brushing
- 3 1/4 – 3 3/4 cups all-purpose flour, plus more for dusting
- 4 cloves garlic, minced
- 1/4 cup chopped fresh parsley
- 1/4 cup grated Parmesan cheese
- 1/4 teaspoon garlic powder
- Pinch of red pepper flakes (optional)
Instructions
- In a large bowl, dissolve the yeast in the warm water. Let it stand for 5-10 minutes, or until foamy. This indicates that the yeast is active and ready to use. If it doesn’t foam, your yeast might be old and you’ll need to start with a fresh packet.
- Add the warm milk, sugar, salt, and 1/4 cup melted butter to the yeast mixture. Stir well to combine all the ingredients.
- Begin adding the flour, one cup at a time, mixing well after each addition. Start with 3 1/4 cups and gradually add more until the dough starts to come together and pull away from the sides of the bowl. You might not need all 3 3/4 cups, depending on the humidity and the type of flour you’re using.
- Turn the dough out onto a lightly floured surface. Knead for 6-8 minutes, or until the dough is smooth and elastic. If the dough is too sticky, add a little more flour, a tablespoon at a time.
- Place the dough in a lightly oiled bowl, turning to coat all sides. Cover the bowl with plastic wrap or a clean kitchen towel. Let it rise in a warm place for 1-1.5 hours, or until doubled in size.
- While the dough is rising, prepare the garlic butter. In a small bowl, combine the minced garlic, chopped parsley, Parmesan cheese, garlic powder, and red pepper flakes (if using) with the remaining melted butter. Mix well until everything is evenly distributed.
- Set the garlic butter aside until you’re ready to assemble the rolls.
- Once the dough has doubled in size, gently punch it down to release the air.
- Turn the dough out onto a lightly floured surface. Divide the dough into 12 equal pieces.
- Roll each piece of dough into a ball. Place the rolls in a greased 9×13 inch baking dish. Make sure to leave a little space between each roll to allow for expansion during the second rise.
- Cover the baking dish with plastic wrap or a clean kitchen towel. Let the rolls rise in a warm place for 30-45 minutes, or until they are puffy and almost doubled in size.
- Preheat your oven to 375°F (190°C).
- Once the rolls have risen, brush them generously with the prepared garlic butter.
- Bake for 20-25 minutes, or until the rolls are golden brown and cooked through. A toothpick inserted into the center of a roll should come out clean.
- Optional: Broil for Extra Color: If you want a deeper golden brown color, you can broil the rolls for the last 1-2 minutes of baking. Watch them closely to prevent burning!
- Remove the rolls from the oven and let them cool slightly before serving. These garlic bread rolls are best served warm.
Notes
- Cheese Lovers: Add shredded mozzarella or provolone cheese on top of the rolls before baking for an extra cheesy treat.
- Herb Infusion: Experiment with different herbs in the garlic butter, such as oregano, thyme, or rosemary.
- Spicy Kick: Add a pinch of cayenne pepper to the garlic butter for a spicy kick.
- Make Ahead: You can prepare the dough ahead of time and store it in the refrigerator overnight. Let it come to room temperature before shaping and baking.
- Freezing: Baked garlic bread rolls can be frozen for up to 2 months. Wrap them tightly in plastic wrap and then in foil. Reheat in the oven at 350°F (175°C) until warmed through.
- Using a Stand Mixer: If you have a stand mixer, you can use it to make the dough. Use the dough hook attachment and knead for 6-8 minutes on medium speed.
- Garlic Infused Oil: For a more subtle garlic flavor, you can infuse the butter with garlic by gently heating minced garlic in the butter over low heat for a few minutes before adding the other ingredients. Be careful not to burn the garlic.
- Different Flours: While all-purpose flour works great, you can also experiment with using bread flour for a slightly chewier texture.
- Serving Suggestions: These garlic bread rolls are perfect as a side dish for pasta, soups, salads, or grilled meats. They’re also great on their own as a snack.


Leave a Comment