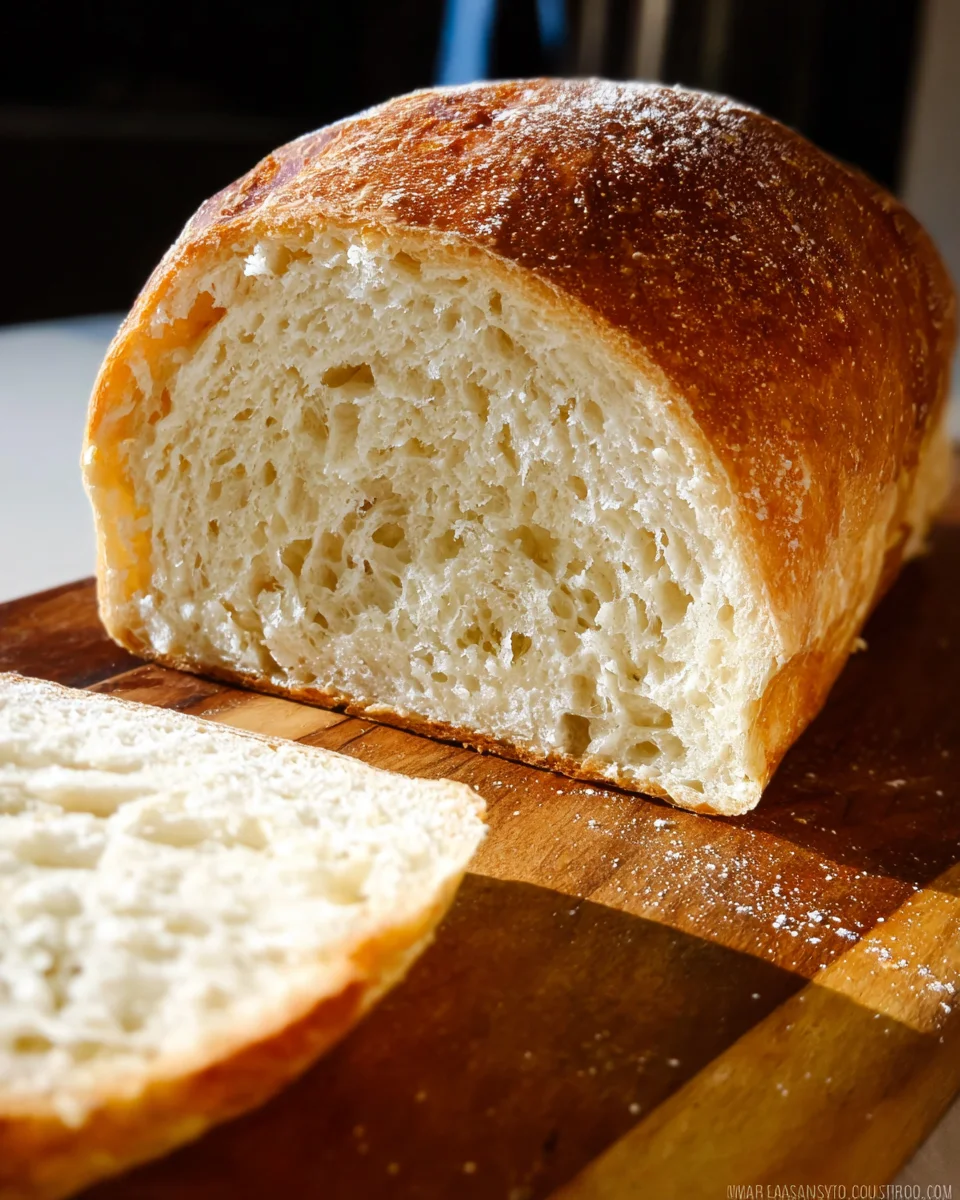
Grandmas Perfect Homemade Bread is more than just a recipe; it’s a fragrant embrace, a comforting memory that transcends generations. Have you ever walked into a home where the irresistible scent of freshly baked bread filled every corner, instantly transporting you back to simpler times? That quintessential aroma, the golden crust, and the tender, airy crumb – these are the hallmarks of a truly exceptional loaf, the kind only a grandma seems to master, making every slice an experience in itself.
The Enduring Legacy of Homemade Bread
Across cultures and continents, homemade bread has long been a cornerstone of family life, a symbol of sustenance, warmth, and love shared around the table. It represents a heritage of baking, often passed down through generations, connecting us to our past with every knead and proof. There’s a profound connection we feel when we bake, an almost meditative process that yields incredibly rewarding results. People adore this dish not just for its unparalleled taste and delightful texture – that perfect balance of a crispy exterior and a pillowy soft interior – but also for the sheer joy and satisfaction it brings to both the baker and those who get to savor a slice, still warm from the oven.
I am thrilled to guide you through the steps to recreate that cherished experience. With a little patience and a lot of love, you too can achieve Grandmas Perfect Homemade Bread, transforming your kitchen into a haven of delectable aromas and creating new, lasting memories for your loved ones.

Ingredients:
- For the Dough:
- 3 cups (720ml) warm water, between 105°F and 115°F (40°C-46°C) – This specific temperature is crucial for activating the yeast without killing it. Think of it as a warm bath for your yeast!
- 2 tablespoons (28g) active dry yeast – Using active dry yeast means we’ll need to proof it first, giving us a visual confirmation that it’s alive and ready to make our Grandmas Perfect Homemade Bread light and airy.
- 1 tablespoon (18g) granulated sugar (for yeast) – This little bit of sugar acts as food for the yeast, helping it to wake up and get bubbling.
- 1 tablespoon (18g) fine sea salt – Salt is vital not just for flavor, but also for controlling yeast activity and strengthening the gluten structure. Don’t skip it!
- 6 ½ to 7 cups (about 780g-840g) bread flour, plus more for dusting – I always reach for bread flour because its higher protein content develops stronger gluten, giving our Grandmas Perfect Homemade Bread that signature chewy texture and excellent rise. All-purpose flour can work in a pinch, but the results might be slightly different.
- ¼ cup (60ml) olive oil or melted unsalted butter, plus more for greasing – This adds richness, flavor, and contributes to a softer crumb. I find olive oil gives a lovely subtle note, but butter is equally delicious.
Preparing the Yeast and Wet Ingredients
- Activate the Yeast: Grab a large mixing bowl, preferably one that you’ll use for mixing all your dough. Pour in the 3 cups of warm water. It’s absolutely critical that the water temperature is just right – aim for that sweet spot between 105°F and 115°F (40°C-46°C). If it’s too cold, your yeast won’t wake up; too hot, and you’ll unfortunately kill it, leading to a dense, sad loaf. I always use a kitchen thermometer to be precise here; it truly makes all the difference in achieving Grandmas Perfect Homemade Bread. Sprinkle the 2 tablespoons of active dry yeast and the 1 tablespoon of granulated sugar over the warm water. Give it a gentle stir, just enough to moisten everything. Now, let it sit undisturbed for about 5 to 10 minutes. What you’re looking for is a frothy, foamy layer to form on the surface. This beautiful bubbly layer is proof that your yeast is alive, active, and eager to get to work! If you don’t see any foam, your yeast might be old or the water temperature was off, and you’ll need to start this step over. Trust me, it’s worth taking the time to ensure your yeast is happy.
- Combine Wet Ingredients: Once your yeast is wonderfully frothy, it’s time to add the rest of the wet ingredients. Pour in the ¼ cup of olive oil or melted butter. Then, add the 1 tablespoon of fine sea salt. Give everything a good stir with a whisk or a sturdy spoon until it’s well combined. The salt needs to dissolve evenly, as it plays a crucial role not only in the flavor profile of Grandmas Perfect Homemade Bread but also in regulating the yeast’s activity and strengthening the gluten structure. It’s a delicate balance, and making sure it’s fully incorporated now helps prevent pockets of too much salt later on.
Mixing and Kneading the Dough
- Initial Mixing of Flour: Now for the flour! Gradually add the bread flour, about 1 cup at a time, to the wet mixture. As you add each cup, mix it in thoroughly with a strong wooden spoon or a dough whisk. At first, it will be quite loose and shaggy. As you continue to add flour, the dough will start to come together, becoming thicker and more difficult to stir. You might find you don’t need the full 7 cups of flour, or you might need a tiny bit more – it really depends on the humidity in your kitchen and the flour itself. I usually start with 6 ½ cups and only add more if the dough is still excessively sticky.
- Bringing the Dough Together: Once the dough becomes too stiff to stir, turn it out onto a lightly floured clean work surface. Resist the urge to add too much flour at this stage, as it can make your Grandmas Perfect Homemade Bread dry and dense. Your aim here is to get all the flour incorporated. Use your hands to gently fold and press the dough, bringing any loose bits into the main mass. It will feel sticky, but persevere! This initial gathering stage is essential before we move on to proper kneading.
-
Kneading – The Heart of Grandmas Perfect Homemade Bread:
This is where the magic truly happens, developing the gluten that gives our bread its structure and chew. You have two excellent options here:
Hand Kneading:
If you’re kneading by hand, prepare for a wonderful workout and a truly tactile experience. Sprinkle a minimal amount of flour on your clean countertop. Take the shaggy dough, push it away from you with the heel of your hand, then fold it back over itself. Rotate the dough a quarter turn and repeat: push, fold, rotate. Continue this rhythm for about 10-15 minutes. At first, the dough will be very sticky, tearing easily. As you knead, you’ll notice a remarkable transformation. The stickiness will gradually decrease, the dough will become smoother, more elastic, and springier. It will start to resist your pushes, indicating the gluten is developing. You’ll also notice it becoming less shaggy and more uniform. The surface should eventually become smooth and supple. This process is meditative, and I find a real joy in feeling the dough transform under my hands. The goal is to develop enough gluten so that when you perform the “windowpane test,” a small piece of dough can be stretched thin enough to see light through it without tearing.
Stand Mixer Kneading:
If you’re using a stand mixer with a dough hook attachment, this process is less strenuous but equally effective. Place the shaggy dough into the mixer bowl. Start the mixer on low speed (setting 2 on most KitchenAid models) for about 2 minutes to bring the dough together. Then, increase the speed to medium-low (setting 3-4) and let it knead for 8-10 minutes. Keep an eye on the dough; it should be gathering around the hook, occasionally slapping the sides of the bowl. If it looks too sticky after 5 minutes, add a tablespoon of flour at a time until it cleans the sides of the bowl. If it looks too dry and is struggling to come together, add a teaspoon of water. Like hand kneading, the dough should become smooth, elastic, and pass the “windowpane test.” The beauty of using a mixer is its consistency, ensuring even gluten development throughout the dough, which is key for a uniform texture in your Grandmas Perfect Homemade Bread.
Regardless of your method, the dough is properly kneaded when it’s smooth, elastic, and passes the “windowpane test.” To do this, pinch off a small piece of dough (about the size of a golf ball), and gently stretch it with your fingers. If you can stretch it thin enough to see light through it without it tearing, your gluten is perfectly developed. If it tears easily, keep kneading for a few more minutes and test again.
The First Rise (Bulk Fermentation)
- Preparing for the First Rise: Lightly grease a large, clean bowl with olive oil or a neutral cooking oil. Place your beautifully kneaded dough into the bowl, turning it once to coat the entire surface with a thin layer of oil. This prevents the dough from drying out and sticking to the bowl as it rises. Now, cover the bowl tightly with plastic wrap or a clean kitchen towel. It’s important to create a snug environment for the dough to keep moisture in.
- The Ideal Rising Environment: Find a warm, draft-free spot in your kitchen. An ideal temperature for yeast activity is around 75-80°F (24-27°C). I often turn on my oven to its lowest setting for a minute, then turn it off and let the dough rise inside the slightly warm oven (with the door ajar sometimes) to create a perfect little proofing box. Alternatively, placing it near a sunny window (but not in direct blazing sun), on top of a warm refrigerator, or even in a microwave (turned off, of course!) can work wonders.
- Monitoring the Rise: Let the dough rise for 1 to 1 ½ hours, or until it has doubled in size. This is called bulk fermentation, and it’s a crucial step where the yeast produces gases that inflate the dough, giving our Grandmas Perfect Homemade Bread its light texture. The exact timing can vary depending on the temperature of your kitchen and the vigor of your yeast. Don’t rush this stage; patience is truly a virtue here. To check if it’s ready, gently poke two fingers into the dough about half an inch deep. If the indentations remain, the dough is ready. If they spring back quickly, it needs a little more time. Over-proofing can lead to a slightly alcoholic smell and a weaker structure, while under-proofing means a dense loaf, so watch it closely! The aroma filling your kitchen will be subtly yeasty and wonderful – a true sign of good things to come.
Shaping the Loaves
- Punch Down the Dough: Once the dough has doubled, gently punch it down. This isn’t aggressive; it’s more of a firm press to release the accumulated gases. This step redistributes the yeast and nutrients, equalizes the temperature, and helps develop a finer crumb structure. Turn the dough out onto a lightly floured surface.
- Divide and Rest: If you’re making two standard loaves (which I usually do with this recipe for Grandmas Perfect Homemade Bread), use a bench scraper or a sharp knife to divide the dough into two equal pieces. For the best rise and crumb, it’s a good idea to let the dough rest, covered, for 10-15 minutes after dividing. This brief rest period, often called a bench rest, allows the gluten to relax, making the dough much easier to shape without tearing or shrinking back.
- Shaping a Classic Loaf: Take one piece of dough. Gently flatten it into a rectangle, about 9×13 inches, on your lightly floured surface. Imagine the long side facing you. Now, take the top edge and fold it down to the center, pressing firmly with your fingertips to seal the seam. Then, take the bottom edge and fold it up to overlap the previous fold, pressing firmly to seal. You now have a rough log. Turn the log so a short end is facing you. Starting from the top, tightly roll the dough down towards you, pressing firmly with each turn to eliminate any air pockets. The goal here is to create tension on the surface of the dough, which helps it hold its shape during the second rise and baking. Once you reach the bottom, pinch the final seam closed tightly along the bottom of the loaf and also pinch the ends to seal them. This tight seal is crucial for maintaining the structure of Grandmas Perfect Homemade Bread. Repeat with the second piece of dough.
The Second Rise (Proofing)
- Prepare for the Second Rise: Lightly grease two standard loaf pans (9×5 inches). Carefully place each shaped loaf, seam-side down, into its prepared loaf pan. It’s important to ensure the seam is underneath to prevent it from bursting open during baking.
- The Final Proof: Cover the loaf pans loosely with plastic wrap or a clean kitchen towel. Return them to that same warm, draft-free spot you used for the first rise. Let them rise for another 45-60 minutes, or until they have nearly doubled in size and the dough gently springs back when lightly poked. This second rise, often called proofing, is shorter but equally important. It gives the yeast one last chance to create gas, contributing to the final volume and light texture of Grandmas Perfect Homemade Bread. You’ll notice the loaves look beautifully plump and full. While they won’t look exactly like the finished bread, they’ll have significantly expanded. Towards the end of this rise, about 15-20 minutes before you anticipate it being ready, preheat your oven.
Baking Grandmas Perfect Homemade Bread
- Preheat Your Oven: This is a critical step for a good crust and rise. Preheat your oven to 375°F (190°C) with a rack in the center. Allow it to preheat for at least 15-20 minutes after it reaches temperature, ensuring the oven walls and internal temperature are consistently hot. A properly preheated oven gives the bread an immediate burst of heat, known as oven spring, which helps it achieve maximum volume.
- Scoring (Optional, but Recommended): Just before placing the loaves into the oven, you can lightly score the top of each loaf with a very sharp knife or a baker’s lame. Make one or two shallow (about ½ inch deep) diagonal slashes across the top. This isn’t just for aesthetics; it allows the bread to expand in a controlled way during baking, preventing uncontrolled tearing or blowouts in other areas. It truly makes for a more professional-looking Grandmas Perfect Homemade Bread.
- Bake the Loaves: Carefully place the loaf pans into the preheated oven. Bake for 30-35 minutes. After about 15-20 minutes, you might notice the tops browning quite quickly. If this happens, you can loosely tent the loaves with aluminum foil to prevent them from getting too dark before the inside is fully cooked.
- Check for Doneness: The bread is done when the crust is a beautiful golden brown and sounds hollow when tapped on the bottom. For absolute certainty, I always recommend using an instant-read thermometer. Insert it into the center of the loaf; it should register an internal temperature of 190-200°F (88-93°C). If it hasn’t reached this temperature, return it to the oven for another 5-10 minutes, checking every few minutes. There’s nothing worse than an underbaked Grandmas Perfect Homemade Bread, so don’t be shy about checking the temperature!
Cooling and Enjoying
- Immediate Removal from Pans: As soon as you pull the loaves from the oven, immediately remove them from their pans. If you leave them in the hot pans, the residual heat will continue to cook the sides and bottom, making them soggy. Place them on a wire cooling rack.
- Cool Completely: This is arguably one of the most challenging but crucial steps. Allow Grandmas Perfect Homemade Bread to cool completely on the wire rack for at least 1 ½ to 2 hours before slicing. I know, I know, the smell is intoxicating, and you’ll want to dive in right away! However, slicing hot bread can lead to a gummy, dense texture because the internal moisture and starches are still settling and firming up. Patience here is rewarded with the perfect texture and flavor. Once cooled, you can slice into thick pieces and enjoy the fruits of your labor! This homemade bread is wonderful simply with butter, as a base for sandwiches, or accompanying a hearty soup. You’ll truly taste the difference that making Grandmas Perfect Homemade Bread from scratch makes.
Conclusion:
Well, my friends, we’ve reached the end of our journey through this incredible recipe, and I truly hope you’re feeling as inspired as I am about what you’ve learned. This isn’t just another bread recipe; it’s an invitation to experience something truly special, a cornerstone of comfort and culinary delight that will quickly become a cherished part of your home baking repertoire.
Why This Recipe is an Absolute Must-Try
If you take one thing away from this, let it be that the effort, no matter how small, is profoundly rewarding. What makes this particular recipe stand out from the myriad of bread recipes out there is its unparalleled simplicity married with an utterly divine outcome. We’re talking about a texture that is simultaneously crisp on the crust and unbelievably soft, airy, and yielding on the inside. The aroma alone, as it bakes and wafts through your kitchen, is enough to justify every moment spent. It’s that deep, yeasty, comforting scent of pure goodness that store-bought bread simply can’t replicate. Furthermore, the flavor profile is rich and wholesome, with a subtle sweetness that makes it incredibly versatile. This isn’t just bread; it’s a warm hug, a taste of tradition, and a testament to the magic of simple ingredients transformed by loving hands. There’s a profound sense of satisfaction that comes from pulling a golden-brown loaf from your own oven, a feeling of accomplishment that genuinely nourishes the soul as much as the bread nourishes the body. It’s consistent, reliable, and absolutely delicious every single time.
This is precisely why I’ve come to affectionately call this the recipe for Grandmas Perfect Homemade Bread. It embodies all the qualities you’d expect from a timeless, family-favorite recipe: ease of execution, wholesome ingredients, and an utterly irresistible result that beckons you back for “just one more slice.” The joy isn’t just in eating it, but in the entire process – watching the dough rise, feeling its elasticity, and finally, slicing into that perfectly baked loaf. It’s a sensory experience from start to finish, a true return to the fundamentals of good food made with care.
Serving Suggestions and Creative Variations
Now that you’re convinced of its magic, let’s talk about how to truly savor every crumb. While a simple slice, still warm from the oven, slathered with unsalted butter is a transcendental experience in itself, this bread opens up a world of culinary possibilities. For breakfast, imagine it toasted to perfection, topped with homemade jam, a generous smear of cream cheese and chives, or even mashed avocado and a sprinkle of chili flakes. It makes the most incredible French toast you’ve ever tasted, soaking up the custard beautifully without falling apart, yielding a golden, custardy interior with crisp edges.
For lunch, elevate your sandwich game dramatically. A classic BLT or a grilled cheese sandwich made with this bread transforms from an everyday meal into an extraordinary treat. Consider open-faced sandwiches with roasted vegetables and a drizzle of balsamic glaze, or simply serve thick slices alongside a hearty bowl of soup or stew for an ultimate comfort meal. The robust structure of the bread holds up wonderfully to moist fillings, making it ideal for everything from pulled pork sliders to elegant tea sandwiches. Its subtle sweetness also pairs beautifully with savory elements, creating a balanced and delightful bite every time.
And if, by some miracle, you have any left over (which is a rare occurrence in my house!), don’t let a single piece go to waste. Stale bread can be cubed, tossed with olive oil and herbs, and baked into crunchy croutons for salads, or blitzed into fresh breadcrumbs for coating chicken or topping casseroles. You could even transform it into a decadent bread pudding, soaking up a sweet custard and baked until golden and bubbling, perhaps with some seasonal berries. The possibilities are truly endless, and each variation only highlights the exceptional quality and versatility of the base bread, ensuring nothing goes unappreciated.
Your Turn to Bake and Share!
So, what are you waiting for? I wholeheartedly encourage you to roll up your sleeves, gather your ingredients, and embark on this wonderful baking adventure. Trust me, the moment you taste that first bite of your very own homemade loaf, still warm and fragrant, you’ll understand exactly what I mean. Don’t just read about it; experience it! I am so excited for you to discover the profound satisfaction that comes with baking this recipe, not to mention the praise you’ll receive from everyone lucky enough to try a slice. Once you’ve made it, please come back and share your experiences, your favorite serving suggestions, or any creative variations you came up with in the comments below. Your insights and culinary triumphs inspire us all! Happy baking, and enjoy every delicious moment.
Grandmas Perfect Homemade Bread
More than just a recipe, Grandma’s Perfect Homemade Bread is a comforting memory, a fragrant embrace, creating golden crusts and tender, airy crumbs. This recipe guides you to bake the best homemade bread.
Ingredients
Instructions
Important Information
Nutrition Facts (Per Serving)
It is important to consider this information as approximate and not to use it as definitive health advice.
Allergy Information
Please check ingredients for potential allergens and consult a health professional if in doubt.


Leave a Comment