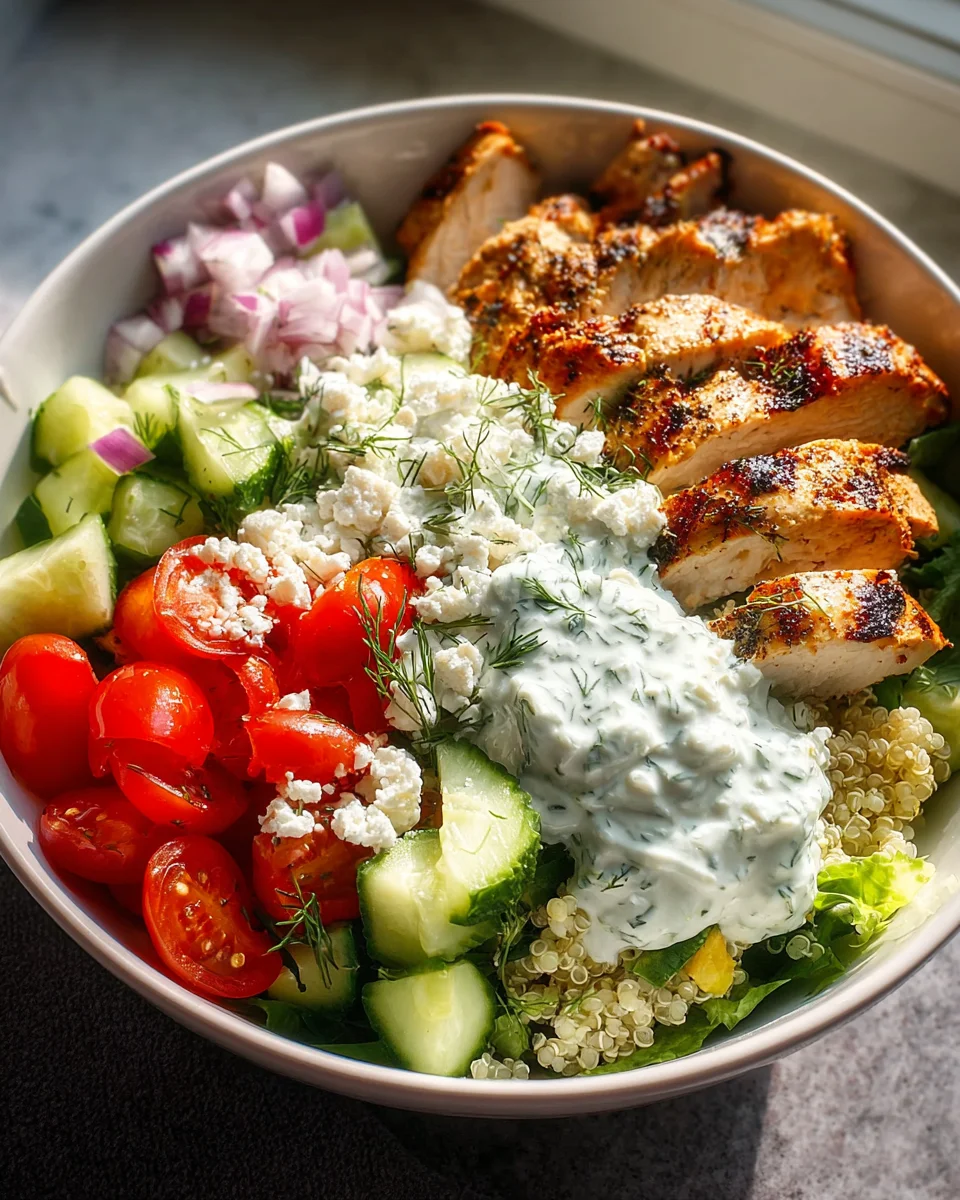
Greek Chicken Bowls are about to become your new favorite go-to meal, bringing the vibrant flavors of the Mediterranean directly to your kitchen in one satisfying package! I’ve always been captivated by the freshness and simplicity of Greek cuisine, a tradition deeply rooted in centuries of healthy eating and the bountiful produce of the region. While the ‘bowl’ concept might be a modern twist, the essence of these dishes – fresh vegetables, tender marinated chicken, creamy tzatziki, and savory feta – embodies the very heart of Greek culinary philosophy.
People absolutely adore this dish not just for its incredible taste and delightful textures, from the juicy, perfectly seasoned chicken to the crisp cucumbers and tangy olives, but also for its remarkable convenience and health benefits. It’s a fantastic way to enjoy a balanced, protein-rich meal that feels indulgent yet light, perfect for meal prepping or a quick weeknight dinner. These Greek Chicken Bowls offer a symphony of flavors that will transport your taste buds straight to a sun-drenched taverna, proving that healthy eating can be incredibly delicious and exciting.

Ingredients:
- For the Greek Marinated Chicken:
- 1.5 lbs boneless, skinless chicken breasts or thighs (I often opt for thighs because they stay wonderfully juicy!)
- 1/4 cup olive oil (a good quality extra virgin olive oil makes a difference here)
- 1/4 cup fresh lemon juice (this will be the juice from about 1-2 medium-sized lemons)
- 4 cloves garlic, thoroughly minced
- 2 tablespoons dried oregano (Greek oregano, if you can find it, is exceptionally fragrant)
- 1 teaspoon dried thyme
- 1 teaspoon salt (I prefer Kosher salt for its even flavor distribution)
- 1/2 teaspoon freshly ground black pepper
- Optional: 1 tablespoon fresh dill or parsley, finely chopped (can be added to the marinade or reserved for garnish)
- For the Creamy Tzatziki Sauce:
- 1 cup plain Greek yogurt (full-fat or 2%, it’s crucial that it’s plain and unsweetened for the best authentic flavor)
- 1/2 English cucumber, grated and then meticulously squeezed dry
- 2 cloves garlic, minced very finely (or grated, for a smoother texture)
- 1 tablespoon fresh lemon juice
- 1 tablespoon fresh dill, chopped (if you don’t have fresh, 1 teaspoon of dried dill can be substituted, but fresh is truly superior)
- 1 tablespoon olive oil
- Salt and freshly ground black pepper, to taste
- For the Fluffy Lemon Herb Rice:
- 1 cup basmati or long-grain white rice (basmati has a lovely aroma and texture)
- 2 cups chicken broth or vegetable broth (or water, though broth adds more flavor)
- 1 tablespoon olive oil
- 1/2 lemon, both zested and juiced
- 1/4 cup fresh parsley, finely chopped
- 1/4 cup fresh dill, finely chopped
- 1/2 teaspoon salt
- For the Fresh Greek Salad Base:
- 1 head romaine lettuce, thoroughly washed and chopped into bite-sized pieces
- 1 English cucumber, diced
- 1 pint cherry tomatoes, halved, or 2-3 ripe Roma tomatoes, diced
- 1/2 red onion, thinly sliced (for a milder flavor, you can quick-pickle these in a little red wine vinegar)
- 1 cup Kalamata olives, pitted and halved (the briny kick is essential!)
- 1 red bell pepper, deseeded and diced
- 1/2 cup crumbled feta cheese (sheep or goat milk feta is my favorite for authenticity)
- For the Greek Vinaigrette Dressing:
- 1/2 cup olive oil (again, a good quality one shines here)
- 1/4 cup red wine vinegar
- 1 tablespoon dried oregano
- 1 teaspoon Dijon mustard (this is optional, but it helps emulsify the dressing and adds a nice zing)
- 1/2 teaspoon salt
- 1/4 teaspoon freshly ground black pepper
- Optional Toppings & Servings:
- Warm pita bread or soft pita wraps (perfect for scooping!)
- Extra fresh dill or parsley, for that beautiful final garnish
- A dollop of creamy hummus
- Fresh lemon wedges, for an extra burst of citrus
1. Preparing the Greek Marinated Chicken
This is where we infuse our chicken with those classic Greek flavors that make these Greek Chicken Bowls so utterly delicious and unforgettable. It’s a surprisingly simple process, but paying attention to the marinating time is crucial for maximizing flavor, tenderness, and ensuring your chicken is packed with zesty, herbaceous goodness.
- Prepare the Chicken: If you’re using boneless, skinless chicken breasts, I highly recommend slicing them horizontally to create thinner cutlets. Alternatively, you can place them between two sheets of plastic wrap and pound them gently to an even thickness of about 3/4 inch. This ensures they cook evenly and absorb the marinade more effectively, preventing dry spots. If you’re opting for chicken thighs, you can usually leave them as is, or trim any excessive fat if that’s your preference. Always pat the chicken pieces thoroughly dry with paper towels before adding them to the marinade; this helps the flavors adhere better to the surface and promotes a better sear or char during cooking.
- Whisk the Marinade: In a medium-sized mixing bowl or a large, durable resealable plastic bag, combine all the glorious marinade ingredients: the generous pour of olive oil, the bright fresh lemon juice, the pungent minced garlic, fragrant dried oregano, earthy dried thyme, a good pinch of salt, and freshly ground black pepper. Whisk everything together thoroughly until it’s beautifully combined and forms a homogenous mixture. The quality of your olive oil here can genuinely elevate the final taste of your marinade and, by extension, your chicken, so don’t be shy about using one you truly enjoy.
- Marinate the Chicken: Carefully add the prepared chicken pieces to the bowl or bag with the whisked marinade. Take a moment to ensure that every single piece of chicken is thoroughly coated in the aromatic mixture. If you’re using a bowl, make sure to cover it tightly with plastic wrap to prevent any refrigerator odors from getting in or out. Place the chicken in the refrigerator to marinate. For a decent flavor infusion, allow at least 30 minutes. However, for truly optimal flavor penetration and tenderness, I’ve found that 2-4 hours is ideal. If you’re a planner, marinating overnight (up to a maximum of 12 hours) yields the most intensely flavorful and succulent chicken, especially for leaner chicken breasts. It’s important not to marinate for more than 24 hours because the acidity from the lemon juice can actually start to “cook” the chicken proteins, leading to a tougher texture rather than a tender one.
-
Cook the Chicken: When you’re ready to cook, remove the marinated chicken from the refrigerator and let it sit at room temperature for about 15-20 minutes. This little trick helps to ensure more even cooking and prevents the chicken from seizing up when it hits the heat.
- Grilling: Preheat your outdoor grill or indoor grill pan to medium-high heat. Once hot, lightly oil the grates to prevent sticking. Place the chicken on the grill and cook for approximately 5-7 minutes per side, adjusting the time based on the thickness of your chicken pieces, until it’s beautifully cooked through and boasts appealing char marks. Always verify doneness with a meat thermometer; the internal temperature should register 165°F (74°C).
- Pan-Searing: Heat 1-2 tablespoons of olive oil in a large, heavy-bottomed skillet or a cast-iron pan over medium-high heat until shimmering. Once hot, carefully add the chicken in a single layer, making sure not to overcrowd the pan (it’s better to cook in batches if necessary to ensure a good sear rather than steaming). Sear for 6-8 minutes per side until each piece is golden brown, cooked through, and has a delightful crust.
- Baking: Preheat your oven to a robust 400°F (200°C). Arrange the chicken pieces on a baking sheet that you’ve lined with parchment paper for easy cleanup. Bake for 20-25 minutes, flipping the chicken halfway through the baking time, or until it’s thoroughly cooked and reaches the safe internal temperature.
- Rest and Slice: This step is often overlooked but it’s absolutely crucial for juicy chicken! Once your chicken is cooked, transfer it immediately to a clean cutting board and tent it loosely with aluminum foil. Let it rest for a full 5-10 minutes. This resting period allows the muscle fibers to relax and the delicious juices to redistribute throughout the meat, resulting in incredibly moist and tender chicken. After resting, slice the chicken against the grain into strips or dice it into uniform bite-sized pieces, making it perfectly suited for your vibrant Greek Chicken Bowls.
2. Crafting the Creamy Tzatziki Sauce
No truly authentic Greek Chicken Bowl is complete without a generous dollop of luscious, homemade tzatziki. This cool, refreshing, and garlicky yogurt sauce provides the perfect creamy counterpoint to the savory chicken and crisp fresh vegetables. Making it from scratch is incredibly simple, requires minimal effort, and yields a flavor that is far superior to most store-bought alternatives. Trust me, once you make your own, you’ll never go back!
- Prepare the Cucumber: Begin by grating half of an English cucumber using the large holes of a box grater. Once grated, immediately transfer the shredded cucumber to a clean kitchen towel, a cheesecloth, or several layers of sturdy paper towels. This step is unequivocally vital and non-negotiable! Cucumber holds a surprising amount of water, and if you skip or rush this step, your tzatziki will inevitably be watery, thin, and lack that desirable creamy consistency. Squeeze out as much excess water as you possibly can. I usually gather the edges of the towel and twist and press firmly until no more liquid drips out, ensuring the cucumber is as dry as possible. This makes a profound difference in the final texture of your sauce.
- Combine Ingredients: In a medium-sized mixing bowl, combine the thoroughly strained, grated cucumber with the rich, plain Greek yogurt. It’s essential to use plain, unsweetened Greek yogurt here; full-fat varieties tend to produce the absolute creamiest and most luxurious result, but 2% Greek yogurt also works wonderfully. Add the finely minced garlic (the smaller you mince it, the better it integrates), the bright fresh lemon juice, the beautifully fragrant chopped fresh dill, and the smooth olive oil.
- Season and Mix: Season the mixture generously with salt and freshly ground black pepper to taste. Using a spoon or a flexible spatula, mix all the ingredients thoroughly until everything is well combined and the sauce appears smooth, uniform, and enticingly creamy. Give it a taste and adjust seasonings if needed; sometimes a little more salt or lemon can truly make the flavors pop.
- Chill and Mellow: Cover the bowl tightly with plastic wrap and transfer the tzatziki to the refrigerator to chill for at least 30 minutes. This crucial resting period allows all the wonderful flavors to meld, deepen, and truly integrate with each other. For the absolute best flavor experience, I strongly recommend letting it chill for at least an hour, or even better, overnight. During this time, the sharpness of the garlic mellows slightly, and the fresh dill beautifully infuses its aromatic essence into the creamy yogurt. Give it a final good stir right before you’re ready to serve to ensure everything is perfectly combined and ready to go.
3. Cooking the Fluffy Lemon Herb Rice
This simple, yet incredibly aromatic rice provides a wonderfully comforting and absorbent base for your Greek Chicken Bowls, perfectly poised to soak up all the delectable flavors from the chicken, tzatziki, and dressing. It’s a fantastic and satisfying alternative to traditional pita bread, especially if you’re looking for a gluten-friendly option or simply something a little different to complete your meal. The fresh herbs and lemon add a bright, Mediterranean essence that truly complements the other components.
- Rinse the Rice: Place the basmati or long-grain white rice in a fine-mesh sieve and rinse it meticulously under cold running water. Continue rinsing until the water that drains from the bottom runs completely clear. This crucial step removes excess surface starch from the rice grains, which is key to preventing the rice from becoming sticky or gummy and instead promotes a wonderfully fluffy, separate-grain texture.
- Sauté Aromatics (Optional but Recommended): In a medium saucepan with a tight-fitting lid, heat 1 tablespoon of olive oil over medium heat until it shimmers gently. Add the rinsed and drained rice to the hot oil and stir continuously for about 1-2 minutes. You’ll notice the rice grains starting to become lightly toasted and turn opaque. This quick sautéing step is a chef’s secret for adding a subtle, nutty depth of flavor and further ensuring each grain remains distinct and fluffy in the final cooked product.
- Add Liquid and Seasoning: Carefully pour in the 2 cups of chicken broth (or vegetable broth/water). Adding broth instead of just water will significantly boost the overall flavor of your rice. Stir in the 1/2 teaspoon of salt and the bright, fragrant zest of half a lemon. Bring the liquid to a rolling boil over medium-high heat.
- Simmer and Steam: Once the liquid is vigorously boiling, immediately reduce the heat to the lowest possible setting. Cover the saucepan tightly with its lid. Allow the rice to simmer undisturbed for 15-18 minutes. It’s paramount to resist the urge to peek or lift the lid during this time! Lifting the lid allows precious steam to escape, and that steam is absolutely essential for the proper cooking and tenderization of the rice grains. The trapped steam ensures even cooking and a perfectly fluffy result.
- Rest and Fluff: After the 15-18 minutes of simmering, remove the saucepan completely from the heat, but here’s another critical point: keep the lid on! Let the rice rest, still covered, for an additional 5-10 minutes. This final resting period allows the residual steam to finish cooking the rice, ensuring every grain is perfectly tender, separate, and not mushy. It also allows the grains to firm up slightly.
- Finish with Herbs and Lemon: Finally, remove the lid. Add the fresh lemon juice from the remaining half a lemon, the vibrant chopped fresh parsley, and the aromatic chopped fresh dill to the cooked rice. Gently fluff the rice with a fork, carefully incorporating the fresh herbs and lemon zest and juice evenly throughout the grains. This infuses the rice with incredible freshness and brightness. Serve it warm, ready to be the perfect base for your bowls.
4. Assembling the Vibrant Greek Salad Base
The fresh salad component is what truly makes these Greek Chicken Bowls vibrant, texturally exciting, and wonderfully healthful. It’s packed with crisp textures, bright, tangy flavors, and an array of lovely Mediterranean colors that invite you to dig in. This is where we bring together all the fresh, raw veggies to create a truly irresistible foundation for our Greek masterpiece.
-
Prepare the Vegetables: This step involves a bit of chopping, but it’s well worth the effort for the beautiful presentation and varied textures.
- Thoroughly wash and chop the head of romaine lettuce into uniform bite-sized pieces. Romaine offers a fantastic crunch.
- Dice the English cucumber into small, manageable cubes.
- If using cherry tomatoes, halve them. If you prefer Roma tomatoes, dice them into pieces similar in size to your cucumber.
- Thinly slice the red onion. For those who prefer a milder onion flavor, a great trick is to place the slices in a bowl of ice water for 10-15 minutes, then drain them thoroughly. This significantly reduces their pungency.
- Pit and halve the Kalamata olives. Their briny, salty punch is a non-negotiable classic Greek flavor.
- Deseed and dice the red bell pepper. It adds sweetness and a beautiful splash of color.
- Combine Salad Ingredients: In a large mixing bowl, gently combine all the prepped vegetables: the chopped romaine lettuce, diced cucumber, halved cherry tomatoes, thinly sliced red onion, Kalamata olives, and diced red bell pepper. Give them a gentle toss to distribute everything evenly.
- Prepare the Greek Vinaigrette: In a small jar with a tight-fitting lid (this is my preferred method for easy mixing and storage!) or a small mixing bowl, combine all the dressing ingredients: the good quality olive oil, the tangy red wine vinegar, the aromatic dried oregano, the teaspoon of Dijon mustard (if you’re using it – it’s brilliant for emulsifying and adding a subtle depth), salt, and freshly ground black pepper. Secure the lid on the jar and shake it vigorously until the dressing is beautifully emulsified and all the ingredients are well combined. If using a bowl, whisk thoroughly until the dressing is smooth and slightly thickened. Always taste the dressing at this stage and adjust seasonings as needed; you might find it needs a little more salt to brighten, a touch more pepper for warmth, or a hint more oregano to deepen its herbaceous character, all according to your personal preference.
- Dress the Salad: Just before you’re ready to serve and assemble your bowls, pour approximately half of the prepared Greek vinaigrette over the salad mixture. Toss the salad gently but thoroughly to ensure all the vegetables are lightly and evenly coated with the dressing. I always recommend starting with a lighter hand, as you can always add more dressing when assembling individual bowls if desired, but you can’t take it away once it’s on, and nobody likes a soggy salad! Finally, add the crumbled feta cheese and give it one last, very gentle toss. The feta provides a salty, tangy creaminess that truly elevates the entire salad.
5. Bringing It All Together: Assembling Your Greek Chicken Bowls
This is the exciting grand finale, the moment where all our beautifully prepared components come together to create the ultimate, flavorful, and incredibly satisfying Greek Chicken Bowl! The true beauty of building these bowls is the flexibility it offers: everyone can customize their own to their exact liking, making it a fantastic option for family meals, entertaining guests, or even efficient meal prepping for the week ahead.
- Prepare Your Serving Bowls: Gather your individual serving bowls. I find that wide, shallow bowls work absolutely best for showcasing all the vibrant, colorful components and allowing ample space for mixing and enjoying each delicious bite.
- Lay the Rice Base: Start by placing a generous scoop of the warm, fluffy lemon herb rice at the bottom of each bowl. This aromatic rice acts as a comforting, substantial foundation, perfectly poised to absorb and carry the flavors of all the subsequent layers.
- Add the Salad: Next, artfully arrange a substantial portion of the freshly dressed Greek salad alongside the rice, or partially overlapping it. Make sure you get a good, diverse mix of all the colorful, crisp vegetables and tangy feta cheese. This salad component adds a crucial burst of freshness, a delightful crunch, and a wonderful health-conscious balance to the bowl.
- Crown with Chicken: Now for the star of our show! Gracefully arrange a portion of your perfectly cooked, sliced, and exquisitely marinated Greek chicken on top of or nestled next to the rice and salad. The golden-brown, flavor-packed chicken strips or cubes are undeniably the centerpiece of these incredible Greek Chicken Bowls.
- Dollop the Tzatziki: Time for the creamy indulgence! Spoon a generous dollop (or two, I certainly won’t judge your enthusiasm for this delicious sauce!) of the cool, homemade tzatziki sauce directly over the chicken. This provides a crucial cooling counterpoint to the savory, warm chicken and effectively ties all the diverse flavors of the bowl together with its creamy, herbaceous goodness.
- Drizzle and Garnish: If you or your guests prefer an extra burst of flavor or moisture, offer additional Greek vinaigrette on the side for an optional drizzle over the salad. To truly finish your bowls with a flourish, garnish them with a sprinkle of extra fresh dill or parsley. A fresh lemon wedge on the side is also a fantastic addition, allowing for a final squeeze of bright citrus to awaken all the flavors. Perhaps a few extra Kalamata olives or feta crumbles wouldn’t go amiss for that extra visual appeal and flavor punch.
- Optional Additions: For an even more complete and authentic Mediterranean experience, consider serving your magnificent Greek Chicken Bowls with warm, soft pita bread or pita wraps on the side. They’re perfect for scooping up all the delicious remnants! A spoonful of creamy hummus can also be a truly delightful addition, providing another layer of velvety texture and nutty, savory flavor.
- Serve Immediately: These vibrant bowls are truly best enjoyed fresh, allowing you to savor the wonderful contrasting temperatures and textures. Encourage everyone to mix and match their ingredients as they eat to create their own perfect, flavor-packed bite!
And there you have it – a magnificent, flavorful, and wholesome Greek Chicken Bowl ready to be devoured. Enjoy every vibrant, delicious bite!
Conclusion:
I truly believe that what we’ve just explored isn’t just a recipe; it’s an experience waiting to happen in your kitchen. This dish stands out as an absolute game-changer for so many reasons. Imagine vibrant, fresh flavors dancing on your palate, perfectly balanced with savory, tender chicken. It’s the kind of meal that brings a burst of sunshine to even the greyest day, making you feel nourished and satisfied without any heaviness. It’s incredibly versatile, fitting seamlessly into busy weeknights, leisurely weekend brunches, or even sophisticated meal prep plans. The ease of preparation, combined with its impressive nutritional profile, makes it a true champion in my culinary playbook. You’re not just cooking; you’re crafting a masterpiece of taste and health, something that genuinely feels like a treat while being remarkably good for you. This recipe is a testament to how simple, good ingredients can transform into something extraordinary with just a little love and attention. Every component contributes to a harmonious whole, promising a delightful culinary journey from the very first bite to the last.
Now, let’s talk about how you can enjoy this culinary delight because the possibilities are truly endless! While it shines as a standalone main course, don’t limit your imagination. For a quick and satisfying lunch, pack it up in a reusable container – the flavors actually meld and deepen beautifully overnight, making it an ideal meal prep superstar. Think about serving it deconstructed on a large platter for a more communal, family-style dinner; everyone can pick and choose their favorite components. It also makes for a fantastic light dinner on a warm evening, perhaps paired with a glass of crisp white wine. If you’re hosting a gathering, consider transforming it into an elegant appetizer spread: small skewers with a piece of chicken, a cherry tomato, a cube of cucumber, and a dollop of tzatziki for dipping. You could even serve the components separately as part of a larger buffet, allowing guests to build their own plates. And for those mornings when you crave something savory, try adding a fried egg on top for a surprisingly delicious breakfast-for-dinner twist. The beauty lies in its adaptability; it’s a dish that genuinely works for any occasion and any time of day.
One of the things I love most about cooking is the freedom to experiment and make a recipe truly your own. This is where the magic really happens! While the classic rendition is absolutely divine, don’t hesitate to play around with variations. If you’re looking for different protein options, grilled halloumi cheese makes for a wonderful vegetarian alternative, or perhaps some pan-seared shrimp for a seafood twist. You could even swap out the chicken for thinly sliced grilled lamb for an even richer, more traditional Mediterranean flavor profile. For an extra boost of greens, consider adding a handful of fresh spinach or massaged kale to the base of your bowls. Different grains can also offer new textures and nutrients; try quinoa, farro, or even a wild rice blend instead of the classic rice or couscous. And let’s not forget the dressing! While the creamy tzatziki is a must-have, a drizzle of balsamic glaze or a sprinkle of fresh dill and mint can elevate the flavors even further. Whether you stick to the classic Greek Chicken Bowls recipe or decide to put your own unique spin on it, the core elements of freshness, flavor, and satisfaction will remain.
So, now it’s your turn! I genuinely hope you feel inspired to bring this incredible recipe into your own kitchen. Don’t just read about it – experience it. Gather your ingredients, put on some good music, and let yourself enjoy the process of creating something truly delicious and nourishing. There’s an immense satisfaction in crafting a meal that not only tastes amazing but also makes you feel good from the inside out. This isn’t just another meal; it’s a moment of culinary joy waiting to unfold. Trust me, once you taste the vibrant combination of flavors, the tender chicken, and the refreshing components, you’ll understand exactly why I’m so enthusiastic about it. It’s an easy win, a guaranteed crowd-pleaser, and a fantastic way to introduce fresh, wholesome ingredients into your diet without sacrificing an ounce of flavor.
And once you’ve whipped up your own batch, I absolutely can’t wait to hear about your experience! What variations did you try? Did you discover a new favorite ingredient to add? How did your family or friends react? Sharing your culinary adventures is one of the best parts of being in a food community. So please, don’t be shy! Snap a picture, share your thoughts, and let us know how these bowls transformed your mealtime. Your insights and creativity can inspire others, and I always learn so much from hearing about your unique approaches. Happy cooking, my friends, and get ready to fall in love with your new favorite meal!
Greek Chicken Bowls
Quick, healthy, and flavor-packed Greek Chicken Bowls featuring marinated chicken, fresh vegetables, rice, and creamy tzatziki. Perfect for a balanced weeknight dinner or meal prep.
Ingredients
Instructions
Important Information
Nutrition Facts (Per Serving)
It is important to consider this information as approximate and not to use it as definitive health advice.
Allergy Information
Please check ingredients for potential allergens and consult a health professional if in doubt.
Leave a Comment