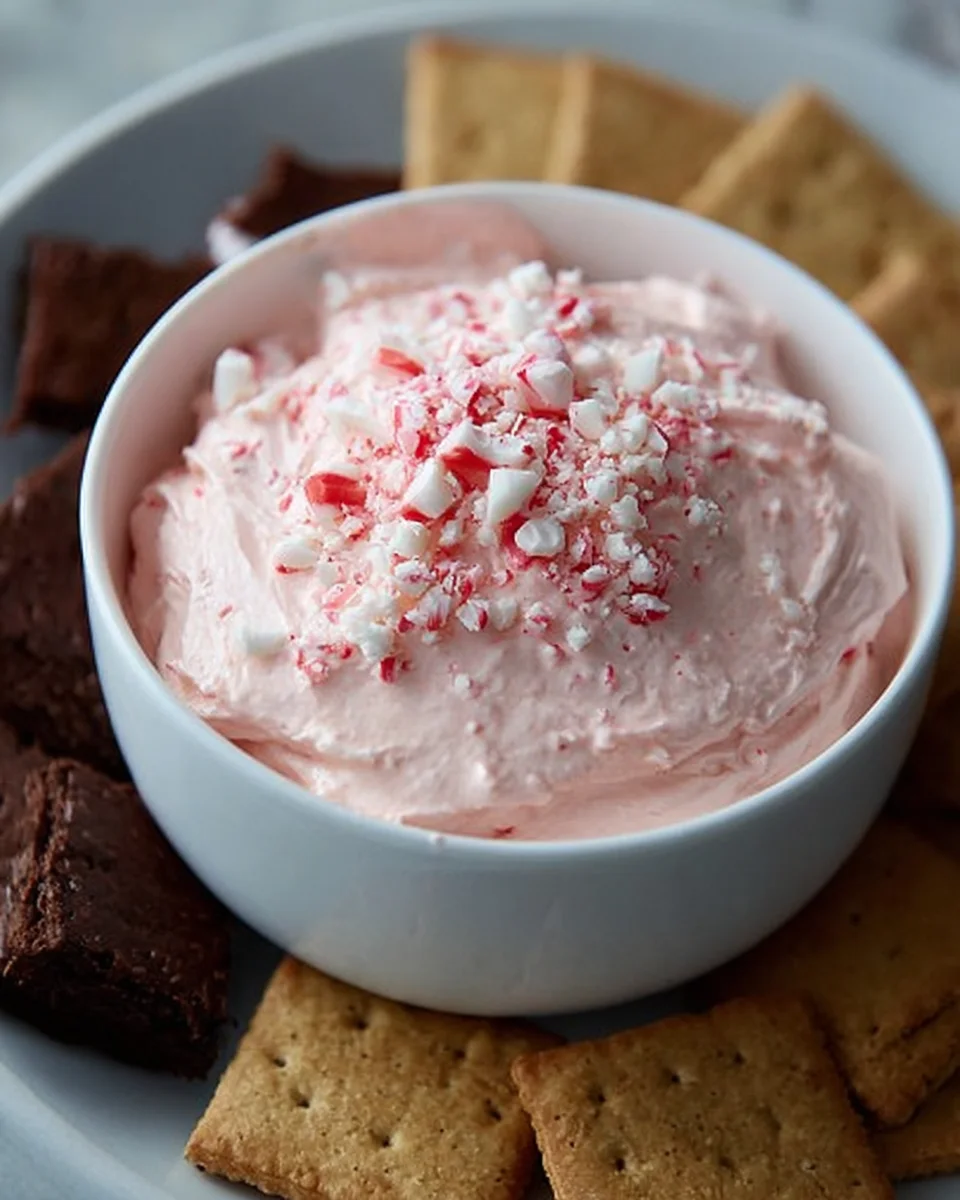
Candy Cane Kiss Marshmallow Dip is not just a dessert; it’s an instant holiday classic waiting to happen in your kitchen! Prepare to utterly enchant your taste buds and impress your guests with a treat that perfectly captures the festive spirit. I’ve always adored how certain dishes can instantly transport you to a joyful place, and this dip does precisely that. It’s incredibly easy to whip up, making it an ideal choice for busy holiday entertainers who still want to serve something spectacular.
Embrace the Holiday Spirit with Ease
While dessert dips have enjoyed immense popularity in recent years as convenient party foods, the combination of classic peppermint and rich chocolate, often found in holiday candy canes and Kisses, has long been a cherished part of winter celebrations. This recipe beautifully marries that tradition with the fun, communal aspect of a dip, evolving the idea of s’mores into a dazzling, no-fuss holiday centerpiece.
The delightful balance of fluffy, creamy marshmallow, the unmistakable cool crunch of candy cane, and the sweet surprise of chocolate from the Kisses creates an irresistible symphony of flavors and textures. Every scoop of this Candy Cane Kiss Marshmallow Dip offers a burst of seasonal cheer, making it a guaranteed crowd-pleaser. You’ll love its vibrant appearance and the sheer joy it brings to any festive gathering, offering a simple yet elegant solution for a show-stopping dessert that truly shines.

Ingredients:
- 16 ounces (2 blocks) cream cheese, full-fat, softened to room temperature
- 1/2 cup unsalted butter, softened to room temperature
- 1 cup powdered sugar (confectioners’ sugar), sifted
- 2 teaspoons pure vanilla extract
- 1/4 teaspoon salt (enhances sweetness beautifully!)
- 1 (8 ounce) bag mini marshmallows
- 1 (10 ounce) bag Hershey’s Candy Cane Kisses (approximately 50-60 Kisses)
- Optional: 1-2 drops red or pink food coloring (gel preferred for vibrancy)
- For serving: Graham crackers, vanilla wafers, shortbread cookies, chocolate cookies, pretzel sticks, apple slices, strawberries, ginger snaps, or even plain spoons!
Preparing Your Candy Cane Kiss Marshmallow Dip Base
- Softening the Stars of the Show: My first and perhaps most crucial tip for any successful cream cheese-based dip is to ensure your cream cheese and butter are truly at room temperature. This isn’t just a suggestion; it’s a foundation for a smooth, lump-free dip. I usually take them out of the fridge at least an hour, sometimes two, before I plan to start. You want them pliable enough to easily make an indentation with your finger, but not melted or greasy. If you’re in a pinch, you can carefully soften the cream cheese in its wrapper in the microwave for 15-20 seconds on low power, checking frequently, but I find the natural method always yields the best texture.
- Whipping Up the Dreamy Base: In a large mixing bowl, using either an electric hand mixer or a stand mixer fitted with the paddle attachment, combine the softened cream cheese and softened butter. I like to start on low speed to incorporate them gently, then gradually increase to medium-high. Beat these two ingredients together for a good 3-5 minutes. You’re aiming for a mixture that is incredibly light, fluffy, and completely smooth, with no lumps of cream cheese or streaks of butter visible. This aeration is key to a light, airy dip, preventing it from feeling too heavy or dense. Make sure to scrape down the sides of the bowl frequently with a spatula to ensure everything is evenly mixed.
- Sweetening the Deal: Once your cream cheese and butter base is perfectly smooth, it’s time to add the sweetness. Gradually add the sifted powdered sugar to the mixture. I always recommend sifting powdered sugar because it tends to clump easily, and sifting prevents those pesky lumps from ending up in your final dip. Start your mixer on low speed again to avoid a “sugar cloud” explosion in your kitchen, then slowly increase to medium. Beat until the sugar is fully incorporated and the mixture is once again smooth and fluffy. This usually takes another 2-3 minutes.
- Flavor Boosters: Now for the wonderful aroma and depth of flavor! Stir in the pure vanilla extract and the salt. I know, salt in a sweet dip might sound counterintuitive, but trust me, it’s a secret ingredient that elevates the flavors. It doesn’t make the dip salty; rather, it brightens the sweetness and brings out the creamy notes of the vanilla and cream cheese. Mix these in until just combined.
- Optional Festive Hue: If you’re going for that extra festive look, this is where you can add a drop or two of red or pink gel food coloring. Gel colors are fantastic because they provide vibrant color without adding much liquid, which could alter the dip’s consistency. Add just a tiny bit at a time, mix, and assess the color. You want a subtle, pastel pink that hints at the candy cane theme, not an aggressively bright red, unless that’s your preference! Mix until the color is uniform.
Unwrapping the Candy Cane Kisses
-
The Star Ingredient Prep: This step is where the “Candy Cane Kiss” part of our Candy Cane Kiss Marshmallow Dip truly shines. First, you’ll need to unwrap all of your Hershey’s Candy Cane Kisses. This can be a fun, albeit slightly tedious, task. Recruit some helpers if you have them! Once unwrapped, we need to prepare them for mixing. You have a few options here:
- Rough Chop: My preferred method is to give them a rough chop with a sharp knife on a cutting board. This creates varying sizes of candy pieces, which I find adds lovely textural interest to the dip. Some will melt into the dip, imparting their flavor, while others will remain as delightful little pockets of candy cane goodness.
- Food Processor: For a finer, more uniform candy distribution, you can pulse the Kisses in a food processor a few times until they are finely chopped. Be careful not to over-process them into a paste; you want small pieces, not a sticky mass.
- Bag and Mallet: If you enjoy a bit of stress relief, place the unwrapped Kisses in a sturdy freezer bag, seal it, and gently tap them with a rolling pin or meat mallet until broken into pieces.
You’ll want to reserve about 1/4 to 1/3 of the chopped Kisses for sprinkling on top before baking. The rest will be folded into the cream cheese base.
- Folding in the Festive Bits: Gently fold the majority of your chopped Candy Cane Kisses (reserving some for topping) into the prepared cream cheese mixture using a spatula. Be careful not to overmix here; you just want to evenly distribute the candy pieces throughout the dip. You’ll already start to smell that delightful peppermint and white chocolate aroma!
Assembling and Baking Your Irresistible Dip
- Choosing Your Vessel: Lightly grease an oven-safe baking dish, such as an 8×8 inch square dish, a 9-inch pie plate, or a small oval gratin dish. A non-stick spray works well, or a light coating of butter. The size of the dish will determine the thickness of your dip; a smaller dish will give you a thicker, more decadent layer, while a wider dish will result in a thinner layer that might bake a little faster.
- Spreading the Sweetness: Carefully spoon the Candy Cane Kiss Marshmallow Dip mixture into your prepared baking dish. Use your spatula to spread it out evenly to the edges. Try to make the top as smooth as possible, as this will provide a nice base for the marshmallows.
- A Cloud of Marshmallows: Now, generously cover the top of the cream cheese layer with an even layer of mini marshmallows. I usually use a full 8-ounce bag, ensuring that the entire surface is blanketed. Don’t be shy here; the more marshmallows, the gooier and more spectacular the top layer will be once baked. The marshmallows will puff up and create a beautiful golden-brown crust.
- Final Sprinkles: Take the reserved chopped Candy Cane Kisses and sprinkle them evenly over the layer of marshmallows. Some will settle slightly into the marshmallows, and others will sit on top, creating delightful pockets of minty chocolate that will melt and mingle with the gooey marshmallow.
- Preheating the Oven: Preheat your oven to 375°F (190°C). This moderately high temperature is perfect for quickly toasting the marshmallows without overcooking the dip base.
- Baking to Golden Perfection: Place the baking dish into the preheated oven. Bake for approximately 10-15 minutes. Keep a very close eye on it, especially during the last few minutes! The goal here is for the marshmallows to become beautifully golden brown and toasted on top, puffed up and gloriously gooey. The Candy Cane Kisses will also melt slightly and meld into the marshmallow layer, creating an intoxicating aroma that will fill your kitchen. If you like an extra crispy, deeply golden top, you can turn on the broiler for the last 30-60 seconds, but watch it like a hawk, as marshmallows can go from perfect to burnt in an instant. Trust me, I’ve learned this the hard way!
Serving and Enjoying Your Candy Cane Kiss Marshmallow Dip
- The Moment of Truth: Once the dip has achieved that perfect golden hue, carefully remove it from the oven using oven mitts. The dish will be extremely hot.
- Cooling Slightly: While it’s tempting to dive right in, I recommend letting the Candy Cane Kiss Marshmallow Dip cool for about 5-10 minutes before serving. This brief resting period allows the dip to set slightly, making it easier to scoop and less prone to being scalding hot. It will still be wonderfully warm, gooey, and utterly irresistible.
- Presentation and Dippers: Serve your warm, bubbly dip directly from the baking dish. Arrange an array of dippers around the dish. My personal favorites are crunchy graham crackers and vanilla wafers, as their simple sweetness perfectly complements the rich, minty dip. Pretzel sticks offer a fantastic sweet and salty contrast that is surprisingly addictive. For a healthier (but still delicious!) option, apple slices or fresh strawberries are delightful. Chocolate cookies or ginger snaps also make excellent dippers, adding another layer of flavor and texture. Don’t underestimate the power of a simple spoon for enjoying this decadent treat!
- Leftovers and Storage: If by some miracle you have any leftovers (which is rare in my house!), cover the baking dish tightly with plastic wrap or transfer the dip to an airtight container. Store it in the refrigerator for up to 3-4 days.
- Reheating Tips: This dip is truly best served warm, so reheating is a great idea. You can gently reheat individual portions in the microwave until warm and gooey. For the entire dish, pop it back into a preheated oven at 300°F (150°C) for 10-15 minutes, or until warmed through and the marshmallows are softened again. The top won’t be as freshly toasted as the first bake, but it will still be incredibly delicious.
-
Variations to Explore:
- Chocolate Lover’s Dream: Drizzle some melted chocolate syrup over the top after baking, or add a layer of chocolate chips under the marshmallows.
- Extra Minty Kick: A tiny drop (and I mean tiny!) of peppermint extract can be added to the cream cheese mixture along with the vanilla if you want an even more pronounced mint flavor.
- Holiday Sprinkles: Before baking, sprinkle some festive red and green sprinkles over the marshmallows for an extra pop of color.
- Different Kisses: While Candy Cane Kisses are central to this recipe, you could experiment with other holiday-themed Kisses if you find them, though the minty crunch is truly unique.
This Candy Cane Kiss Marshmallow Dip is more than just a dessert; it’s an experience. It’s the kind of comforting, festive treat that brings smiles and cheer to any gathering, especially during the colder months. I promise you, once you make it, it will become a requested favorite in your home! Enjoy every warm, gooey, minty bite!
Conclusion:
So, there you have it – the recipe for what I truly believe is going to become a staple in your holiday entertaining repertoire. This isn’t just another dessert; it’s an experience, a delightful fusion of festive flavors and comforting textures that simply begs to be shared. From its incredibly simple preparation to the moment it graces your table, radiating warmth and cheer, this creation is designed to bring smiles. I’ve loved developing this recipe and can’t wait for you to experience the magic yourself.
What makes this particular treat a true must-try? It’s the unique combination of the creamy, vanilla-scented marshmallow base, generously studded with the iconic peppermint crunch of Candy Cane Kisses, all melting together into a gooey, irresistible dip. It’s sweet, it’s minty, and it has that subtle chocolate undertone that just screams “holiday season.” Imagine serving this up at your next gathering; it’s guaranteed to be the star, sparking conversations and inspiring second, maybe even third, helpings. It’s perfect for cozy nights in with family, adding a touch of festive indulgence to a movie marathon, or as a show-stopping centerpiece at a bustling holiday party. The ease of making it means you can whip it up even when time is tight, yet it looks and tastes like something far more complex.
It’s truly a testament to how simple ingredients can create something extraordinary and memorable.
Now, let’s talk about how to truly elevate your experience with this wonderful Candy Cane Kiss Marshmallow Dip. While it’s utterly fantastic straight from the oven, served with a simple spoon, I highly recommend gathering an assortment of dippers. Think beyond the usual! Classic graham crackers or vanilla wafers are always a hit, their crispness providing a lovely contrast to the creamy dip. But why stop there? Consider dipping crunchy shortbread cookies, ginger snaps for an extra spice kick, or even soft sugar cookies. For a touch of freshness, apple slices, pear wedges, or even banana coins make surprisingly good accompaniments. If you’re feeling adventurous, try dipping pretzel rods; the salty-sweet combination is absolutely divine and incredibly addictive. For presentation, serve it warm in a festive bowl, perhaps garnished with a few extra crushed candy canes or a sprinkle of mini chocolate chips, to really make it pop on your dessert spread.
And for those of you who love to experiment, there are so many ways to put your own spin on this delightful treat. If you want an even more intense chocolate flavor, consider drizzling melted dark chocolate over the top just before serving, creating beautiful swirls. For an adult gathering, a tiny splash of peppermint schnapps or crème de menthe could be incorporated into the marshmallow base, adding a sophisticated kick. You could also try different types of Kisses – perhaps the classic milk chocolate for a less minty option, or even caramel Kisses if you’re looking for a different seasonal twist. Don’t be afraid to adjust the amount of crushed candy canes to your preference; more for a stronger mint punch, less for a subtler hint. Or, instead of one large dip, you could even prepare individual ramekins for a personalized touch, perfect for a cozy dinner party. The possibilities are truly endless, limited only by your imagination!
So, please, don’t just read about this incredible dessert; go ahead and make it! I promise you won’t be disappointed. It’s a joyful, easy, and utterly delicious way to celebrate the season. I genuinely encourage you to grab those ingredients, get into the kitchen, and experience the magic of this Candy Cane Kiss Marshmallow Dip for yourself. Once you’ve whipped up your batch and shared it with loved ones, I would absolutely love to hear about your experience. Did you try a unique dipper? Did you add a special variation? Share your photos and your feedback! Your culinary adventures inspire me, and I can’t wait to see how you make this festive treat your own. Happy dipping, everyone!
Candy Cane Kiss Marshmallow Dip Delight!
An easy, irresistible holiday dessert dip featuring creamy marshmallow, softened cream cheese, and the delightful crunch of peppermint chocolate Hershey’s Candy Cane Kisses. This festive treat is perfect for enchanting taste buds and impressing guests with minimal effort.
Ingredients
Instructions
Important Information
Nutrition Facts (Per Serving)
It is important to consider this information as approximate and not to use it as definitive health advice.
Allergy Information
Please check ingredients for potential allergens and consult a health professional if in doubt.

Leave a Comment