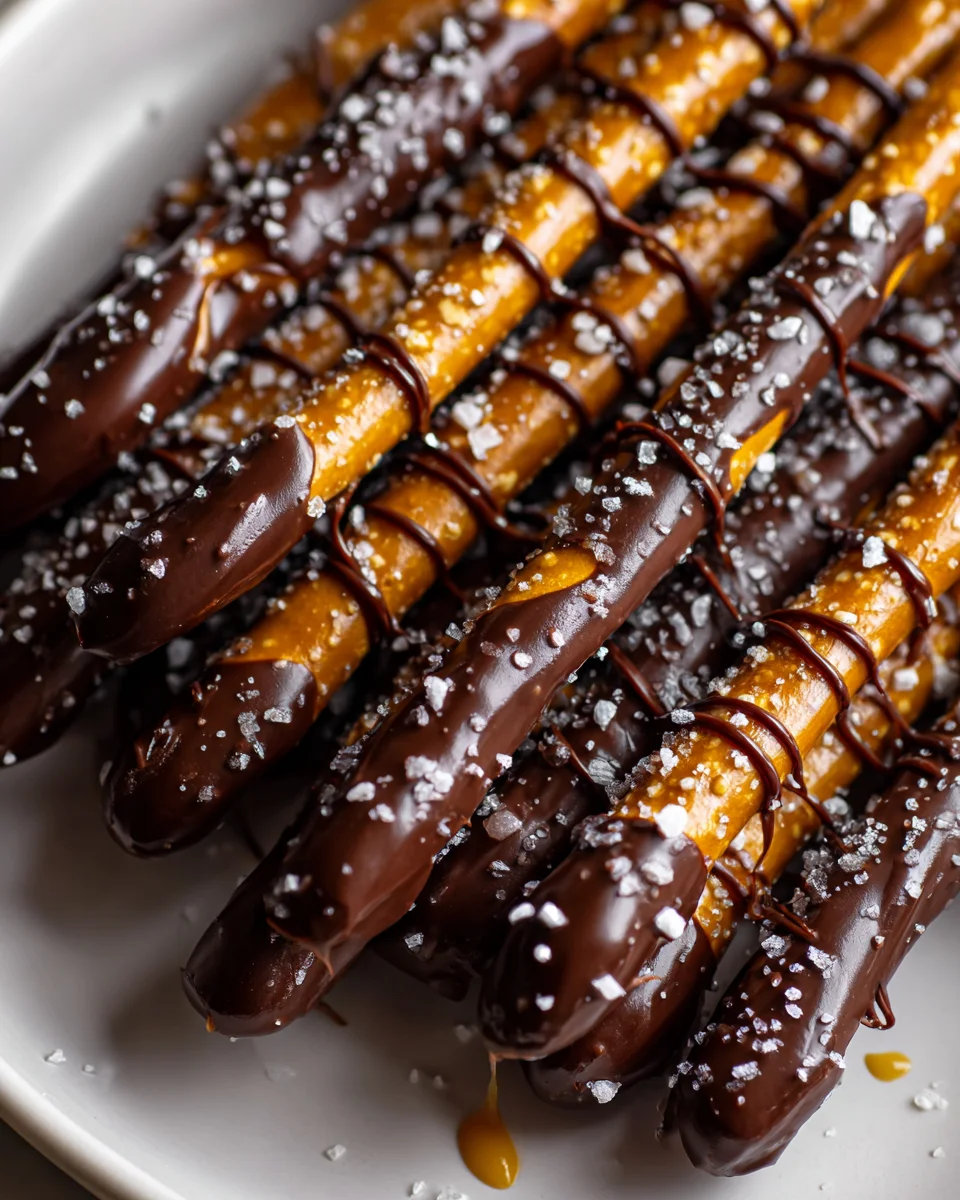
Chocolate Dipped Salted Caramel Pretzel Rods
Oh, get ready, because you’re about to fall head over heels for a treat that truly has it all! I’m talking about the ultimate sweet and salty indulgence, all wrapped up in one perfectly portable package. What makes these Chocolate Dipped Salted Caramel Pretzel Rods so special, you ask? It’s the magical interplay of textures and flavors: the satisfying crunch of a sturdy pretzel rod, the chewy, buttery embrace of homemade salted caramel, and the decadent snap of a rich chocolate coating, all punctuated by that irresistible hint of flaky sea salt. You’ll absolutely love making these because they’re surprisingly simple yet look incredibly impressive – perfect for a party, a thoughtful homemade gift, or just a delightful treat-yourself moment. Essentially, we’re taking humble pretzel rods, giving them a luxurious bath in creamy, gooey salted caramel, enrobing them in glorious melted chocolate, and finishing them with a flourish of extra salt. Prepare for pure bliss!

Ingredient Notes
Creating delicious Chocolate Dipped Salted Caramel Pretzel Rods starts with choosing the right ingredients. Each component plays a vital role in achieving that perfect balance of sweet, salty, and crunchy, so let’s talk about what works best and why, along with a few substitution ideas.
Pretzel Rods
- The Star: Standard pretzel rods are your best friend here. Their long, sturdy shape makes them ideal for dipping and handling. Look for brands that offer consistent length and thickness. I find the thicker ones hold up better to the weight of the caramel and chocolate.
- What to Avoid: While pretzel twists are great for snacking, they don’t quite offer the same dipping surface or presentation as rods. Thin pretzel sticks can also be too fragile.
- Substitution: If you absolutely can’t find rods, extra-long pretzel sticks could work in a pinch, but be mindful that they might break more easily when handled.
Soft Caramels
- My Go-To: I always reach for individually wrapped soft caramel candies, like Kraft Caramels. They melt beautifully and provide that wonderfully chewy, rich caramel layer that sticks perfectly to the pretzels. Unwrap them all before you start – trust me, it saves a lot of time and sticky fingers later!
- Homemade vs. Store-Bought: While homemade caramel is divine, for this recipe, store-bought soft caramels are incredibly convenient and deliver consistent results. If you opt for homemade, ensure it’s a soft, pliable caramel that won’t become rock hard when cooled.
- Consistency is Key: You’ll likely need a splash of milk or cream (about 1-2 tablespoons) to help the caramels melt into a smooth, dippable consistency. This makes all the difference!
- Substitution: Caramel bits are a good alternative if you can find them, as they are designed for melting. Avoid hard caramel candies, as they won’t melt smoothly or give you the desired texture.
Melting Chocolate
- For Best Results: High-quality melting wafers, also known as candy melts or confectionery coating, are often the easiest to work with. They melt smoothly, set quickly, and don’t require tempering. Dark chocolate melting wafers offer a beautiful contrast to the sweet caramel.
- My Favorite Kinds: I love using a good quality dark chocolate (60-70% cacao) for dipping, as its slight bitterness really balances the sweetness of the caramel. Milk chocolate is also fantastic for a sweeter treat, and white chocolate can be used for decorative drizzles or a different flavor profile.
- What to Avoid: Standard chocolate chips often contain stabilizers that prevent them from melting into a truly smooth, dippable consistency. If you use them, you might need to add a teaspoon of coconut oil or shortening to help thin them out, but be careful not to add too much or the chocolate won’t set properly.
- Substitution: Good quality baking bars (chopped) can be used, but you might need to temper them for a shiny, stable finish, which can be a bit more advanced.
Flaky Sea Salt
- The Essential Finish: This isn’t just a garnish; it’s a flavor enhancer! Flaky sea salt, like Maldon, provides bursts of salinity that cut through the richness of the caramel and chocolate, elevating the entire experience. Its texture also adds a delightful crunch.
- Why Flaky? The irregular flakes adhere beautifully to the wet chocolate and provide a more pleasant mouthfeel than fine table salt, which can sometimes just dissolve or taste too intensely salty in one spot.
- Substitution: Coarse kosher salt can work in a pinch, but I highly recommend investing in flaky sea salt for its superior flavor and texture. Avoid regular table salt entirely, as it’s too fine and can make the pretzels overly salty.
Step-by-Step Instructions
Alright, let’s get dipping! Making these Chocolate Dipped Salted Caramel Pretzel Rods is a fun and relatively easy process, perfect for a cozy afternoon project. Here’s how I like to do it to ensure perfect results every time.
- Prepare Your Workspace: First things first, gather all your ingredients and set up your station. Line two large baking sheets with parchment paper or silicone baking mats. This will prevent sticking and make cleanup a breeze. Unwrap all your caramel candies and have your pretzel rods, chocolate, and flaky sea salt ready to go.
-
Melt the Caramels:
- Place the unwrapped caramels in a microwave-safe bowl. Add 1 to 2 tablespoons of milk or cream. Start with 1 tablespoon and add more if needed.
- Microwave on high in 30-second intervals, stirring well after each interval, until the caramel is completely melted and smooth. This usually takes about 1.5 to 2.5 minutes, depending on your microwave. Be careful not to overheat! The caramel should be a smooth, dippable consistency. If it’s too thick, add another half-tablespoon of milk or cream.
- Alternatively, you can melt the caramels in a double boiler over simmering water, stirring until smooth. This method offers more gentle, even heat.
-
Dip in Caramel:
- Hold a pretzel rod by one end and carefully dip it into the melted caramel. I like to leave about 1-2 inches of the pretzel bare at the top for easy handling and to show off that pretzel crunch.
- Use a spoon or a small spatula to help coat the pretzel evenly, or gently rotate it in the caramel.
- Carefully lift the pretzel rod out of the caramel, letting any excess drip back into the bowl. You can gently scrape the back of the rod against the rim of the bowl to remove extra drips.
- Place the caramel-dipped pretzel rod onto one of your prepared baking sheets. Repeat with the remaining pretzel rods.
- Chill the Caramel: Once all the pretzel rods are coated in caramel, transfer the baking sheet to the refrigerator for about 15-20 minutes. This chilling step is crucial! It allows the caramel to firm up and set, preventing it from mixing with the chocolate layer later.
-
Melt the Chocolate: While the caramel is chilling, it’s time to melt your chocolate.
- Place your chosen melting chocolate (wafers, chopped baking bar, or chips with a tiny bit of coconut oil) into a microwave-safe bowl.
- Microwave on high in 30-second intervals, stirring thoroughly after each. Continue until the chocolate is smooth and completely melted. This usually takes about 1.5 to 3 minutes. Stirring often is key to even melting and preventing scorching.
- Alternatively, melt the chocolate in a double boiler over simmering water, stirring until silky smooth.
-
Dip in Chocolate: Once the caramel is firm, retrieve your pretzel rods from the fridge.
- Dip each caramel-coated pretzel rod into the melted chocolate. I like to dip just enough to leave a small band of caramel showing between the pretzel and the chocolate for a lovely visual effect.
- Again, use a spoon or spatula if needed to ensure an even coating. Lift the rod, allowing any excess chocolate to drip off.
- As soon as you lift it, carefully place it back onto a clean section of your parchment-lined baking sheet.
- Sprinkle with Salt: Immediately after dipping each pretzel rod in chocolate, generously sprinkle it with flaky sea salt. Don’t wait until all pretzels are dipped; the chocolate needs to be wet for the salt to adhere properly.
- Chill to Set: Once all the pretzel rods are chocolate-dipped and salted, return the baking sheet to the refrigerator for another 20-30 minutes, or until the chocolate is completely set and firm to the touch.
- Enjoy! Once fully set, carefully peel them off the parchment paper and enjoy your delicious creation!
Tips & Suggestions
Making Chocolate Dipped Salted Caramel Pretzel Rods is a joy, and with a few extra tips, you can ensure your treats are not only delicious but also beautiful. Here are some of my go-to suggestions:
- Caramel Consistency is Key: If your melted caramel seems too thick to dip smoothly, add a tiny bit more milk or cream (half a tablespoon at a time) and stir until you reach the desired consistency. It should be thick enough to cling but thin enough to drip off easily. If it starts to firm up while you’re dipping, pop it back in the microwave for 15-20 seconds to re-melt.
- Chocolate Melting Method Matters: Whether you use a microwave or a double boiler, gentle heat is crucial for chocolate. Overheating chocolate can cause it to seize (become thick and clumpy) or burn, making it unusable. Stir frequently, especially in the microwave, to distribute heat evenly.
- Achieving a Smooth Chocolate Coat: For the smoothest finish, I often use a deep, narrow glass or mug for melting my chocolate. This allows me to fully submerge the pretzel rod without wasting too much chocolate on a wide, shallow bowl. It also helps achieve a more even coating without having to use a spoon.
- Don’t Skip the Chilling Steps: Seriously, these are non-negotiable! Chilling the caramel layer ensures it sets firmly before you add the chocolate, preventing a messy blend. Chilling the finished pretzel rods ensures the chocolate hardens quickly for a crisp snap and easy handling.
- Speed is Your Friend with Salt: Flaky sea salt needs to be sprinkled immediately after dipping in chocolate. If you wait too long, the chocolate will start to set, and the salt won’t stick. Have a bowl of salt ready right next to your dipping station.
- Get Creative with Toppings: While flaky sea salt is classic, feel free to get creative! You could drizzle with white chocolate, sprinkle with finely chopped nuts (pecans or almonds are great), or even add festive sprinkles for different occasions. Just make sure to add any additional toppings while the chocolate is still wet.
- Working in Batches: If you’re making a large quantity, it can be helpful to work in smaller batches. Dip a few pretzels in caramel, chill them, then dip them in chocolate and salt, and chill again. This keeps your ingredients at the ideal temperature and prevents you from getting overwhelmed.
- Gift Giving: These pretzel rods make fantastic homemade gifts! Once completely set, individually wrap them in small cellophane bags tied with a ribbon. They’re always a hit for holidays, birthdays, or just a thoughtful gesture.
Storage
Once you’ve gone to the effort of creating these delightful Chocolate Dipped Salted Caramel Pretzel Rods, you’ll want to make sure they stay fresh and delicious. Proper storage is key to maintaining their perfect texture and flavor.
- Airtight is Best: The absolute most important thing for storing these treats is an airtight container. Exposure to air is the enemy of both pretzels (which can go stale) and chocolate (which can develop bloom, a white, chalky appearance). A good quality plastic container with a tight-fitting lid or a cookie tin works perfectly.
- Room Temperature is Ideal (Mostly): I generally recommend storing your pretzel rods at cool room temperature, away from direct sunlight and heat. If your kitchen is consistently warm (above 75°F or 24°C), the chocolate and caramel might soften too much. In that case, refrigeration might be necessary.
- Refrigeration Notes: If you do need to refrigerate them, be aware that the pretzels can lose a bit of their crispness and the chocolate might develop a slight condensation when brought back to room temperature. To minimize this, place them in the airtight container, then put the container in the fridge. When you’re ready to serve, let the container sit at room temperature for 15-20 minutes (still sealed) before opening. This allows the temperature to equalize slowly, reducing condensation.
- Prevent Sticking: When placing the pretzel rods in the container, layer them carefully. I often place a sheet of parchment paper between layers to prevent them from sticking together, especially if they’re in a single container. You can also stand them upright if your container is tall enough.
- Shelf Life: Stored properly in an airtight container at cool room temperature, your Chocolate Dipped Salted Caramel Pretzel Rods will stay fresh and delicious for up to 1 week. Beyond that, the pretzel can start to lose its crispness, though they’ll still be perfectly edible. If refrigerated, they can last a bit longer, up to 10 days, but as mentioned, be mindful of texture changes.
- Avoid Freezing: I don’t recommend freezing these pretzel rods. The caramel can become too hard and difficult to eat, and the pretzel can become soggy upon thawing. It’s best to enjoy them fresh!
Final Thoughts
And there you have it! I truly hope you’re as excited as I am about creating these incredible Chocolate Dipped Salted Caramel Pretzel Rods. This isn’t just another sweet treat; it’s a symphony of textures and flavors that truly stands out. I love how the satisfying crunch of the pretzel perfectly complements the creamy, rich salted caramel, all enrobed in a generous layer of luscious chocolate. It’s that perfect balance of sweet and salty that makes these irresistible.
Whether you’re looking for a delightful homemade gift, a show-stopping addition to a party platter, or simply a well-deserved treat for yourself, these Chocolate Dipped Salted Caramel Pretzel Rods are an absolute must-try. They’re surprisingly easy to make and guaranteed to bring smiles and satisfied sighs with every bite. So go ahead, treat yourself and your loved ones to this wonderfully unique and utterly delicious confection!
Irresistible Chocolate Dipped Salted Caramel Pretzels

Indulge in the perfect blend of sweet and salty with these Chocolate Dipped Salted Caramel Pretzel Rods. Enjoy the crunchy pretzel, rich caramel, and smooth chocolate for a delightful treat!
- Prep Time: 15 mins
- Cook Time: 30 mins
- Total Time: 45 minutes
- Yield: 24 pretzel rods 1x
- Category: Dessert
- Method: Dipping
- Cuisine: American
Ingredients
- Standard pretzel rods
- Individually wrapped soft caramel candies (like Kraft Caramels)
- 1–2 tablespoons of milk or cream
- High-quality melting wafers (candy melts or confectionery coating)
- Dark chocolate melting wafers (60-70% cacao)
- Milk chocolate (optional)
- White chocolate (optional for drizzles)
- Flaky sea salt (like Maldon)
Instructions
- Prepare Your Workspace: Gather all your ingredients and set up your station. Line two large baking sheets with parchment paper or silicone baking mats. Unwrap all your caramel candies and have your pretzel rods, chocolate, and flaky sea salt ready to go.
- Melt the Caramels: Place the unwrapped caramels in a microwave-safe bowl. Add 1 to 2 tablespoons of milk or cream. Microwave on high in 30-second intervals, stirring well after each interval, until the caramel is completely melted and smooth. Alternatively, melt the caramels in a double boiler over simmering water, stirring until smooth.
- Dip in Caramel: Hold a pretzel rod by one end and carefully dip it into the melted caramel. Use a spoon or a small spatula to help coat the pretzel evenly. Carefully lift the pretzel rod out of the caramel, letting any excess drip back into the bowl. Place the caramel-dipped pretzel rod onto one of your prepared baking sheets. Repeat with the remaining pretzel rods.
- Chill the Caramel: Once all the pretzel rods are coated in caramel, transfer the baking sheet to the refrigerator for about 15-20 minutes.
- Melt the Chocolate: Place your chosen melting chocolate into a microwave-safe bowl. Microwave on high in 30-second intervals, stirring thoroughly after each. Alternatively, melt the chocolate in a double boiler over simmering water, stirring until silky smooth.
- Dip in Chocolate: Once the caramel is firm, retrieve your pretzel rods from the fridge. Dip each caramel-coated pretzel rod into the melted chocolate, allowing any excess chocolate to drip off. Place it back onto a clean section of your parchment-lined baking sheet.
- Sprinkle with Salt: Immediately after dipping each pretzel rod in chocolate, generously sprinkle it with flaky sea salt.
- Chill to Set: Once all the pretzel rods are chocolate-dipped and salted, return the baking sheet to the refrigerator for another 20-30 minutes, or until the chocolate is completely set.
- Enjoy: Once fully set, carefully peel them off the parchment paper and enjoy your delicious creation!
Nutrition
- Serving Size: 1 pretzel rod
- Calories: 150
- Sugar: 10 g
- Sodium: 150 mg
- Fat: 7 g
- Saturated Fat: 4 g
- Unsaturated Fat: 2 g
- Trans Fat: 0 g
- Carbohydrates: 20 g
- Fiber: 1 g
- Protein: 1 g
- Cholesterol: 5 mg
Keywords: Ensure the caramel is at the right consistency for dipping. Use a narrow glass for melting chocolate for a smoother coat. Don't skip the chilling steps to maintain texture.


Leave a Comment