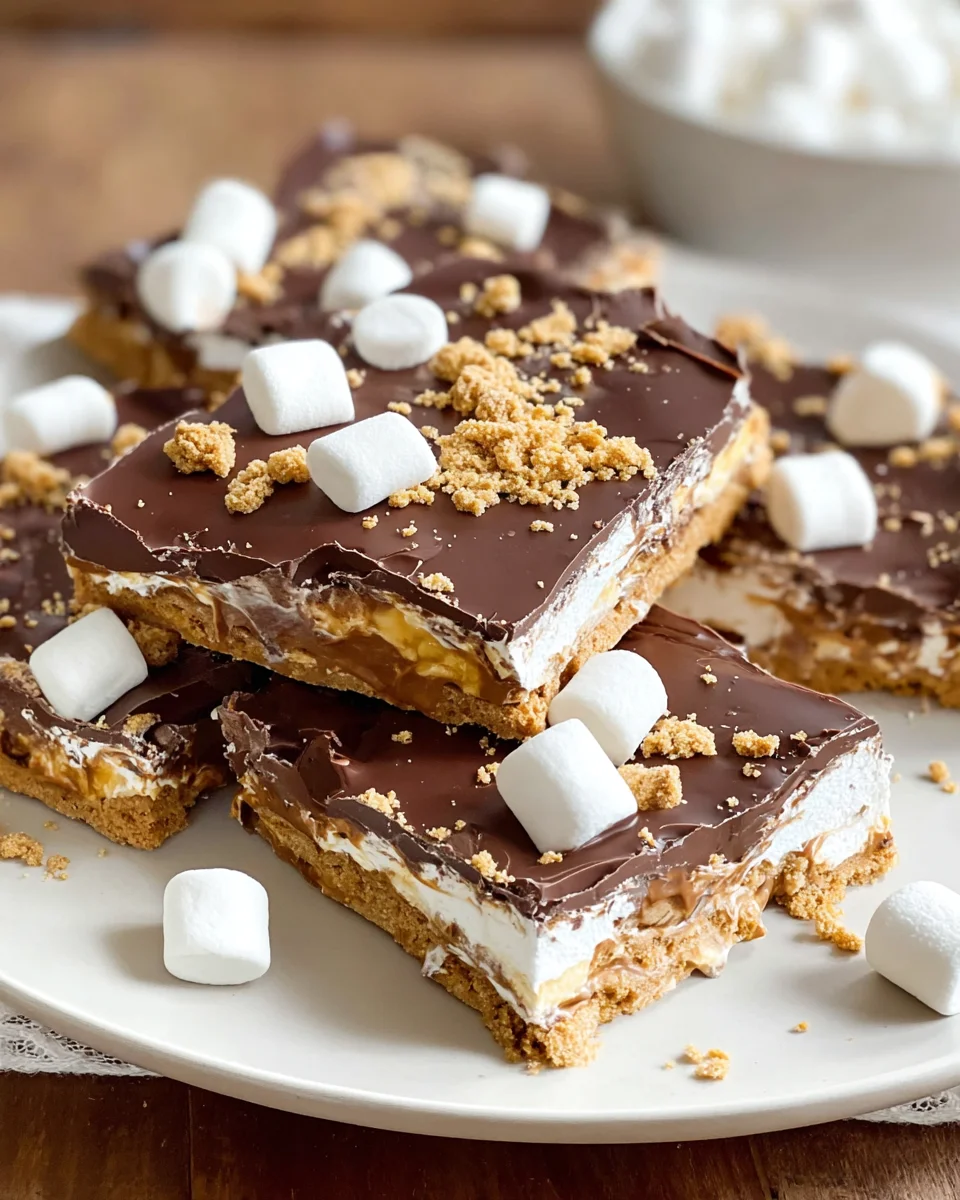
Irresistible Smores Bark Recipe For Sweet Nostalgia – I’m absolutely thrilled to share a delightful treat that captures all the magic of a crackling campfire without needing to leave your kitchen. There’s something inherently comforting about s’mores, isn’t there? From childhood camping trips to backyard bonfires, the sticky, gooey combination of toasted marshmallow, melted chocolate, and crunchy graham cracker has been a staple of sweet memories for generations. This beloved dessert, believed to have originated with the Girl Scouts in the 1920s, has a cherished place in American culture, symbolizing warmth, camaraderie, and simple pleasures.
I find that people absolutely adore s’mores not just for their incredible taste and diverse textures – the creamy chocolate, the chewy marshmallow, and the satisfying crunch – but also for the powerful wave of nostalgia they evoke. It’s a flavor profile that instantly transports you back to simpler times. This particular recipe takes that cherished experience and transforms it into a convenient, shareable bark, allowing you to enjoy all those beloved flavors in a whole new way. Get ready to create an Irresistible Smores Bark Recipe For Sweet Nostalgia that will have everyone reaching for more, making new memories with every delicious bite!

Ingredients:
- 1 ¾ cups (about 10 full sheets) Graham Crackers: Crushed into fine crumbs. I love using honey graham crackers for that classic sweetness, but cinnamon or chocolate graham crackers could also be a fun twist!
- ½ cup (1 stick or 113g) Unsalted Butter: Melted. This is going to bind our graham cracker base beautifully.
- ¼ cup Granulated Sugar: To add a little extra sweetness to our crust and help it crisp up.
- ½ teaspoon Vanilla Extract: A touch of warmth and aroma for our graham cracker layer.
- 24 ounces (about 4 cups) Semi-Sweet Chocolate Chips or Chopped Chocolate: High-quality chocolate makes all the difference here. You can use milk chocolate for a sweeter bark or dark chocolate for a richer, more intense flavor. A combination is also fantastic!
- 10 ounces (about 5 cups) Mini Marshmallows: These little fluffy clouds are essential. I find mini marshmallows work best for even distribution and melting, but you could cut larger marshmallows into smaller pieces if that’s what you have on hand.
- Optional toppings: A sprinkle of sea salt flakes for contrast, extra crushed graham cracker crumbs, or even a drizzle of melted white chocolate for decoration.
Equipment You’ll Need:
Having the right tools at hand makes any cooking project smoother and more enjoyable, and this “Irresistible Smores Bark Recipe For Sweet Nostalgia” is no exception. Before we dive into the fun, gather these essentials:
- 9×13 inch Baking Pan or Sheet Pan: This size is ideal for creating a nice, even layer of bark. If you want a thicker bark, you could use a slightly smaller pan, but adjust chilling times accordingly.
- Parchment Paper: Absolutely crucial! This prevents sticking and makes lifting and breaking the bark incredibly easy. Do not skip this step!
- Medium Microwave-Safe Bowl or Double Boiler Setup: For melting our glorious chocolate. A sturdy glass bowl for the microwave or a heat-proof bowl set over a saucepan of simmering water will do the trick.
- Rubber Spatula: Essential for stirring chocolate and spreading it smoothly.
- Small Mixing Bowl: For combining our graham cracker crust ingredients.
- Measuring Cups and Spoons: For accurate ingredient measurement.
- Heavy-duty Rolling Pin or Food Processor: To turn those graham crackers into beautiful crumbs.
- Offset Spatula or Butter Knife: For spreading the chocolate evenly across the graham cracker base. An offset spatula gives you more control and a smoother finish.
- Baking Tray (for toasting marshmallows): If you’re toasting marshmallows separately under the broiler.
- Kitchen Torch (optional, but highly recommended for marshmallow perfection): If you want that perfect golden-brown, slightly charred marshmallow top without using the broiler. It gives you incredible control!
Prepping Your Workspace for Sweet Success:
Before we embark on this delightful journey to create an “Irresistible Smores Bark Recipe For Sweet Nostalgia,” let’s get our kitchen in order. A well-prepped workspace is key to a smooth and enjoyable cooking experience. I always say, mise en place (everything in its place) is a cook’s best friend!
- Line Your Pan: First things first, grab your 9×13 inch baking pan. Line it completely with parchment paper, making sure to leave an overhang on the longer sides. This overhang will act as handles later, allowing you to easily lift the cooled bark out of the pan without any struggle or breakage. Trust me, this little step saves a lot of potential frustration! You want the parchment paper to cover the bottom and go up the sides as much as possible.
- Crush Those Graham Crackers: Now, let’s tackle the graham crackers. You have a couple of options here.
- Food Processor Method: For the quickest and most uniform crumbs, place your graham cracker sheets into a food processor and pulse until they resemble fine sand. Be careful not to over-process them into a paste.
- Bag and Roll Method: If you don’t have a food processor, no worries! Place the graham crackers in a large, sturdy zip-top bag. Seal it, pressing out as much air as possible, and then use a rolling pin to crush them into fine crumbs. This method is surprisingly therapeutic and gives you a good arm workout! The goal is fine, even crumbs, almost like sand, so they’ll bind together well.
Once crushed, measure out your 1 ¾ cups of fine graham cracker crumbs and set them aside.
- Measure and Stage: Measure out all your other ingredients – the melted butter, sugar, vanilla extract, chocolate chips, and mini marshmallows. Having everything ready to go will make the process seamless and prevent any last-minute scrambling. This way, you can focus on enjoying each step of creating your delicious bark.
Crafting the Graham Cracker Foundation:
This base is what gives our bark that authentic s’mores crunch and flavor. It’s like building the delicious foundation of a very tasty house!
- Combine Dry Ingredients: In a medium mixing bowl, combine the finely crushed graham cracker crumbs with the granulated sugar. Give them a good stir with a spoon or whisk to ensure the sugar is evenly distributed throughout the crumbs. This little bit of sugar helps sweeten the base and gives it a lovely texture.
- Add Wet Ingredients: Pour the melted unsalted butter and the vanilla extract over the graham cracker and sugar mixture. Now, with a rubber spatula or a sturdy spoon, mix everything together thoroughly. You want to keep mixing until all the crumbs are moistened and resemble wet sand. It should be clumpy and hold together when you press it between your fingers. The butter is our binding agent, ensuring our foundation is solid.
- Press into the Pan: Transfer the moistened graham cracker mixture into your prepared 9×13 inch pan (the one lined with parchment paper). Now, here’s where you get to be a little firm! Using the bottom of a measuring cup, your clean hands, or a flat spatula, press the mixture down firmly and evenly across the bottom of the pan. The goal is to create a compact, even layer. Pay special attention to the corners and edges to ensure they are just as compacted as the center. This firm press is crucial for a stable base that won’t crumble apart when you cut the bark. We’re aiming for a solid, golden-brown canvas for our chocolate and marshmallows.
- Pre-bake (Optional but Recommended for Extra Crispness): For an extra crisp and slightly toasty graham cracker base, you can pop this layer into a preheated oven at 350°F (175°C) for about 5-7 minutes. This step helps to set the crust and deepen its flavor. Let it cool slightly before moving to the next step if you choose to pre-bake. If you’re short on time, you can skip this, but I find it really elevates the texture!
Melting and Spreading the Chocolate Dream:
Now for the star of the show – the chocolate! This layer will encase our graham cracker base and provide that rich, decadent backdrop for our toasted marshmallows. Using high-quality chocolate here truly makes an “Irresistible Smores Bark Recipe For Sweet Nostalgia.”
- Choose Your Melting Method: You have a couple of excellent options for melting your chocolate. Regardless of the method, the key is to melt it gently and slowly to prevent scorching or seizing.
- Microwave Method (My Go-To for Speed): Place your 24 ounces of chocolate chips or chopped chocolate into a large, microwave-safe bowl. Microwave on high power in 30-second intervals, stirring thoroughly after each interval. It’s vital to stir even if the chocolate doesn’t look fully melted, as residual heat will continue to melt the chips. Continue this process until the chocolate is smooth and glossy with no lumps. This usually takes about 2-3 minutes total, but microwaves vary, so keep a close eye on it! Do not overheat the chocolate, as it can seize and become grainy.
- Double Boiler Method (For the Smoothest Finish): If you prefer a more controlled melt, set a heat-proof bowl over a saucepan containing about an inch or two of simmering water (make sure the bottom of the bowl doesn’t touch the water). Add your chocolate to the bowl. Stir occasionally with a rubber spatula as the chocolate slowly melts from the steam. Once it’s mostly melted, remove the bowl from the heat and continue stirring until completely smooth. This method is fantastic for preventing scorching and achieving a beautifully tempered, shiny chocolate.
- Add Vanilla (Optional for Chocolate Layer): If you didn’t add vanilla to your graham cracker base, or just want an extra boost, you can stir in another ½ teaspoon of vanilla extract into the melted chocolate. This enhances the flavor profile beautifully.
- Spread the Chocolate Evenly: Once your chocolate is perfectly smooth and glorious, pour it over the graham cracker base in your prepared pan. Use an offset spatula or the back of a spoon to gently spread the chocolate evenly across the entire surface, all the way to the edges. You want a smooth, uniform layer. Give the pan a gentle tap on the counter a few times to help settle the chocolate and release any air bubbles. This creates a beautifully flat surface for our marshmallows.
Toasting the Marshmallow Clouds:
This is where the “s’mores” magic truly happens! That perfectly toasted, slightly gooey, and caramelized marshmallow layer is what makes this bark so special and evokes true sweet nostalgia. There are a few ways to achieve this, so choose the one that works best for you and your kitchen setup.
- Scatter the Marshmallows: Evenly sprinkle all of your mini marshmallows over the melted chocolate layer. Try to get them in a single, relatively even layer. Don’t worry if there are tiny gaps, they will expand and melt together. You can gently press them down a little, but don’t submerge them into the chocolate completely. We want them to sit on top.
- The Broiler Method (My Favorite for a Crowd):
- Preheat: Position your oven rack to the top position, about 6-8 inches from the broiler element. Preheat your broiler to high.
- Broil with Vigilance: Carefully place the baking pan with the chocolate and marshmallows under the preheated broiler. Now, this step requires your undivided attention! Marshmallows can go from perfectly golden to burnt in a matter of seconds.
- Watch Closely: Stand by the oven door and watch the marshmallows constantly. As soon as they puff up, turn golden brown, and get those delightful charred spots, immediately remove the pan from the oven. This usually takes only 30 seconds to 2 minutes, depending on your broiler’s intensity.
- Cool Briefly: Allow the toasted marshmallows to cool for just a minute or two on the counter. They will be incredibly hot and sticky.
- The Kitchen Torch Method (For Precision and Control):
- Torch Away: If you have a kitchen torch, this is a fantastic and controlled way to toast your marshmallows. Hold the torch a few inches above the marshmallows and move it constantly in a circular motion.
- Achieve Perfection: Toast until the marshmallows are beautifully golden brown with a few perfectly charred spots, just like they’ve been over a campfire. This method gives you excellent control over the level of toastiness and prevents overheating the chocolate underneath too much. This is my preferred method for an “Irresistible Smores Bark Recipe For Sweet Nostalgia.”
- The Baking Method (Gentler Option):
- Preheat Oven: If you’re nervous about the broiler or don’t have a torch, you can bake the marshmallows. Preheat your oven to 350°F (175°C).
- Bake and Watch: Place the pan in the preheated oven for about 5-8 minutes, or until the marshmallows are puffed and lightly golden. They won’t get as deeply charred as with a broiler or torch, but they will still be delicious and gooey.
The Final Assembly: Bringing It All Together:
Once your marshmallows are perfectly toasted to your liking, it’s time to bring everything together and prepare for the grand finale – chilling!
- Cool Slightly: After toasting, let the pan sit on a wire rack for about 5-10 minutes. This allows the marshmallows to set a little and the chocolate to cool down just enough before chilling. If you put it straight into the fridge while the chocolate is very warm, it can sometimes cause condensation, which we want to avoid for the best texture.
- Add Optional Toppings (If Using): If you’re adding any optional toppings like a sprinkle of flaky sea salt, extra graham cracker crumbs, or a drizzle of melted white chocolate, now is the time to do it! While the marshmallows are still slightly tacky and the chocolate hasn’t fully set, these toppings will adhere nicely. The sea salt, in particular, adds a wonderful counterpoint to all the sweetness, elevating this “Irresistible Smores Bark Recipe For Sweet Nostalgia.”
- Prepare for Chilling: Gently cover the pan with a loose piece of aluminum foil or plastic wrap. Try not to let it touch the sticky marshmallows.
Chilling and Breaking: The Moment of Truth:
Patience, my friends, is a virtue, especially when it comes to chocolate bark! The chilling process is crucial for getting those clean breaks and firm layers.
- Chill Thoroughly: Carefully transfer the covered pan to the refrigerator. Allow the bark to chill for at least 2-3 hours, or ideally until the chocolate is completely firm and set. Depending on the temperature of your fridge and how thick your chocolate layer is, this could take a bit longer. The key is to ensure the chocolate is fully solidified. If you try to break it too soon, the chocolate will be soft and sticky, and you won’t get those satisfying shards. I sometimes even leave it overnight if I’m not in a rush, just to be absolutely sure.
- Lift and Loosen: Once fully chilled, grab the parchment paper overhangs that you so thoughtfully left earlier. Use them as handles to gently lift the entire slab of s’mores bark out of the baking pan and onto a clean cutting board or work surface. The parchment paper will peel away effortlessly, revealing your gorgeous creation!
- Break into Pieces: Now for the fun part! You can use a large, sharp knife to cut the bark into squares or rectangles, or for a more rustic and characteristic “bark” look, simply break it into irregular pieces with your hands. I prefer the latter, as it gives it that charming, homemade feel. Just find a starting point and apply gentle pressure until it cracks. Break it into pieces of various sizes – some big, some small, perfect for sharing (or not!).
- Admire Your Work: Take a moment to admire your beautiful “Irresistible Smores Bark Recipe For Sweet Nostalgia.” Each piece will have distinct layers of crunchy graham cracker, smooth chocolate, and fluffy, toasted marshmallow.
Tips for the Perfect “Irresistible Smores Bark Recipe For Sweet Nostalgia”:
Crafting the perfect s’mores bark is an art, but these tips will help you master it and ensure your creation truly stands out as an irresistible treat that brings back sweet nostalgia.
- Chocolate Quality Matters: While chocolate chips work perfectly well, using high-quality chocolate baking bars (chopped) will result in a smoother, richer, and more luxurious chocolate layer. The flavor difference is noticeable! Consider using a blend of milk chocolate and semi-sweet for a balanced taste profile that appeals to everyone.
- Marshmallow Mastery:
- Even Distribution: Try to spread your mini marshmallows as evenly as possible. This ensures that every piece of bark gets a good ratio of marshmallow and that they toast uniformly.
- Toasting Control: If using a broiler, do not walk away! Broilers are intense. Even 10 seconds can make a difference between golden brown and black. A kitchen torch offers the most control for achieving that perfect, unevenly browned campfire look.
- Larger Marshmallows: If using larger marshmallows, snip them with kitchen shears into quarters or halves. This makes them easier to distribute and toast.
- Graham Cracker Variations:
- Flavor Twists: Experiment with different graham cracker flavors! Cinnamon graham crackers add a wonderful spice note, while chocolate graham crackers double down on the chocolate goodness.
- Texture Play: For a slightly chunkier base, don’t crush all the graham crackers to a fine powder. Leave some slightly larger pieces for added texture.
- Preventing Sticky Marshmallows: If your marshmallows feel too sticky after toasting, allow them to cool completely before covering the pan for chilling. You can also lightly dust them with a tiny bit of cornstarch before toasting, though I rarely find this necessary if chilled properly.
- Sea Salt is Your Friend: A generous sprinkle of flaky sea salt (like Maldon) over the still-warm toasted marshmallows and chocolate is a game-changer. It cuts through the sweetness and enhances all the other flavors, making each bite even more satisfying.
- Add Extra Toppings: This bark is a fantastic canvas for creativity!
- Candy Bits: Sprinkle crushed candy bars (like Snickers or Butterfingers) over the chocolate before it sets.
- Nuts: Toasted chopped pecans or almonds add a lovely crunch.
- Sprinkles: For a festive touch, add colorful sprinkles.
- Drizzles: A drizzle of melted white chocolate, caramel, or even peanut butter can add another layer of flavor and visual appeal.
- Troubleshooting Seized Chocolate: If your chocolate seizes (becomes thick, grainy, and unworkable) while melting, it’s usually due to a tiny bit of water getting into it or overheating. You might be able to rescue it by stirring in a tablespoon or two of a neutral oil (like vegetable or canola oil) or melted butter, very slowly, until it smooths out. However, prevention is best: keep water away from your chocolate and melt it slowly and gently.
Storage and Gifting Ideas:
Once you’ve crafted your gorgeous “Irresistible Smores Bark Recipe For Sweet Nostalgia,” you’ll want to store it properly to maintain its freshness and potentially share its deliciousness with others!
- Storage:
- Airtight Container: Store the s’mores bark in an airtight container at room temperature for up to 5-7 days. While it won’t spoil, the marshmallows might start to get a little chewier over time.
- Refrigeration: For longer storage or if your kitchen is particularly warm, you can store it in the refrigerator for up to 2 weeks. Just be aware that refrigeration can sometimes cause chocolate to “bloom” (develop a whitish film due to sugar or fat crystallization), which is harmless but can affect appearance. If you do refrigerate, allow it to come closer to room temperature for about 15-20 minutes before serving for the best texture and flavor.
- Layer with Parchment: If stacking multiple layers of bark in your container, place a piece of parchment paper between each layer to prevent them from sticking together.
- Freezing (Not Recommended): While technically possible, freezing is generally not recommended for s’mores bark as it can significantly change the texture of the marshmallows and lead to a less pleasant eating experience upon thawing.
- Gifting:
This s’mores bark makes an absolutely delightful homemade gift for friends, family, neighbors, or even as a party favor! It’s personal, delicious, and shows you care.
- Pretty Packaging: Arrange pieces of bark in clear cellophane bags tied with festive ribbons. You can find lovely treat bags at craft stores or online.
- Decorative Tins: Layer the bark in attractive tins or boxes. Again, use parchment paper between layers to prevent sticking.
- Gift Tags: Attach a simple, handwritten gift tag with “Homemade S’mores Bark” or “A Taste of Sweet Nostalgia Just For You.”
- Bundle with Hot Cocoa: For an extra thoughtful gift, pair the bark with a small jar of homemade hot cocoa mix or gourmet hot chocolate packets. It’s a perfect combination for cozy evenings!
- Holiday Treat: This bark is particularly popular during holidays. Adjust sprinkles or chocolate drizzle colors to match the occasion (e.g., red and green for Christmas, pastels for Easter).
Conclusion:
So, there you have it! We’ve journeyed through the remarkably simple steps to create something truly magical in your own kitchen – a treat that encapsulates everything wonderful about a classic campfire delight without the need for an actual flickering flame. I genuinely believe that mastering this
Irresistible Smores Bark Recipe For Sweet Nostalgia
will become one of your absolute favorite kitchen triumphs, a go-to for countless occasions. What makes this recipe an undeniable must-try, you ask? Well, for starters, its ease is astonishing. Forget complicated baking techniques or obscure ingredients; we’re talking about straightforward melting, spreading, sprinkling, and chilling. It’s a project that even the most novice of bakers can tackle with unwavering confidence, yielding results that look and taste like they came straight from a gourmet confectionery. The true beauty of this bark lies in its delightful balance: the creamy, indulgent richness of high-quality chocolate, the airy, fluffy sweetness of perfectly toasted marshmallow, and that unmistakable, comforting crunch of golden graham crackers. Each and every bite is a symphony of textures and flavors, instantly transporting you back to those cherished moments gathered around a warm fire, sharing stories and laughter with your dearest loved ones. It’s more than just a dessert; it’s a nostalgic hug in edible form, guaranteed to bring a genuine smile to anyone’s face, regardless of their age.
Beyond its effortless creation and heartwarming taste, this S’mores Bark is incredibly versatile. It’s a fantastic solution for last-minute party platters, a thoughtful homemade gift for friends and family, or simply a delightful treat to have on hand for those moments when a sweet craving strikes. It stores beautifully, making it perfect for preparing ahead of time. Think about breaking it into rustic, jagged pieces and arranging it artfully on a serving tray for your next gathering – its visual appeal is just as captivating as its flavor. You could even serve smaller shards alongside a scoop of vanilla bean ice cream, allowing the melting chocolate to create a luxurious sauce. Or, imagine crumbling a piece over a mug of hot cocoa for an elevated winter warmer. The possibilities are truly endless!
Get Creative with Your Bark!
Speaking of possibilities, let’s talk about variations. While the classic combination is pure perfection, don’t be afraid to experiment and make this recipe truly your own. Consider swapping out milk chocolate for a blend of dark and semi-sweet for a more intense chocolate experience, or try a white chocolate base for a different flavor profile altogether. A tiny sprinkle of flaky sea salt over the finished bark can wonderfully enhance the chocolate’s depth and cut through the sweetness, adding a sophisticated touch. For an extra layer of crunch and flavor, you could mix in crushed pretzels, chopped nuts like pecans or almonds, or even a handful of mini chocolate chips into your melted chocolate layer. Feeling festive? A touch of peppermint extract in the chocolate or a sprinkling of holiday-themed sprinkles before chilling can transform it for seasonal celebrations. The core of this
Irresistible Smores Bark Recipe For Sweet Nostalgia
is so adaptable that you can truly let your imagination run wild.
I truly hope you feel inspired to dive into your kitchen and give this S’mores Bark recipe a try. It’s more than just following instructions; it’s about creating moments of joy, both in the making and in the sharing. It’s a simple pleasure that delivers huge satisfaction, and I promise you won’t be disappointed. Once you’ve whipped up your own batch of this delightful treat, I would absolutely love to hear about your experience! Did you stick to the classic? Did you venture into creative variations? How did your friends and family react? Please share your stories, tips, and even photos with us. Your feedback not only brightens my day but also helps inspire others in our wonderful community of home bakers. Happy baking, and get ready to indulge in some serious sweet nostalgia!
Irresistible Smores Bark Recipe For Sweet Nostalgia
Capture the magic of s’mores without a campfire! This delightful bark combines crunchy graham cracker, rich chocolate, and toasted marshmallow for a treat that evokes sweet memories and is incredibly easy to share.
Ingredients
Instructions
Important Information
Nutrition Facts (Per Serving)
It is important to consider this information as approximate and not to use it as definitive health advice.
Allergy Information
Please check ingredients for potential allergens and consult a health professional if in doubt.

Leave a Comment