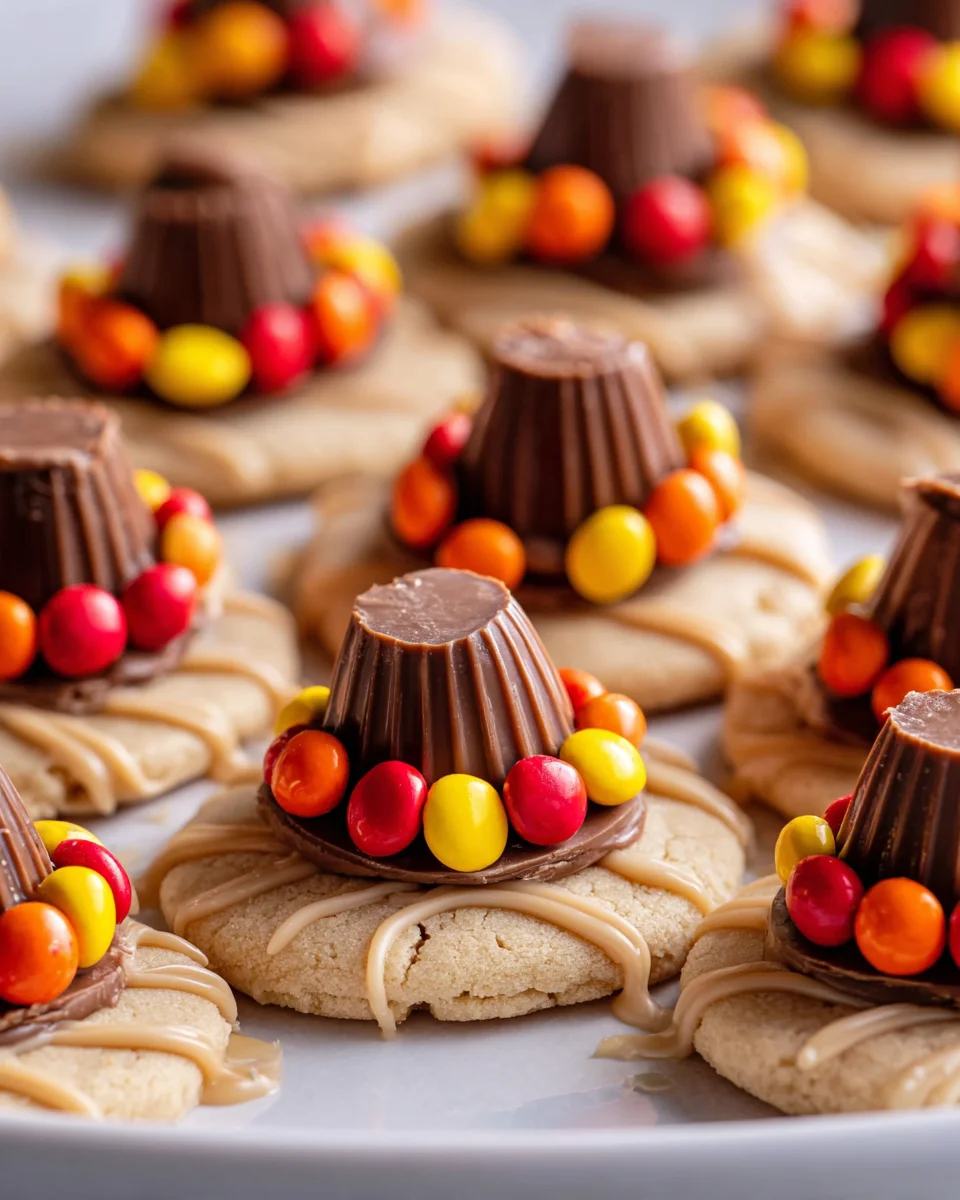
Pilgrim Hat Cookies are not just a festive dessert; they are miniature edible symbols of gratitude and gathering, instantly recognizable for their charming silhouette. There’s a certain magic in preparing these delightful treats, as they bring a touch of playful history to any Thanksgiving celebration. I find that their iconic shape, reminiscent of the hats worn by the early American Pilgrims, makes them an incredibly popular choice for holiday gatherings, especially when little hands are eager to help in the kitchen.
Why do these particular cookies capture so many hearts each autumn? Beyond their whimsical appearance, it’s the delightful combination of classic flavors—often a rich chocolate base paired with a crunchy cookie and a sweet, creamy filling—that truly makes them irresistible. They are remarkably simple to assemble, often requiring no baking at all, which is a blessing during the bustling holiday season. Pilgrim Hat Cookies offer a perfect blend of convenience, visual appeal, and nostalgic taste. I am incredibly excited to share my favorite rendition of this timeless holiday confection with you, ensuring your festive table is adorned with these charming and delicious edible hats.

Ingredients:
- For the Cookie Base:
- 1 cup (2 sticks) unsalted butter, softened to room temperature. It’s truly crucial for the butter to be properly softened, not melted, to achieve that wonderful creamy texture when mixing. This ensures your cookies are tender, not tough.
- 1 cup granulated sugar. This provides the perfect sweetness for our base. You can adjust slightly if you prefer a less sweet or sweeter cookie, but this is a classic starting point for these delightful Pilgrim Hat Cookies.
- 1 large egg. Make sure it’s at room temperature for better emulsification with the butter and sugar. A cold egg can cause the mixture to curdle slightly.
- 1 teaspoon pure vanilla extract. Don’t skimp on good vanilla! It makes a huge difference in the overall flavor profile of your cookies.
- 2 ½ cups all-purpose flour. I always recommend spooning and leveling your flour rather than scooping directly from the bag. Scooping can pack too much flour into your measuring cup, leading to dry, crumbly cookies.
- ½ teaspoon baking powder. This gives our cookies just a little lift, keeping them from being too dense.
- ¼ teaspoon salt. A pinch of salt balances the sweetness and enhances all the other flavors in the dough.
- Optional: If you’re short on time, you can use pre-made chocolate wafer cookies, shortbread cookies, or even peanut butter cookies as your base for these festive Pilgrim Hat Cookies. Aim for a diameter of about 2-2.5 inches.
- For the Chocolate Hat Tops:
- 12-ounce bag (or about 2 cups) semi-sweet chocolate chips, or a mix of milk and semi-sweet for a richer flavor. These will be melted down to create the ‘glue’ for the hat and the buckle.
- About 30-40 square-shaped chocolate candies or chocolate-covered graham cracker squares. Think about options like Ghirardelli squares, Hershey’s miniature chocolate bars (snapped into squares), or even fudge squares. The key is a flat, square shape that will sit nicely on our cookie base and resemble a hat. Each Pilgrim Hat Cookie needs one.
- For the Hat Buckles:
- Small yellow or orange candies. My favorites for this are yellow Reese’s Pieces, yellow M&M’s, or even small squares of yellow or orange fruit leather cut with a small knife. You could also use yellow fondant if you’re feeling ambitious and want a really polished look for your Pilgrim Hat Cookies.
- Additional items:
- Parchment paper or silicone baking mats. Essential for non-stick baking and easy cleanup.
- Baking sheets.
- Mixing bowls (at least one large).
- Electric mixer (stand mixer or hand mixer).
- Rolling pin (if making cookies from scratch).
- 2-inch round cookie cutter (if making cookies from scratch).
- Small microwave-safe bowl or double boiler for melting chocolate.
- Piping bag with a small round tip, or a ziploc bag with a tiny corner snipped off. This is super helpful for precision when applying the melted chocolate “glue.”
Phase 1: Preparing Your Cookie Bases
Let’s get started on creating the delicious foundations for our Pilgrim Hat Cookies. While store-bought cookies are a fantastic shortcut, I find that making your own sugar cookie bases adds a personal touch and a depth of flavor that’s truly unmatched. Plus, it fills your home with an absolutely irresistible aroma!
- Cream the Butter and Sugar: In a large mixing bowl, using an electric mixer on medium speed, cream together the softened butter and granulated sugar. This process should take about 3-5 minutes. You’re looking for a light, fluffy, and pale yellow mixture. Don’t rush this step, as proper creaming incorporates air, which contributes to the tender texture of your finished cookies. Scrape down the sides of the bowl periodically to ensure everything is evenly combined.
- Add Wet Ingredients: Once the butter and sugar are beautifully creamy, beat in the room-temperature egg until it’s fully incorporated. Then, stir in the pure vanilla extract. Continue mixing until the mixture is smooth and cohesive. Again, a quick scrape down of the bowl helps tremendously.
- Combine Dry Ingredients: In a separate medium bowl, whisk together the all-purpose flour, baking powder, and salt. Whisking them together ensures they are evenly distributed throughout the dry mixture, preventing pockets of leavening agent or salt in your final dough.
- Gradually Add Dry to Wet: With the mixer on low speed, gradually add the dry ingredients to the wet ingredients, a third at a time. Mix just until combined and no streaks of flour remain. Be careful not to overmix the dough, as overmixing can develop the gluten in the flour too much, resulting in tough cookies. The dough should come together as a soft, pliable ball.
- Chill the Dough: Form the dough into a disc, wrap it tightly in plastic wrap, and refrigerate it for at least 30 minutes, or up to 2 hours. Chilling the dough is a vital step for sugar cookies; it helps prevent the cookies from spreading too much in the oven, making them easier to handle, and allows the flavors to meld beautifully.
- Preheat Oven and Prep Baking Sheets: While your dough is chilling, preheat your oven to 375°F (190°C). Line two baking sheets with parchment paper or silicone baking mats. This ensures your cookies won’t stick and makes cleanup a breeze.
- Roll and Cut Cookies: On a lightly floured surface, roll out the chilled dough to about ¼-inch thickness. If the dough is too sticky, flour your rolling pin lightly as well. Using a 2-inch round cookie cutter, cut out as many circles as possible. Carefully transfer the cutouts to your prepared baking sheets, leaving about an inch of space between each cookie. Re-roll any dough scraps and cut out more cookies until all the dough is used.
- Bake the Cookies: Bake for 8-10 minutes, or until the edges are lightly golden. The centers should still look slightly soft. Baking times can vary depending on your oven, so keep a close eye on them. You want them to be perfectly set but not overly browned.
- Cool Completely: Let the cookies cool on the baking sheets for about 5 minutes before carefully transferring them to a wire rack to cool completely. This firming-up period on the hot tray prevents them from breaking when you move them. Ensuring your cookie bases are fully cooled before assembly is absolutely paramount for successful Pilgrim Hat Cookies. If they’re warm, your chocolate will melt!
If you’re using store-bought cookies, simply arrange them on a clean surface or a baking sheet lined with parchment paper, ready for assembly. Just double-check their size to ensure they’re a good fit for the hat tops you’ve chosen.
Phase 2: Preparing the Chocolate Hat Tops and Buckles
Now that our beautiful cookie bases are ready and waiting, let’s turn our attention to the iconic elements that transform them into charming Pilgrim Hat Cookies: the chocolate hat tops and their distinctive buckles.
- Select Your Hat Tops: Gather your chosen square-shaped chocolate candies or chocolate-covered graham cracker squares. If you’re using larger items like full Hershey’s bars, gently break them into individual squares. If you’re using Ghirardelli squares, they are usually perfect as is. The goal is a neat, flat square that will sit proudly on your cookie base. Count them out to match the number of cookies you’ve prepared.
- Prepare Your Buckles: Decide on your buckle material. If using yellow Reese’s Pieces or M&M’s, simply separate the yellow ones from the rest and have them ready in a small bowl. If you opt for cutting out small squares from fruit leather or fondant, use a very small, sharp knife to create tiny squares (about ¼-inch by ¼-inch). Precision here makes a big difference in the final aesthetic of your Pilgrim Hat Cookies.
- Melt the Chocolate (for “Glue”): Place your semi-sweet chocolate chips (or mix) into a microwave-safe bowl. Microwave on high for 30-second intervals, stirring well after each interval, until the chocolate is smooth and fully melted. Be careful not to overheat the chocolate, as it can seize and become unusable. Alternatively, you can use a double boiler: bring a small saucepan of water to a simmer, then place a heat-safe bowl over it (ensuring the bowl doesn’t touch the water). Add the chocolate chips to the bowl and stir continuously until melted and smooth. This method offers more controlled melting.
- Transfer Melted Chocolate: Once melted, transfer the chocolate to a piping bag fitted with a small round tip, or a small Ziploc bag with a tiny corner snipped off. This will allow for precise application when assembling our Pilgrim Hat Cookies, preventing messy drips and creating a clean finish.
Having all these components ready before you start assembling makes the process much smoother and more enjoyable. It’s like having all your puzzle pieces laid out!
Phase 3: Assembling Your Charming Pilgrim Hat Cookies
This is where the magic truly happens! We’re going to transform our simple cookies into adorable Pilgrim Hat Cookies, ready for your Thanksgiving table or any festive occasion. Take your time with each step; a steady hand and a little patience will result in beautifully crafted treats.
- Position Your Cookie Bases: Arrange your completely cooled cookie bases on a clean work surface or back on your parchment-lined baking sheets. Having them organized and within easy reach will make the assembly process much more efficient.
- Attach the Chocolate Hat Tops: Pick up one of your cooled cookie bases. Carefully pipe a small dollop or a thin square of melted chocolate onto the center of the cookie. You don’t need too much; just enough to act as a strong adhesive. Immediately, place one of your square chocolate hat tops directly on top of the melted chocolate, pressing down gently but firmly to ensure it adheres well. Repeat this process for all your cookies. The melted chocolate will act as the “brim” of the hat, securing the square chocolate “crown” in place.
- Create the Buckle Outline: Once all the chocolate hat tops are secured, let them set for a few minutes. This ensures the hats won’t slide around when you add the buckle. Now, using your piping bag with melted chocolate, carefully draw a small square outline on the front center of each chocolate hat top. This outline will define the shape of your buckle and create a lovely visual contrast. A steady hand here is key! If you find your chocolate is cooling and becoming too thick, gently reheat it for a few seconds in the microwave or over the double boiler.
- Place the Buckle Candy: While the chocolate buckle outline is still wet, carefully pick up one of your chosen yellow or orange buckle candies (Reese’s Pieces, M&M’s, or a small cut square of fruit leather/fondant) and gently press it into the center of the chocolate buckle outline. The wet chocolate will securely hold the candy in place. Take your time to center each buckle perfectly, as this is the focal point of our Pilgrim Hat Cookies.
- Final Touches and Setting: Once all your Pilgrim Hat Cookies have their hats and buckles, you’re almost done! Take a moment to admire your work. If any chocolate has smeared or gone astray, you can gently clean it up with a toothpick before it fully sets.
Important Note on Setting Time:
The success of your Pilgrim Hat Cookies hinges on allowing the chocolate to set completely. If you move them too soon, the hats can slide, or the buckles might fall off. Patience truly is a virtue in this final stage!
Phase 4: Setting and Storage for Optimal Enjoyment
Congratulations! You’ve successfully assembled a batch of beautiful Pilgrim Hat Cookies. Now, let’s ensure they set properly and are stored in a way that preserves their charm and deliciousness until you’re ready to share or savor them.
- Allow to Fully Set: Carefully transfer your assembled Pilgrim Hat Cookies to a clean baking sheet lined with parchment paper. Place the baking sheet in a cool, dry place. If your kitchen is warm, you can place them in the refrigerator for about 15-30 minutes. The cold air will help the melted chocolate firm up quickly, cementing the hats and buckles firmly in place. Once the chocolate is completely hardened (it shouldn’t be tacky or soft to the touch), your cookies are ready to be handled and enjoyed.
- Storage for Freshness: Once fully set, store your Pilgrim Hat Cookies in an airtight container at room temperature. Layering them between sheets of parchment paper can help prevent them from sticking together or the buckles getting dislodged. They will remain fresh and delicious for up to 5-7 days.
- Freezing for Longer Storage (Optional): If you want to make these cookies ahead of time for a future event, they freeze remarkably well! Once completely set, arrange the Pilgrim Hat Cookies in a single layer on a baking sheet and freeze them for about an hour until solid. Then, transfer them to an airtight, freezer-safe container or bag. Again, layer with parchment paper to protect them. They can be frozen for up to 1 month. When you’re ready to enjoy them, simply take them out of the freezer and let them thaw at room temperature for a few hours before serving.
These delightful Pilgrim Hat Cookies are not just a treat for the taste buds, but also a wonderful visual addition to any autumnal gathering, especially around Thanksgiving. Their charming appearance often sparks conversation and brings a smile to everyone’s face. Enjoy the fruits of your labor, whether you’re serving them to guests or keeping them all to yourself!
Conclusion:
Finally, we’ve arrived at the culmination of our delightful baking journey together, and I truly hope you’re as excited about this recipe as I am. There’s something uniquely special about creating a treat that not only tantalizes the taste buds but also brings a smile to everyone’s face with its charm and creativity. This isn’t just another cookie recipe; it’s an invitation to craft edible joy, to create memorable moments, and to add a touch of whimsy to your holiday or everyday table. I’ve found that the sheer simplicity of preparation, combined with the incredibly impressive final presentation, makes these cookies an absolute standout. They’re a testament to how effortless it can be to produce something truly spectacular from your own kitchen, even if you don’t consider yourself a seasoned baker.
What makes this particular recipe an absolute must-try, in my humble opinion, is its perfect blend of accessibility and wow-factor. You don’t need any specialized equipment or advanced culinary skills to achieve stunning results. The ingredients are readily available, and the steps are straightforward, making it an ideal project for a cozy afternoon bake with family, or even a fun activity to engage little hands in the kitchen. Imagine the delight on children’s faces as they help assemble these charming creations! Furthermore, the balance of textures and flavors – the comforting chewiness of the cookie base, the rich chocolate element, and the sweet, decorative buckle – creates a harmonious bite that’s simply irresistible. Each cookie is a miniature work of art, and yet, surprisingly easy to achieve. I genuinely believe that once you try making these, they’ll quickly become a cherished part of your baking repertoire, eagerly anticipated by anyone who gets to enjoy them.
Elevate Your Cookie Experience: Serving & Variation Ideas
Once your beautiful batch of cookies is cooled and ready, the serving possibilities are delightfully diverse. Of course, they are absolutely perfect enjoyed just as they are, perhaps with a tall glass of cold milk, a steaming mug of coffee, or a comforting cup of hot chocolate, especially on a crisp autumn evening. For a festive gathering, arrange them artfully on a large platter amidst a scattering of fall leaves or miniature pumpkins to really amplify their seasonal charm. They also make incredibly thoughtful homemade gifts, tucked into decorative bags or boxes and tied with a festive ribbon – trust me, a handmade treat like this speaks volumes about your care and effort.
But the fun doesn’t stop there! I always encourage a little culinary experimentation. While the classic design is undeniably charming, feel free to play around with variations to suit your taste or occasion. For the cookie base, why not experiment with a different flavor profile? A peanut butter cookie base would add a delightful nutty dimension, or a ginger snap base could infuse them with a warm, spicy kick, perfect for colder months. When it comes to the “hat” component, if chocolate kisses aren’t your preference, try using mini peanut butter cups for a completely different flavor combination, or even a small dollop of melted white chocolate allowed to set for a truly unique look. The “buckle” is also an area ripe for creativity. Instead of writing icing, you could use a small square of white chocolate, or even a tiny piece of edible glitter for an extra sparkle. For a really festive touch, consider using different colored icing for the buckle to match various holiday themes – orange and black for Halloween, red and green for Christmas, or pastel shades for Easter. The beauty of this recipe is its adaptability, allowing you to put your own unique spin on these delightful treats every time.
Your Turn: Bake, Share, and Inspire!
Now that you have all the tips, tricks, and inspiration at your fingertips, it’s truly time to roll up your sleeves and get baking! I’m genuinely excited for you to experience the joy of creating these Pilgrim Hat Cookies yourself. I have a strong feeling they will bring so much warmth, cheer, and deliciousness into your home, whether you’re making them for a special occasion or simply to brighten a regular day. Don’t be shy about making them your own with any of the variations we discussed, or even coming up with entirely new ideas – that’s part of the fun of baking!
I would absolutely love to hear about your baking adventures and see your beautiful creations. Please don’t hesitate to share your experiences, your photos, and any brilliant variations you come up with. Your feedback and creativity not only inspire me but also contribute to a wonderful community of fellow home bakers. So go ahead, preheat that oven, gather your ingredients, and prepare to bake some magic. Happy baking, my friends!
Pilgrim Hat Cookies
Miniature edible symbols of gratitude, Pilgrim Hat Cookies are a charming, no-bake Thanksgiving treat. They combine classic flavors and are remarkably simple to assemble, making them a popular choice for holiday gatherings.
Ingredients
Instructions
Important Information
Nutrition Facts (Per Serving)
It is important to consider this information as approximate and not to use it as definitive health advice.
Allergy Information
Please check ingredients for potential allergens and consult a health professional if in doubt.

Leave a Comment