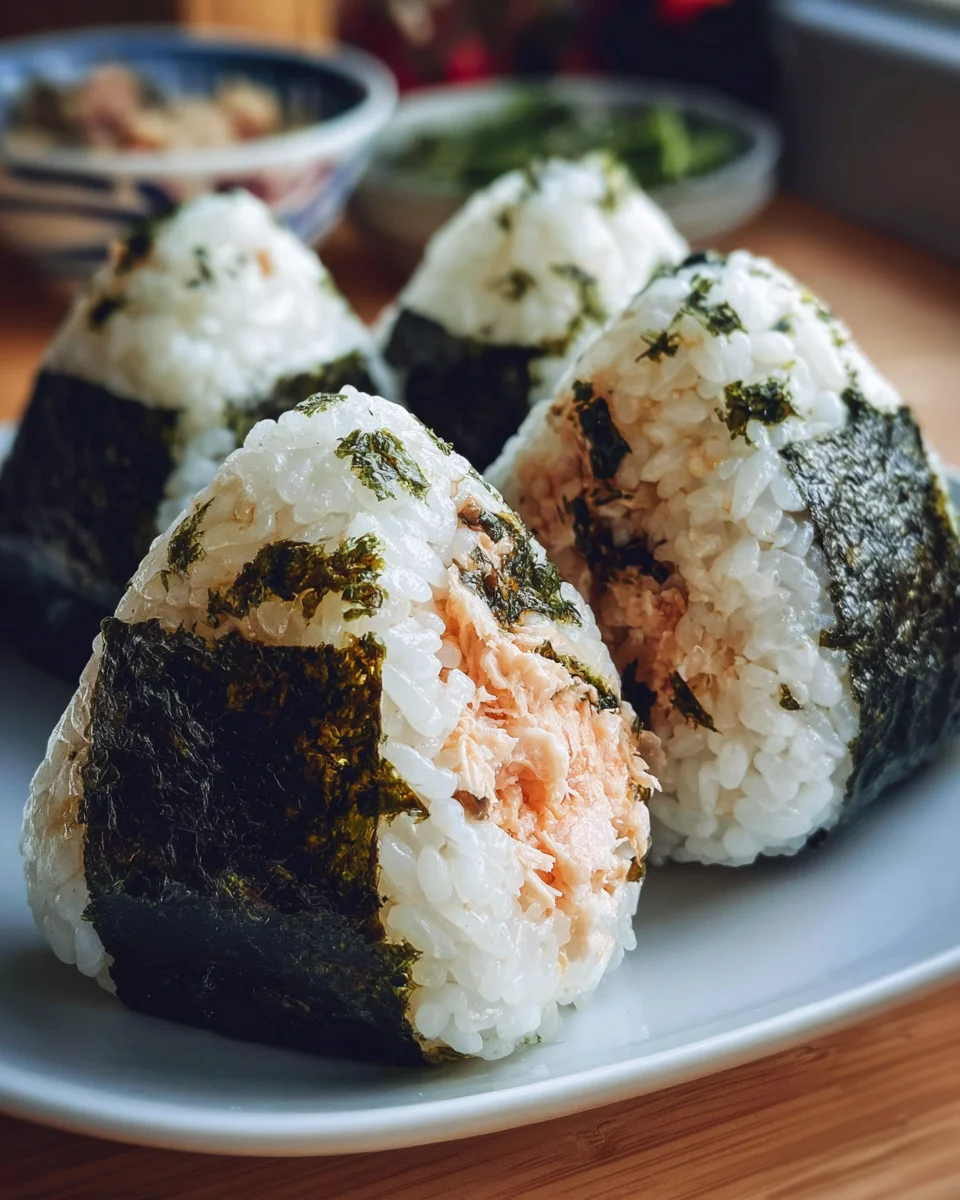
Onigiri Recipe: Have you ever craved a snack that’s both incredibly satisfying and wonderfully portable? I’m thrilled to share with you the secrets to crafting the perfect onigiri, those iconic Japanese rice balls that are much more than just a simple meal—they’re a delightful cultural staple. Originating centuries ago, onigiri served as a practical and delicious way for travelers, farmers, and even samurai to carry their sustenance. Today, they remain an enduring symbol of Japanese convenience and comfort food, gracing bento boxes, convenience store shelves, and home kitchens across the globe.
I personally find immense joy in making and eating onigiri due to their incredible versatility and comforting simplicity. The beauty of onigiri lies in its perfect balance: perfectly cooked, subtly seasoned rice encasing a delightful filling, often embraced by a crisp sheet of nori. Whether it’s the tangy zest of umeboshi, the savory richness of grilled salmon, or the creamy indulgence of tuna mayo, there’s an onigiri for every palate. People absolutely adore them for their convenience, the satisfying texture of the rice, and the endless possibilities for customization. This comprehensive Onigiri Recipe will empower you to create these charming and delicious rice balls right in your own kitchen, bringing a taste of Japan to your table with ease.

Ingredients:
Embarking on the wonderful journey of making homemade Onigiri is incredibly rewarding. The beauty of an Onigiri Recipe lies in its simplicity and versatility. Here’s everything you’ll need to create a batch of delightful rice balls, including options for popular fillings:
- For the Rice:
- 2 cups (approximately 400g) Japanese short-grain rice (also known as sushi rice). This type of rice is essential for its stickiness and texture, which allows the onigiri to hold its shape perfectly. Long-grain or medium-grain rice simply won’t yield the same results for this Onigiri Recipe.
- 2 ½ cups cold water, plus extra for rinsing. The exact amount of water can vary slightly depending on your rice cooker or pot, but this is a good starting point.
- ½ teaspoon sea salt, plus extra for shaping. Salt is crucial not just for seasoning the rice, but also for preventing sticking to your hands and providing a protective, savory layer.
- For the Nori (Seaweed):
- 4-5 sheets toasted nori seaweed. These are typically sold in packs as full sheets. You’ll cut them into strips or shapes later. Nori adds a wonderful umami flavor and a convenient handle for eating.
- Optional Fillings (choose one or more!):
- For Baked Salmon Onigiri:
- 1 small salmon fillet (about 4-5 ounces / 110-140g). Fresh or frozen salmon works well.
- Pinch of salt and black pepper.
- 1 teaspoon sake or mirin (optional, for flavor).
- For Creamy Tuna Mayo Onigiri:
- 1 (5-ounce / 140g) can tuna in water or oil, well-drained. Draining properly is key to avoid a soggy filling.
- 2-3 tablespoons Japanese mayonnaise (Kewpie brand recommended for its richer flavor).
- ½ teaspoon soy sauce.
- Pinch of black pepper.
- Optional: finely chopped green onion or chives for freshness.
- For Tangy Umeboshi (Pickled Plum) Onigiri:
- 2-3 whole umeboshi (Japanese pickled plums), pitted and finely chopped. Umeboshi offers a unique salty and sour punch that’s incredibly refreshing.
- Optional: a few finely shredded shiso leaves.
- For Savory Kombu Tsukudani Onigiri:
- 2-3 tablespoons kombu tsukudani (simmered kelp). You can buy this pre-made at most Asian grocery stores. It’s a sweet and savory, intensely flavorful condiment.
- Other popular additions: Furikake (rice seasoning), toasted sesame seeds, bonito flakes.
- For Baked Salmon Onigiri:
- Equipment You’ll Need:
- Rice cooker or heavy-bottomed pot with a tight-fitting lid.
- Large mixing bowl (preferably wooden or non-reactive).
- Small bowls for fillings.
- Cling film / plastic wrap (highly recommended for shaping).
- Sharp knife and cutting board.
- A shallow bowl of lightly salted water for shaping.
- Spatula or rice paddle.
Preparing the Perfect Onigiri Rice
The foundation of any outstanding Onigiri Recipe is perfectly cooked and seasoned rice. It might seem straightforward, but a few key steps ensure your rice is sticky enough to hold its shape, yet fluffy and delicious.
- Rinse the Rice Thoroughly: Place your 2 cups of Japanese short-grain rice in a large bowl. Add cold water, swirling the rice gently with your hand. The water will become cloudy. Drain and repeat this process 4-5 times, or until the water runs mostly clear. This step is crucial for removing excess starch, which helps the rice become fluffy and not gummy after cooking. It’s an essential part of preparing rice for any Japanese dish, especially an Onigiri Recipe.
- Soak the Rice: Once rinsed, drain the rice thoroughly and transfer it to your rice cooker pot or heavy-bottomed pot. Add 2 ½ cups of cold water. Let the rice soak for at least 30 minutes, or up to an hour. Soaking allows the rice grains to absorb water evenly before cooking, resulting in a more tender and uniformly cooked grain. This significantly improves the texture of your finished Onigiri.
- Cook the Rice:
- Using a Rice Cooker: Place the pot in your rice cooker, close the lid, and turn it on to the “white rice” setting. Once it finishes cooking and switches to “keep warm,” let it rest for another 10-15 minutes without opening the lid.
- Using a Stovetop Pot: Bring the rice and water to a boil over medium-high heat. Once boiling, reduce the heat to the lowest setting, cover the pot tightly with a lid, and simmer for 15 minutes. After 15 minutes, remove the pot from the heat and let it rest, still covered, for another 10-15 minutes. Do not lift the lid during cooking or resting, as this releases steam crucial for proper cooking.
- Season and Cool the Rice: Gently transfer the cooked rice to a large, non-reactive bowl (a wooden sushi oke or a large glass bowl is ideal). Sprinkle ½ teaspoon of sea salt evenly over the rice. Using a rice paddle or a flat spoon, gently cut and fold the rice, turning it over to mix the salt in. The goal is to separate and aerate the rice without mashing it. Work quickly while the rice is still warm but not scorching hot. Aim for a temperature that is comfortable to handle, as this is ideal for shaping.
- Prepare Your Nori: While the rice cools slightly, cut your toasted nori sheets. You can cut them into 1-inch wide strips, triangles, or rectangles, depending on how you plan to wrap your onigiri. Some people prefer a small strip at the bottom for handling, while others wrap the entire onigiri.
Crafting Your Delicious Fillings
Now comes the fun part – preparing the delicious fillings that will transform your plain rice into flavorful Onigiri! Each filling offers a distinct taste and texture, allowing you to customize your Onigiri Recipe.
-
Baked Salmon Filling:
- Preheat your oven to 375°F (190°C). Line a small baking sheet with parchment paper.
- Place the salmon fillet on the prepared baking sheet. Season lightly with salt and pepper. If using, drizzle with sake or mirin.
- Bake for 12-15 minutes, or until the salmon is cooked through and flakes easily with a fork.
- Once cooked, let it cool slightly. Using a fork, flake the salmon into small pieces, making sure to remove any skin or bones. Set aside. The salmon should be tender and easily broken down to integrate well into the rice.
-
Creamy Tuna Mayo Filling:
- Open the can of tuna and drain it very, very well. You can even press out excess water using a spoon against a sieve or paper towels. This prevents a watery filling that could compromise the integrity of your onigiri.
- In a small bowl, combine the drained tuna, Japanese mayonnaise, soy sauce, and black pepper.
- Mix thoroughly until all ingredients are well combined and the tuna is coated. If using, stir in chopped green onion or chives. Taste and adjust seasoning if needed. Set aside. This creamy, savory filling is a classic for a reason and a staple in any versatile Onigiri Recipe.
-
Tangy Umeboshi (Pickled Plum) Filling:
- Take the umeboshi plums and carefully remove the pits.
- Finely chop the umeboshi flesh. You want small pieces so it distributes evenly without creating large hard chunks.
- If using, finely shred a few shiso leaves and mix them with the chopped umeboshi. Set aside. The vibrant color and distinct flavor of shiso beautifully complement the umeboshi.
-
Savory Kombu Tsukudani Filling:
- If you are using pre-made kombu tsukudani, simply spoon out the desired amount into a small bowl.
- If making it from scratch, you would typically simmer thin strips of kombu with soy sauce, mirin, sake, and sugar until tender and flavorful. For this Onigiri Recipe, it’s often easiest to buy it pre-prepared.
- This filling is already rich in flavor, so no additional seasoning is usually needed. Set aside.
Shaping Your Onigiri
This is where your Onigiri Recipe truly comes to life! Shaping requires a gentle touch and a bit of practice, but it’s incredibly satisfying. The goal is to create a firm rice ball without compressing the rice too much.
- Prepare Your Hands (or Plastic Wrap):
- Fill a small bowl with about ½ cup of cold water and add a generous pinch of salt. This is your “salt water” for shaping. Dip your hands into this water, shaking off excess. The salt water helps prevent the rice from sticking to your hands and also seasons the outer layer of the onigiri.
- Alternatively, for easier shaping and cleaner hands, lay a piece of cling film (about 12×12 inches / 30×30 cm) on your work surface. Lightly sprinkle a pinch of salt on the center of the plastic wrap. Using plastic wrap is highly recommended for beginners or if you’re making a large batch.
- Scoop the Rice: Take about ½ cup (or a rice cooker scoop) of the prepared, warm rice. Place it in the palm of your salted hand, or onto the center of the salted cling film. The rice should be warm enough to be pliable but not too hot to handle.
- Make a Well for the Filling: Gently flatten the rice in your hand or on the cling film to form a disc. Make a small indentation in the center with your finger.
- Add the Filling: Place about 1-2 tablespoons of your chosen filling into the indentation. Don’t overfill, as it will make shaping difficult.
- Cover with More Rice: Take another small portion of rice (about ¼ cup) and place it over the filling, sealing it. Gently bring the edges of the bottom layer of rice up and over the top layer, completely enclosing the filling.
- Shape the Onigiri (Triangle or Ball):
- For Triangle Shape (the classic Onigiri Recipe look):
- If using your hands: Cup the rice gently between your palms. Use your thumbs and forefingers to form three distinct edges, rotating the rice as you press gently. Your other fingers will support the base. Gently but firmly press each “corner” and side to create a triangular prism shape.
- If using cling film: Gather the edges of the cling film around the rice, twisting the top to form a tight ball. Then, use your hands to press and shape the rice through the plastic wrap, forming the triangular shape by gently compressing the sides into sharp corners.
- For Ball Shape:
- If using your hands: Simply cup the rice and gently roll it between your palms, applying even pressure to form a smooth, compact ball.
- If using cling film: Gather the edges of the cling film and twist the top, then gently roll the plastic-wrapped rice between your hands to form a ball.
- For Triangle Shape (the classic Onigiri Recipe look):
- Apply Gentle Pressure: The key is to apply just enough pressure to compact the rice so it holds its shape, but not so much that it becomes dense and hard. A light, firm touch is perfect. Repeat the shaping process for the remaining rice and fillings.
Wrapping and Serving Your Onigiri
The final touches for your homemade Onigiri Recipe involve adding the nori and getting them ready to enjoy.
- Wrap with Nori: Take your shaped onigiri and gently press a piece of nori onto one side.
- Bottom Strip: A common method is to wrap a rectangular strip around the bottom of the onigiri, leaving the top rice exposed. This acts as a handle and prevents your fingers from getting sticky.
- Full Wrap: For larger onigiri, you can wrap a larger piece of nori around the entire onigiri, leaving a slight overlap.
- Side Strip: Sometimes a narrow strip is simply placed on one side.
Remember that nori can get soggy quickly if left on the onigiri for too long before eating. If you’re packing them for later, it’s best to wrap the nori separately in plastic film and attach it just before eating.
- Serve Immediately: Onigiri are best enjoyed fresh, while the rice is still warm or at room temperature, and the nori is crispy.
Pro Tips for the Ultimate Onigiri Experience
Mastering an Onigiri Recipe is all about the details. Here are some extra tips to elevate your homemade rice balls:
-
The Rice is King:
The quality and preparation of your rice are paramount. Always use Japanese short-grain rice and follow the rinsing, soaking, and resting steps diligently. This ensures the perfect texture that is both sticky and fluffy. Undercooked or overcooked rice will ruin your Onigiri.
-
Temperature Matters:
Shape your onigiri while the rice is still warm, but not scalding. Warm rice is more pliable and easier to mold. If it cools too much, it becomes stiff and crumbly, making shaping difficult. If it’s too hot, it will be hard to handle and may over-compress.
-
Don’t Overfill:
While tempting to pack in as much delicious filling as possible, moderation is key. Too much filling makes the onigiri prone to breaking apart and difficult to seal properly. Aim for a balanced ratio of rice to filling.
-
Gentle Touch is Best:
When shaping, use a firm but gentle pressure. The goal is to compact the rice enough so it holds its shape without falling apart, but not so much that it becomes a dense, hard brick. Light, quick presses are more effective than prolonged squeezing. You should still feel the individual grains of rice.
-
Get Creative with Fillings:
The Onigiri Recipe is incredibly versatile! Don’t limit yourself to the classics. Experiment with other delicious fillings such as:
- Teriyaki Chicken: Diced cooked chicken tossed in teriyaki sauce.
- Shrimp Tempura: Small pieces of cooked shrimp tempura for a crunchy surprise.
- Mentaiko (Spicy Cod Roe): A popular spicy and savory option.
- Pickled Daikon or Takuan: For a refreshing crunch and tangy flavor.
- Kimchi: Finely chopped kimchi for a spicy, fermented kick.
- Soy-Glazed Mushrooms: Sautéed mushrooms seasoned with soy sauce.
-
Storage Tips:
Onigiri are best eaten fresh. However, if you need to store them, wrap each onigiri tightly in plastic cling film to prevent the rice from drying out. Store them at room temperature for a few hours. For longer storage (up to 24 hours), refrigerate them, but be aware that the rice texture will harden. To reheat, microwave for 30-60 seconds, or until just warmed through, to restore some softness. For packed lunches, keep the nori separate and add it just before eating to maintain its crispness.
-
Add a Crunch with Furikake or Sesame Seeds:
You can mix furikake (Japanese rice seasoning) directly into the rice before shaping for an all-over flavor, or sprinkle toasted sesame seeds (black or white) on the outside of the finished onigiri for added texture and visual appeal.
-
Practice Makes Perfect:
Your first few onigiri might not be perfectly shaped, and that’s completely normal! With a little practice, you’ll find your rhythm and technique for shaping perfectly firm and beautiful rice balls.
Conclusion:
Well, there you have it! I truly hope you’ve enjoyed exploring the simple yet profound joy of making your own rice balls. For me, this particular Onigiri Recipe isn’t just about combining rice and fillings; it’s about crafting a small parcel of comfort, convenience, and customisable deliciousness. It’s a must-try for so many reasons, first and foremost being its incredible versatility and ease. Forget complicated techniques or long ingredient lists; the beauty of onigiri lies in its straightforward nature, making it perfect for even novice cooks. You get to control every aspect, ensuring the freshest ingredients and flavours tailored exactly to your preference. It’s an ideal solution for quick lunches, energizing snacks, or even charming additions to a picnic spread. The satisfaction of biting into a perfectly seasoned, lovingly shaped rice ball that you made with your own hands is truly unparalleled. This isn’t just food; it’s a little edible hug, perfect for any time of day, and a wonderful way to bring a touch of Japanese culinary tradition right into your kitchen with minimal fuss.
Now that you’ve mastered the basic technique, the real fun begins with serving and variations! While a freshly made onigiri is absolutely perfect on its own, perhaps wrapped in nori, there are countless ways to elevate your experience. For a classic Japanese lunch, I love serving them alongside a warm bowl of miso soup and a simple green salad with a ginger dressing. They also make fantastic additions to bento boxes, offering a delightful and filling centrepiece. Don’t hesitate to get creative with your fillings; the world is truly your oyster! Beyond the classic tuna mayo or umeboshi, consider flaked grilled salmon, seasoned kombu (kelp), or even fried chicken (karaage) bits for a hearty bite. For a vegetarian option, try sautéed mushrooms with a touch of soy sauce, or finely diced scrambled egg (tamagoyaki). You can also experiment with seasoning the rice itself before shaping; a sprinkle of furikake, a dash of sesame oil, or even a tiny amount of soy sauce mixed in can add another layer of flavour. Don’t forget the external embellishments – a strip of nori, a sprinkle of black sesame seeds, or even a shiso leaf can add both visual appeal and an extra burst of taste. The adaptability of onigiri means you can keep things simple and traditional or venture into exciting, inventive flavour combinations limited only by your imagination.
So, please, don’t just read about it; dive in and give this wonderful recipe a try! I genuinely believe you’ll be amazed at how simple and rewarding it is to make your own onigiri. There’s a unique sense of accomplishment in crafting these little rice triangles or spheres, and the taste of homemade is always superior. Whether you’re preparing a quick snack for yourself, packing a delightful lunch for your kids, or impressing friends at a casual gathering, onigiri will undoubtedly become a staple in your culinary repertoire. I’m always so thrilled to hear about your kitchen adventures, so once you’ve made your first batch, I’d absolutely love to hear about your experience. Did you stick to the classics, or did you get adventurous with your fillings? Share your triumphs, your favourite variations, and perhaps even some photos of your beautiful creations. Happy cooking, and enjoy every delicious bite!
Quick & Easy Onigiri Recipe: Perfect Japanese Rice Balls
Craft the perfect onigiri, iconic Japanese rice balls that are a delightful cultural staple. This recipe guides you through making subtly seasoned rice with a variety of delicious fillings like flaked salmon, creamy tuna mayo, tangy umeboshi, or savory kombu tsukudani, all wrapped in crisp nori. Perfect for a portable snack or a comforting meal, onigiri offers incredible versatility and satisfying simplicity.
Ingredients
Instructions
Important Information
Nutrition Facts (Per Serving)
It is important to consider this information as approximate and not to use it as definitive health advice.
Allergy Information
Please check ingredients for potential allergens and consult a health professional if in doubt.


Leave a Comment