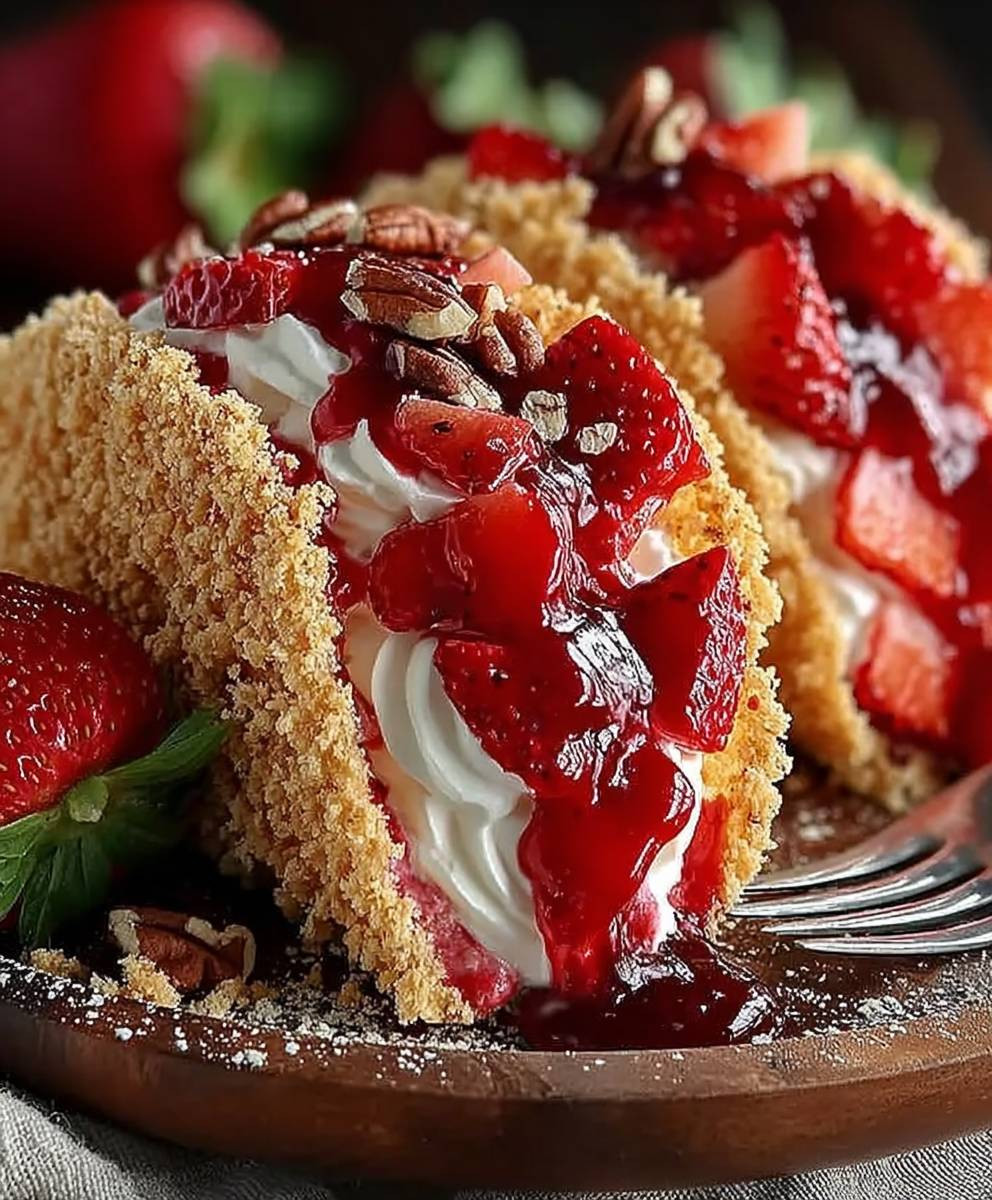
Strawberry Crunch Cheesecake Tacos: Prepare to have your dessert world turned upside down! Imagine the creamy, tangy delight of cheesecake, the sweet burst of fresh strawberries, and the satisfying crunch of a golden taco shell, all harmonizing in a single, unforgettable bite. This isn’t just a recipe; it’s an experience.
While the exact origins of this whimsical treat are shrouded in modern dessert innovation, the inspiration draws from beloved classics. The cheesecake element pays homage to the rich history of cheesecakes, dating back to ancient Greece, while the strawberry crunch evokes nostalgic memories of strawberry shortcake ice cream bars. The taco shell, a nod to Mexican culinary traditions, provides an unexpected and playful twist.
What makes these Strawberry Crunch Cheesecake Tacos so irresistible? It’s the perfect marriage of textures and flavors. The smooth, decadent cheesecake filling contrasts beautifully with the crisp taco shell and the juicy sweetness of the strawberries. They’re also incredibly fun to eat, making them a guaranteed crowd-pleaser at parties and gatherings. Plus, they’re surprisingly easy to assemble, making them a delightful treat you can whip up in no time. Get ready to embark on a dessert adventure that will tantalize your taste buds and leave you craving more!

Ingredients:
- For the Cheesecake Filling:
- 8 ounces cream cheese, softened
- 1/2 cup granulated sugar
- 1 teaspoon vanilla extract
- 1/4 cup heavy cream
- For the Strawberry Crunch Coating:
- 1 cup Golden Oreo cookies, finely crushed
- 1/4 cup freeze-dried strawberries, finely crushed
- 1/4 cup melted butter
- For the Taco Shells:
- 6 (6-inch) flour tortillas
- 2 tablespoons melted butter
- 2 tablespoons granulated sugar
- 1/2 teaspoon ground cinnamon
- For Garnish (Optional):
- Fresh strawberries, sliced
- Whipped cream
- Strawberry syrup
Preparing the Taco Shells:
Okay, let’s start with the taco shells. These are going to be our crispy, cinnamon-sugary base for all that deliciousness. Trust me, this step is worth it!
- Preheat your oven to 350°F (175°C). This is crucial for getting the tortillas nice and crispy without burning them.
- Prepare the cinnamon-sugar mixture. In a small bowl, combine the 2 tablespoons of granulated sugar and 1/2 teaspoon of ground cinnamon. Mix well until evenly combined. This is what’s going to give our taco shells that warm, comforting flavor.
- Brush the tortillas with melted butter. Lightly brush both sides of each flour tortilla with the 2 tablespoons of melted butter. Make sure you get a nice, even coating, but don’t overdo it – we don’t want soggy tacos!
- Sprinkle with cinnamon-sugar mixture. Sprinkle both sides of each buttered tortilla with the cinnamon-sugar mixture. Again, aim for an even coating. The sugar will caramelize in the oven and create a delightful crunch.
- Shape the tortillas into taco shells. There are a couple of ways to do this. You can either drape the tortillas over two bars of your oven rack, or you can use a taco shell holder if you have one. If you’re using the oven rack method, make sure the tortillas are positioned so they form a “U” shape.
- Bake the taco shells. Bake for 8-10 minutes, or until the tortillas are golden brown and crispy. Keep a close eye on them, as they can burn quickly. The edges should be nicely browned and slightly firm to the touch.
- Cool the taco shells. Once the taco shells are baked, carefully remove them from the oven and let them cool completely on a wire rack. This will allow them to crisp up even further. Be gentle, as they can be fragile when they’re still warm.
Making the Cheesecake Filling:
Now for the creamy, dreamy cheesecake filling! This is where the magic really happens. It’s super easy to make, and the result is absolutely divine.
- Soften the cream cheese. Make sure your cream cheese is completely softened before you start. This is essential for a smooth, lump-free filling. If you forget to take it out of the fridge ahead of time, you can microwave it in 15-second intervals until it’s soft, but be careful not to melt it.
- Beat the cream cheese and sugar. In a large bowl, beat the softened cream cheese and granulated sugar together with an electric mixer until smooth and creamy. This usually takes about 2-3 minutes. Scrape down the sides of the bowl as needed to ensure everything is evenly mixed.
- Add the vanilla extract. Stir in the vanilla extract until well combined. The vanilla adds a lovely warmth and depth of flavor to the cheesecake filling.
- Whip in the heavy cream. Gradually add the heavy cream and continue to beat until the filling is light and fluffy. Be careful not to overbeat, as this can cause the filling to become too thick. You want a nice, smooth, and spreadable consistency.
- Chill the filling. Cover the bowl with plastic wrap and refrigerate the cheesecake filling for at least 30 minutes. This will help it firm up slightly and make it easier to work with when assembling the tacos.
Preparing the Strawberry Crunch Coating:
This is the star of the show! The strawberry crunch coating adds a burst of flavor and an irresistible texture that takes these cheesecake tacos to the next level. It’s so good, you might want to make extra!
- Crush the Golden Oreo cookies. Place the Golden Oreo cookies in a food processor and pulse until they are finely crushed. Alternatively, you can place them in a resealable plastic bag and crush them with a rolling pin. You want a fine crumb consistency.
- Crush the freeze-dried strawberries. Place the freeze-dried strawberries in a food processor and pulse until they are finely crushed. You can also crush them in a resealable plastic bag with a rolling pin. Freeze-dried strawberries add a concentrated strawberry flavor and a beautiful pink color to the coating.
- Combine the crushed cookies and strawberries. In a medium bowl, combine the crushed Golden Oreo cookies and crushed freeze-dried strawberries. Mix well until evenly distributed.
- Add the melted butter. Pour the melted butter over the cookie and strawberry mixture and stir until everything is well coated. The melted butter helps bind the crumbs together and adds a rich, buttery flavor.
Assembling the Strawberry Crunch Cheesecake Tacos:
Alright, the moment we’ve all been waiting for! Let’s put everything together and create these amazing Strawberry Crunch Cheesecake Tacos.
- Fill the taco shells. Spoon the chilled cheesecake filling into each of the cooled taco shells. Be generous with the filling, but don’t overfill them, or they’ll be difficult to eat.
- Coat with the strawberry crunch. Gently press the filled taco shells into the strawberry crunch coating, ensuring that the filling is completely covered. You can also sprinkle the coating over the filling if you prefer.
- Garnish (Optional). If desired, garnish the Strawberry Crunch Cheesecake Tacos with fresh strawberry slices, whipped cream, and a drizzle of strawberry syrup. This adds a beautiful finishing touch and enhances the strawberry flavor.
- Serve immediately. These tacos are best served immediately, as the taco shells can soften over time. Enjoy!
Tips and Variations:
- Make it ahead: You can prepare the taco shells, cheesecake filling, and strawberry crunch coating ahead of time and store them separately. Assemble the tacos just before serving.
- Different flavors: Experiment with different flavors of Oreo cookies and freeze-dried fruits. For example, you could use chocolate Oreos and freeze-dried raspberries for a chocolate raspberry cheesecake taco.
- Add chocolate: Drizzle melted chocolate over the finished tacos for an extra touch of indulgence.
- Use different toppings: Get creative with your toppings! Try adding sprinkles, chopped nuts, or mini chocolate chips.
- Make mini tacos: Use smaller tortillas to make mini Strawberry Crunch Cheesecake Tacos for parties or gatherings.
- Vegan option: Use vegan cream cheese, vegan butter, and vegan Oreo cookies to make a vegan version of this recipe.
Storage Instructions:
If you have any leftover Strawberry Crunch Cheesecake Tacos (which is unlikely!), store them in an airtight container in the refrigerator for up to 2 days. Keep in mind that the taco shells may soften over time.
Enjoy!
I hope you enjoy making and eating these Strawberry Crunch Cheesecake Tacos as much as I do! They’re the perfect treat for any occasion.
Conclusion:
Okay, friends, let’s be honest – if you’ve made it this far, you’re already halfway to dessert heaven! These Strawberry Crunch Cheesecake Tacos are more than just a recipe; they’re an experience. The creamy, tangy cheesecake filling, the sweet burst of fresh strawberries, and that irresistible crunch from the golden taco shell… it’s a symphony of textures and flavors that will have everyone begging for more. Trust me, this isn’t your average dessert; it’s a showstopper that’s surprisingly easy to pull off.
Why is this a must-try? Because it’s fun! It’s unexpected! And most importantly, it’s absolutely delicious! Think about it: you get the satisfying crunch of a taco, the comforting richness of cheesecake, and the vibrant freshness of strawberries all in one delightful bite. It’s the perfect dessert for parties, potlucks, or even just a special treat for yourself after a long day. Plus, the presentation is stunning! Imagine serving these beauties at your next gathering – they’re guaranteed to be the talk of the town.
But the fun doesn’t stop there! Feel free to get creative with your serving suggestions and variations. For a truly decadent experience, try drizzling the finished tacos with a warm white chocolate sauce or a tangy strawberry glaze. A sprinkle of chopped pistachios or toasted coconut flakes would also add a lovely textural element. If you’re feeling adventurous, you could even experiment with different fruit fillings. Imagine a blueberry cheesecake taco, or a mango cheesecake taco – the possibilities are endless!
Serving Suggestions:
- Serve immediately for the best crunch.
- Dust with powdered sugar for an extra touch of sweetness.
- Pair with a scoop of vanilla ice cream for an even more indulgent dessert.
- Arrange on a platter with fresh strawberries for a beautiful presentation.
Variations:
- Use different types of berries, such as blueberries, raspberries, or blackberries.
- Add a layer of Nutella or peanut butter to the taco shell before filling.
- Substitute the cheesecake filling with a chocolate mousse or a lemon curd.
- Experiment with different types of taco shells, such as cinnamon sugar tortillas.
I truly believe that this Strawberry Crunch Cheesecake Tacos recipe is a winner. It’s a crowd-pleaser, it’s easy to customize, and it’s guaranteed to bring a smile to your face. So, what are you waiting for? Gather your ingredients, preheat your oven, and get ready to create some magic in the kitchen! I’m so excited for you to try this recipe and experience the joy of these delightful tacos.
And now, for the most important part: I want to hear from you! Once you’ve made these Strawberry Crunch Cheesecake Tacos, please share your experience. Did you love them? Did you make any fun variations? What did your friends and family think? Leave a comment below, tag me in your photos on social media – I can’t wait to see your creations! Happy baking (or should I say, happy taco-ing!) and enjoy every single delicious bite!
Strawberry Crunch Cheesecake Tacos: The Ultimate Dessert Recipe
Crispy cinnamon-sugar taco shells filled with creamy cheesecake and coated in a sweet strawberry crunch. A fun and delicious dessert!
Ingredients
- 8 ounces cream cheese, softened
- 1/2 cup granulated sugar
- 1 teaspoon vanilla extract
- 1/4 cup heavy cream
- 1 cup Golden Oreo cookies, finely crushed
- 1/4 cup freeze-dried strawberries, finely crushed
- 1/4 cup melted butter
- 6 (6-inch) flour tortillas
- 2 tablespoons melted butter
- 2 tablespoons granulated sugar
- 1/2 teaspoon ground cinnamon
- Fresh strawberries, sliced
- Whipped cream
- Strawberry syrup
Instructions
- Preheat your oven to 350°F (175°C).
- In a small bowl, combine the 2 tablespoons of granulated sugar and 1/2 teaspoon of ground cinnamon. Mix well.
- Lightly brush both sides of each flour tortilla with the 2 tablespoons of melted butter.
- Sprinkle both sides of each buttered tortilla with the cinnamon-sugar mixture.
- Drape the tortillas over two bars of your oven rack or use a taco shell holder to form a “U” shape.
- Bake for 8-10 minutes, or until the tortillas are golden brown and crispy.
- Cool completely on a wire rack.
- Ensure cream cheese is completely softened.
- In a large bowl, beat the softened cream cheese and granulated sugar together with an electric mixer until smooth and creamy.
- Stir in the vanilla extract until well combined.
- Gradually add the heavy cream and continue to beat until the filling is light and fluffy.
- Cover and refrigerate the cheesecake filling for at least 30 minutes.
- Crush the Golden Oreo cookies in a food processor or resealable bag until finely crushed.
- Crush the freeze-dried strawberries in a food processor or resealable bag until finely crushed.
- In a medium bowl, combine the crushed Golden Oreo cookies and crushed freeze-dried strawberries.
- Pour the melted butter over the cookie and strawberry mixture and stir until everything is well coated.
- Spoon the chilled cheesecake filling into each of the cooled taco shells.
- Gently press the filled taco shells into the strawberry crunch coating, ensuring that the filling is completely covered.
- Garnish with fresh strawberry slices, whipped cream, and a drizzle of strawberry syrup, if desired.
- Serve immediately.
Notes
- Make it ahead: You can prepare the taco shells, cheesecake filling, and strawberry crunch coating ahead of time and store them separately. Assemble the tacos just before serving.
- Different flavors: Experiment with different flavors of Oreo cookies and freeze-dried fruits. For example, you could use chocolate Oreos and freeze-dried raspberries for a chocolate raspberry cheesecake taco.
- Add chocolate: Drizzle melted chocolate over the finished tacos for an extra touch of indulgence.
- Use different toppings: Get creative with your toppings! Try adding sprinkles, chopped nuts, or mini chocolate chips.
- Make mini tacos: Use smaller tortillas to make mini Strawberry Crunch Cheesecake Tacos for parties or gatherings.
- Vegan option: Use vegan cream cheese, vegan butter, and vegan Oreo cookies to make a vegan version of this recipe.
- Storage Instructions: If you have any leftover Strawberry Crunch Cheesecake Tacos (which is unlikely!), store them in an airtight container in the refrigerator for up to 2 days. Keep in mind that the taco shells may soften over time.

Leave a Comment