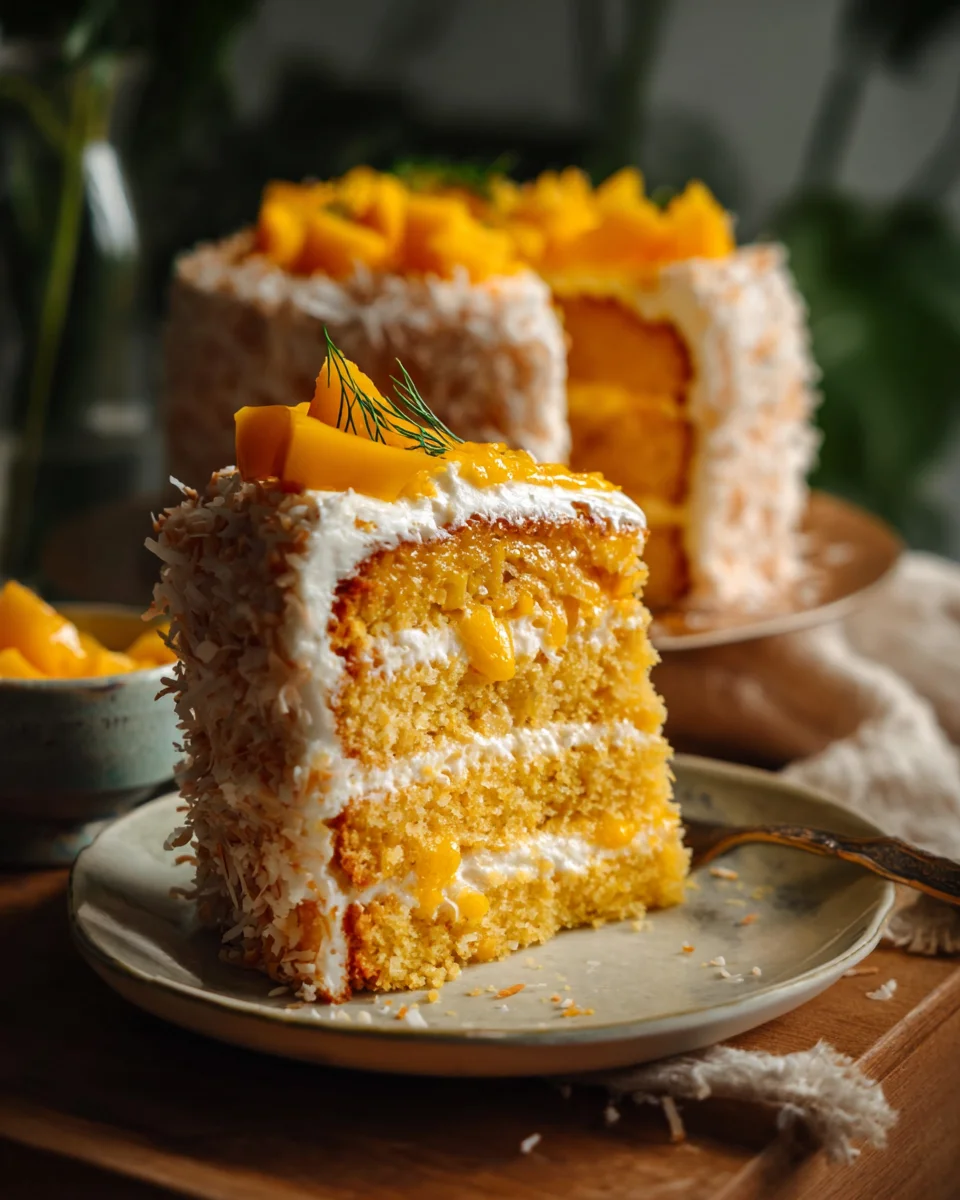
Vegan Mango Coconut Cake.html is an extraordinary dessert that promises to transport your taste buds straight to a sun-drenched tropical paradise. I am absolutely thrilled to share with you why this particular creation holds such a special place in my heart and, undoubtedly, will in yours too.
Have you ever dreamt of a cake that’s not only utterly delicious but also accommodates diverse dietary needs without compromising on flavor or texture? This recipe delivers exactly that. The vibrant combination of sweet, ripe mangoes and creamy coconut milk is a cornerstone of many exquisite tropical cuisines, from Indian Alphonso mango lassi to Thai sticky rice with mango. While a specific historical origin for this exact vegan cake might be elusive, it beautifully marries the vibrant essence of these traditional flavors into a contemporary, plant-based masterpiece, making it an ideal choice for a delightful Vegan Mango Coconut Cake.
People universally adore this delightful dessert for its incredible balance of tangy sweetness from the mango, complemented by the rich, subtle creaminess of coconut. Its moist crumb and delicate, aromatic profile make this Vegan Mango Coconut Cake a delightful treat for any occasion, from casual brunches to elegant celebrations. It’s not just a cake; it’s an experience – light, refreshing, and deeply satisfying, proving that vegan baking can be utterly luxurious. Get ready to embark on a culinary journey that celebrates flavor, compassion, and pure joy.

Ingredients:
-
For the Cake Layers:
-
Dry Ingredients:
- 3 cups (360g) all-purpose flour, sifted: Sifting is crucial here to ensure a light and airy cake crumb, preventing any lumps and helping the dry ingredients combine evenly. It makes a noticeable difference in the final texture of your cake.
- 2 cups (400g) granulated sugar: This provides the perfect level of sweetness and helps keep the cake wonderfully moist, which is especially important for a vegan cake.
- 1 tablespoon baking powder: Our primary leavening agent, ensuring the cake rises beautifully and achieves a tender structure.
- 1 teaspoon baking soda: Works in perfect conjunction with the apple cider vinegar to create extra lift and a melt-in-your-mouth tenderness.
- 1/2 teaspoon fine sea salt: Essential for balancing the sweetness, enhancing all the other flavors, and preventing the cake from tasting bland.
- 1/2 cup (45g) unsweetened shredded coconut: Adds a lovely, subtle texture and a delightful tropical note directly into the cake base, complementing the mango and coconut frosting perfectly.
-
Wet Ingredients:
- 1 ½ cups (360ml) full-fat canned coconut milk, unsweetened (from a can, shaken well): Make absolutely sure it’s full-fat for the richest flavor and moisture. Shake the can vigorously before opening to emulsify the thick cream and thinner liquid inside.
- 1 cup (240ml) unsweetened plant-based milk (almond, soy, or oat work wonderfully): Adds additional moisture and helps achieve the perfect, pourable batter consistency.
- ¾ cup (180ml) neutral oil (like canola, vegetable, or melted refined coconut oil): Contributes significantly to the cake’s tender crumb and ensures it stays incredibly moist for days.
- 2 teaspoons pure vanilla extract: Elevates all the other flavors with its warm, aromatic notes, making the cake smell and taste incredible.
- 2 tablespoons apple cider vinegar: Reacts with the baking soda to create powerful lift and contributes to the cake’s tenderness without imparting any discernible vinegary taste to the finished product.
-
Dry Ingredients:
-
For the Fresh Mango Filling:
- 2 large ripe mangoes (about 2-3 cups diced): Choose mangoes that are beautifully soft to the touch and smell wonderfully fragrant at the stem end for the absolute best, sweetest flavor. Ataulfo or Honey mangoes are excellent choices for their intense sweetness and lack of fibrous texture.
- 2 tablespoons granulated sugar (adjust to mango sweetness): This can be omitted entirely if your mangoes are exceptionally sweet, or slightly increased if they are a little tart and need a boost.
- 1 tablespoon fresh lime juice: Brightens the vibrant mango flavor beautifully and adds a lovely touch of acidity, preventing the filling from being overly sweet.
- 1 tablespoon cornstarch or arrowroot powder: Used as a thickener to create a luscious, jam-like consistency for the filling that holds up well between cake layers.
- 2 tablespoons water: To dissolve the cornstarch thoroughly and ensure a smooth, lump-free thickening mixture.
-
For the Whipped Coconut Cream Frosting:
- 2 cans (13.5 oz / 400ml each) full-fat coconut cream or full-fat coconut milk, chilled overnight in the refrigerator: Chilling is absolutely, 100% essential to separate the thick cream from the liquid. Do not shake these cans at all before opening!
- ½ cup (60g) powdered sugar, sifted: For perfect sweetness and to ensure a smooth, gloriously lump-free frosting. Sifting prevents any grainy texture whatsoever.
- 1 teaspoon pure vanilla extract: Enhances the natural creamy flavor of the coconut and adds a classic, comforting aroma.
- Pinch of salt: A tiny touch of salt is crucial for balancing the sweetness and bringing out the depth of flavor in the frosting.
-
For Garnish (Optional):
- Fresh mango slices or artistic cubes
- Toasted shredded coconut for extra texture and flavor
- Fresh mint leaves for a pop of vibrant color and freshness
Preparation: Getting Started
- Prepare Your Cake Pans and Oven: Before embarking on the mixing adventure, preheat your oven to 350°F (175°C). This ensures your oven is at the correct, consistent temperature when the batter is ready, which is absolutely vital for even baking and a beautiful, consistent rise. Next, take your three 8-inch round cake pans and lightly grease and flour them thoroughly. Alternatively, you can line the bottoms with parchment paper circles and then grease the sides – this is my preferred method for foolproof cake release! This step is utterly crucial to prevent your beautiful cakes from sticking and ensures they slide out effortlessly. I always take extra care here because there’s nothing more frustrating than a cake that won’t release cleanly from the pan after all your hard work!
- Chill Coconut Cream for Frosting: If you haven’t already, make sure to place two cans of full-fat coconut cream or full-fat coconut milk in the refrigerator overnight, or for a minimum of 8 hours. It is paramount that you do not shake the cans! This prolonged chilling period allows the thick, solid cream to completely separate from the watery liquid at the bottom of the can, which is precisely what we’ll need for our luscious, stable whipped frosting. This step is absolutely paramount for achieving a firm, pipeable, and wonderfully light frosting that will hold its shape beautifully on your cake.
Making the Vegan Mango Coconut Cake Layers
- Combine Dry Ingredients: In a very large mixing bowl, a spacious one is best to avoid spills, combine all of your sifted all-purpose flour, granulated sugar, baking powder, baking soda, fine sea salt, and the unsweetened shredded coconut. Using a sturdy whisk, thoroughly combine these dry ingredients together for about 1-2 minutes until everything is perfectly and evenly distributed. This meticulous mixing helps ensure that the leavening agents are spread throughout every part of the batter, leading to an even rise, consistent texture, and no unexpected pockets of unmixed ingredients in your finished cake!
- Mix Wet Ingredients: In a separate, medium-sized bowl or a large liquid measuring cup for convenience, whisk together the full-fat canned coconut milk (remember to give that can a good shake before opening!), the unsweetened plant-based milk, the neutral oil, and the pure vanilla extract. Whisk until they are well combined and uniform. Once these are integrated, add the apple cider vinegar and stir briefly, just enough to incorporate it. You might notice a very slight curdling effect or small “specks” forming, which is perfectly normal and actually beneficial; the vinegar reacts with the plant milk, essentially creating a vegan buttermilk that contributes to the cake’s tenderness.
- Combine Wet and Dry Ingredients: Now, gently pour the entire wet ingredients mixture into the bowl containing the dry ingredients. Using either a whisk or a rubber spatula, mix until the ingredients are just combined. The absolute key here is not to overmix! Overmixing develops the gluten in the flour excessively, which can tragically result in a dense, tough, and chewy cake – the opposite of what we want for this tender creation. Mix only until you see no visible dry streaks of flour remaining. A few small lumps are absolutely fine and actually preferable to an overmixed batter. The finished batter will be relatively thick but still pourable.
- Divide and Bake: Carefully divide the glorious batter evenly among your three meticulously prepared 8-inch cake pans. I often find using a kitchen scale to ensure precise distribution is incredibly helpful, aiming for roughly equal weight in each pan, which guarantees they bake uniformly and rise to similar heights. Place the pans in your preheated oven and bake for 25-30 minutes. You’ll know they’re done when a wooden skewer or toothpick inserted directly into the center of a cake comes out clean, with no wet batter clinging to it. The cakes should also be beautifully lightly golden brown around the edges and spring back gently when lightly pressed.
- Cool the Cake Layers: Once baked to perfection, remove the cakes from the oven and let them cool in their pans on a wire rack for about 10-15 minutes. This crucial initial cooling period allows the cakes to firm up slightly and makes them significantly easier to handle without breaking. After this initial cooling, carefully invert the cakes directly onto the wire rack to cool completely. It is genuinely important that the cakes are completely cool, as in room temperature through and through, before you even think about frosting them; otherwise, your beautiful, delicate frosting will melt and slide right off, creating a messy situation. This cooling process can take anywhere from 1 to 2 hours, or even longer depending on your kitchen’s ambient temperature. For ultimate convenience, you can even wrap them tightly in plastic wrap once cool and refrigerate them overnight if you want to break up the preparation steps over two days.
Preparing the Fresh Mango Filling
- Prepare the Mangoes: Begin by carefully peeling your ripe mangoes. Once peeled, use a sharp knife to dice the luscious flesh into small, uniform cubes. Aim for pieces that are about ¼-inch to ½-inch in size. We’re looking for a chunky but ultimately spreadable filling that provides delightful bursts of mango flavor in every bite of our Vegan Mango Coconut Cake.
- Cook the Mango Filling: In a medium saucepan, combine the diced mangoes, the granulated sugar (if you’re using it to adjust sweetness), and the fresh lime juice. Cook this vibrant mixture over medium heat, stirring occasionally to prevent sticking. Continue cooking until the mangoes soften beautifully and release their sweet juices, which usually takes about 5-7 minutes. While this is simmering, in a small separate bowl, whisk together the cornstarch (or arrowroot powder) and the 2 tablespoons of water until you have a smooth slurry with absolutely no lumps remaining.
- Thicken the Filling: Once your mango mixture is bubbling gently, pour the cornstarch slurry directly into the simmering mangoes, stirring continuously with a whisk or spoon. Bring the mixture back to a gentle boil and continue stirring for about 1-2 minutes, watching closely as the filling thickens considerably and takes on a wonderfully glossy, translucent appearance. It should be thick enough to hold its shape somewhat when spooned, resembling a chunky jam. Remove the saucepan from the heat immediately once it reaches this consistency.
- Cool the Mango Filling: Transfer the warm mango filling to a clean bowl. To prevent an unsightly skin from forming on the surface as it cools, press a piece of plastic wrap directly onto the surface of the filling. Allow it to cool completely to room temperature, which might take an hour or so, and then transfer it to the refrigerator to chill thoroughly for at least 1-2 hours. A cold, firm filling is much easier to work with when assembling your cake and will also prevent your cake layers from becoming soggy.
Crafting the Whipped Coconut Cream Frosting
- Prepare Coconut Cream: This is a critical step for perfect frosting! Carefully open your chilled cans of full-fat coconut cream or coconut milk. You should observe a distinct separation: a thick, solid layer of creamy white coconut cream at the top and a clear, watery liquid at the bottom. Very gently, scoop out only the thick, solid white coconut cream into a large mixing bowl, being careful to leave behind as much of the watery liquid as possible. You can save the leftover coconut water for smoothies, curries, or other recipes – don’t let it go to waste!
- Whip the Coconut Cream: Using an electric mixer (either a stand mixer fitted with a whisk attachment or a good quality hand mixer), begin whipping the thick coconut cream on medium-high speed. As it whips, it will gradually become lighter, fluffier, and beautifully airy, remarkably similar in texture to traditional dairy whipped cream. This usually takes approximately 3-5 minutes, depending on the power of your mixer and the temperature of your kitchen.
- Add Flavorings: Once the coconut cream has started to visibly thicken and gain volume, gradually add the sifted powdered sugar (adding it slowly prevents a sugar cloud and ensures smooth incorporation), the pure vanilla extract, and that tiny but mighty pinch of salt. Continue whipping on high speed until the frosting is wonderfully light, super airy, and holds distinct, stiff peaks when you lift the whisk. Be cautious not to overmix, as coconut cream can sometimes separate or become grainy if whipped for too long, especially if your kitchen is quite warm. The resulting frosting should be smooth, incredibly creamy, and possess a delightful tropical aroma – absolutely perfect for our spectacular Vegan Mango Coconut Cake! If your frosting seems a little soft or struggles to hold peaks, you can place the mixing bowl and whisk attachment in the freezer for 15-20 minutes to chill further, then whip again.
Assembling Your Stunning Vegan Mango Coconut Cake
- Level the Cake Layers (Optional but Recommended): If your cake layers have developed slightly domed tops during baking, as often happens, you’ll want to gently level them for a professional, polished look and, more importantly, a stable, even cake. Using a long serrated knife or a dedicated cake leveling tool, carefully slice off the domed tops to create perfectly flat surfaces. This step makes stacking much easier and significantly prevents your glorious cake from leaning or becoming uneven.
- First Layer and Filling: Carefully place one of your perfectly leveled cake layers onto your chosen serving plate or cake stand. For extra stability and to prevent the bottom layer from sliding, you can apply a small dollop of frosting to the plate first to act as “glue” before placing the cake. Now, spread about ½ to ¾ cup of the chilled mango filling evenly over this first cake layer. For a neat finish, I often pipe a small “dam” or ring of frosting around the very edge of the cake before adding the mango filling – this helps to contain the filling and prevent it from oozing out the sides when you stack the next layer.
- Second Layer and Filling: With care, place the second cake layer directly on top of the mango filling. Gently press down to secure it and ensure it’s level. Repeat the process, spreading another ½ to ¾ cup of the luscious mango filling evenly over this second layer, again leaving a small border or creating a frosting dam if you wish.
- Third Layer and Crumb Coat: Carefully place the final cake layer on top, pressing gently. Now it’s time for the all-important crumb coat! Apply a thin, even layer of the coconut cream frosting all over the top and sides of the entire cake. This initial “crumb coat” serves a vital purpose: it traps any loose crumbs from the cake, ensuring that your final, pristine layer of frosting will be clean, smooth, and crumb-free. Don’t worry if this layer looks a little messy or uneven; its primary job is functional, not aesthetic, at this stage.
- Chill the Crumb-Coated Cake: Transfer the crumb-coated cake to the refrigerator for at least 30 minutes (or 15 minutes in the freezer if you’re in a hurry). This chilling period allows the crumb coat to firm up completely, making it significantly easier to apply the final, smooth frosting layer without dragging crumbs into it. This step is absolutely crucial for achieving a beautifully clean and professional finish on your stunning Vegan Mango Coconut Cake.
- Final Frosting and Decoration: Once the crumb coat is firm and set, take the cake out of the refrigerator. Now, apply the remaining coconut cream frosting to the top and sides of the cake. Use an offset spatula or a cake scraper to smooth the frosting as much as you like. You can aim for a perfectly smooth, pristine finish for an elegant look, or create a more rustic, textured appearance using your spatula – both styles are wonderfully beautiful and inviting!
- Garnish and Serve: If desired, elevate the visual appeal of your spectacular Vegan Mango Coconut Cake by garnishing it! Arrange fresh mango slices or artistic mango cubes on top, sprinkle with some wonderfully toasted shredded coconut for extra texture and a deeper coconut flavor, and add a few fresh mint leaves for a vibrant pop of color and an invigorating touch. The visual appeal truly adds to the overall enjoyment!
- Chill Before Serving: For the absolute best results, to allow the delightful flavors to meld together even further, and for the frosting to fully set and firm up, I highly recommend refrigerating the finished cake for at least another hour before you slice and serve it. This also makes for much cleaner, more precise slices.
- Enjoy! Finally, slice into your magnificent homemade Vegan Mango Coconut Cake and savor every single tropical, creamy, and utterly delightful bite. This cake is truly a showstopper! Store any leftover cake covered in an airtight container in the refrigerator for up to 3-4 days. Because it’s made with fresh ingredients and delicate coconut cream, it’s best enjoyed within a few days of preparation to ensure maximum freshness and flavor.
Conclusion:
Well, we’ve reached the sweet end of our journey, and I genuinely hope you’re feeling as excited as I am about this incredible recipe. If there’s one dessert that truly embodies sunshine, warmth, and pure indulgence without any guilt, it’s the one we’ve just explored. This isn’t just a recipe; it’s an invitation to bring a slice of tropical paradise right into your home, perfect for any occasion, or just because you deserve a treat. What makes this recipe a definite must-try, you ask? It’s the harmonious blend of vibrant, sweet mangoes with the creamy, delicate notes of coconut, all wrapped up in a tender, moist cake that defies expectations for a plant-based dessert. It’s proof that vegan baking can be utterly spectacular, rich in flavor, and delightfully satisfying.
Why This Vegan Mango Coconut Cake is a Game-Changer
From the first delightful aroma filling your kitchen to that unforgettable initial bite, this cake delivers on every front. Its texture is simply divine – incredibly moist, tender, and far from the dry, crumbly vegan cakes of yesteryear. The natural sweetness from ripe mangoes eliminates the need for excessive sugar, allowing the pure, unadulterated flavors of the fruit and coconut to shine through brilliantly. And let’s not forget the beautiful aesthetic! The golden hues of the mango and the pristine white of the coconut create a visual feast that’s as appealing to the eyes as it is to the palate. Whether you’re a seasoned vegan baker or simply curious to try something new and utterly delicious, this Vegan Mango Coconut Cake is designed to impress. It’s naturally dairy-free and egg-free, making it accessible to a wider audience, and yet, no one will ever suspect it’s missing a thing. It’s truly a testament to how simple, wholesome ingredients can come together to create something truly extraordinary. It’s not just a dessert; it’s a celebration of flavor and mindful eating.
Making It Your Own: Serving & Variation Ideas
Now that you’ve mastered the basic recipe, let’s talk about how to elevate your creation even further! While this cake is absolutely stunning on its own, served chilled directly from the fridge, there are countless ways to customize and present it. For an extra touch of decadence, consider a dollop of homemade vegan coconut whipped cream or a scoop of your favorite dairy-free vanilla ice cream. A sprinkle of toasted coconut flakes or a scattering of fresh berries like raspberries or blueberries can add both texture and a burst of complementary flavor. You could also drizzle a homemade mango purée or a simple lime glaze over the top for an additional layer of brightness.
Thinking about variations? The beauty of this recipe lies in its adaptability! While mango and coconut are a match made in heaven, don’t be afraid to experiment with other tropical fruits. Pineapple could make a fantastic substitute, or perhaps a mix of passion fruit and mango for an even more exotic tang. You could also infuse the batter with a hint of cardamom or a whisper of ginger for a subtle spice kick. For individual servings, bake the batter in cupcake molds and top them with a mango buttercream, or even turn it into a loaf cake for easy slicing and sharing. Imagine serving miniature versions at a brunch or an afternoon tea! The possibilities are truly endless, allowing you to tailor this delightful dessert to your specific taste and the occasion at hand. It truly is a versatile canvas for your culinary creativity.
Your Turn! Dive In and Share!
So, there you have it! My sincere hope is that this recipe inspires you to step into the kitchen and create something truly magical. I can honestly say that this cake has brought so much joy to my own table, and I’m absolutely confident it will do the same for you and your loved ones. Don’t hesitate any longer – gather your ingredients, follow the steps, and prepare to be amazed by the sheer deliciousness you can create. There’s nothing quite like the satisfaction of baking something from scratch, especially when the result is as spectacularly delicious and universally loved as this cake. Once you’ve whipped up your own masterpiece, please, please, please share your experience with me! I absolutely adore hearing about your triumphs, your clever adaptations, and seeing your beautiful creations. Take a photo, share your thoughts, and let me know how this incredible, vibrant, and utterly delightful cake brightened your day. Happy baking, my friends!
Tropical Vegan Mango Coconut Cake: A Taste of Paradise
This extraordinary dessert promises to transport your taste buds straight to a sun-drenched tropical paradise. The vibrant combination of sweet mangoes and a creamy dairy-free frosting is a cornerstone of many exquisite tropical cuisines, making it an ideal choice for a delightful Vegan Mango Coconut Cake. It’s light, refreshing, and deeply satisfying, proving that vegan baking can be utterly luxurious.
Ingredients
Instructions
Important Information
Nutrition Facts (Per Serving)
It is important to consider this information as approximate and not to use it as definitive health advice.
Allergy Information
Please check ingredients for potential allergens and consult a health professional if in doubt.

Leave a Comment