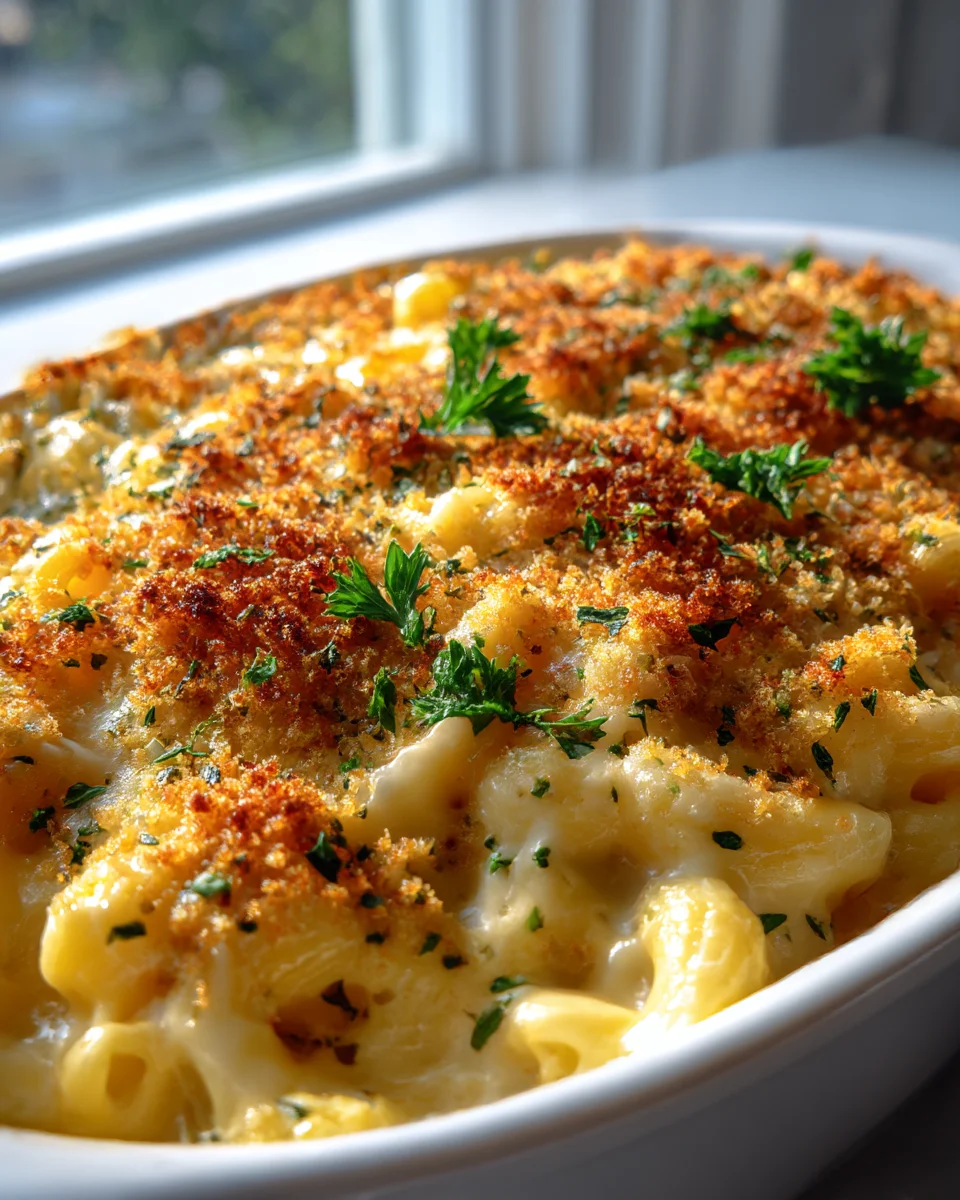
Baked Mac And Cheese With Garlic Herb Crust
Oh, hello there, fellow food lover! Are you ready to dive into a bowl of pure, unadulterated comfort? Because today, I’m absolutely thrilled to introduce you to my go-to recipe for the ultimate Baked Mac And Cheese With Garlic Herb Crust. This isn’t just any mac and cheese; it’s the mac and cheese you’ve been dreaming of, the one that takes a beloved classic and elevates it to extraordinary heights.
What makes this recipe so incredibly special, you ask? It’s all about that glorious, golden-brown garlic herb crust! While the inside remains wonderfully creamy and packed with rich, gooey cheese, the top gets a spectacular crunch and a burst of aromatic flavor from fresh garlic and herbs baked right into the breadcrumbs. It’s a textural masterpiece – a symphony of tender pasta, velvety cheese sauce, and that irresistible savory crumble on top.
You’re going to absolutely adore this dish because it hits all the right notes: it’s hearty, incredibly satisfying, and surprisingly elegant for a comfort food staple. Imagine the aroma filling your kitchen as it bakes, the anticipation building before you even take that first blissful bite. It’s perfect for a cozy family dinner, a potluck showstopper, or even a comforting dish to warm you up on a chilly evening. Get ready to experience mac and cheese like never before – a creamy, cheesy dream with an unforgettable garlicky, herby crown!

Ingredient Notes
There’s nothing quite like a classic baked mac and cheese, but adding a fragrant garlic herb crust truly elevates it to something special! Here’s what you’ll need to make this comforting dish shine in your kitchen, along with some friendly notes and substitution ideas.
- Pasta: I always reach for elbow macaroni for its nostalgic charm and how perfectly it cradles the cheesy sauce. However, feel free to get creative! Other short pasta shapes like cavatappi, shells, or even penne will work wonderfully. The key is to use a shape that can hold onto that delicious sauce.
- Cheese, glorious Cheese: This is where the magic happens! For the ultimate flavor and texture, I love using a blend. A sharp cheddar is a must for that classic tangy bite. Then, I add Gruyere for its nutty complexity and incredible melt. For extra creaminess and a beautiful stretch, Monterey Jack or Fontina are fantastic choices. Avoid pre-shredded cheese if you can; it often contains anti-caking agents that can make your sauce slightly gritty. Grating it yourself takes a little extra effort but is so worth it for a silky-smooth sauce.
- Dairy: Whole milk is my go-to for the béchamel base, providing richness without being overly heavy. For an extra luxurious sauce that’s incredibly creamy, I often add a splash of heavy cream alongside the milk. It makes all the difference!
- Butter and Flour: These two simple ingredients form the foundation of our creamy cheese sauce – the roux! Unsalted butter allows you to control the saltiness of your dish, and all-purpose flour works perfectly for thickening.
- Seasonings: Beyond salt and freshly ground black pepper (don’t skimp!), a tiny pinch of nutmeg might sound unusual, but trust me, it’s a classic secret ingredient that beautifully enhances the cheese flavor without being detectable on its own. A teaspoon of dry mustard powder also does wonders to amplify the cheesy notes.
- For the Garlic Herb Crust: This is what sets our mac and cheese apart!
- Panko Breadcrumbs: These Japanese breadcrumbs are light, airy, and create an incredibly crispy topping that regular breadcrumbs just can’t match.
- Fresh Garlic: Minced finely, it infuses the crust with an irresistible aroma.
- Fresh Herbs: A mix of finely chopped fresh parsley, thyme, and a little oregano is my favorite combination for that fragrant, savory punch. If fresh herbs aren’t available, you can use dried herbs, but reduce the quantity as they are more potent (e.g., 1 teaspoon dried for every tablespoon fresh).
- Melted Butter: It binds the crust ingredients together and helps them toast to a gorgeous golden brown.
- Parmesan Cheese: A little grated Parmesan in the crust adds another layer of salty, nutty flavor and contributes to the golden crispness.
- Optional Flavor Boosters: A dash of Worcestershire sauce can add a fantastic umami depth to the cheese sauce, and a tiny splash of hot sauce or a pinch of cayenne pepper can give it a subtle kick without making it overtly spicy.
Step-by-Step Instructions
Ready to create the ultimate Baked Mac And Cheese With Garlic Herb Crust? Follow these steps, and you’ll have a dish that’s sure to impress!
- Get Prepped! First things first, preheat your oven to 375°F (190°C). Grease a 9×13-inch baking dish (or similar size) and set it aside.
- Cook the Pasta: Bring a large pot of generously salted water to a rolling boil. Add your elbow macaroni (or chosen pasta) and cook it according to package directions, but aim for slightly less than al dente – about 1-2 minutes shy of fully cooked. Remember, it will finish cooking in the oven, so we don’t want it mushy. Drain the pasta well and set it aside.
- Make the Roux: In a large, heavy-bottomed pot or Dutch oven, melt 6 tablespoons of unsalted butter over medium heat. Once the butter is melted and slightly foamy, whisk in the 6 tablespoons of all-purpose flour. Cook this mixture, stirring constantly, for about 1-2 minutes. You’re looking for a pale, golden paste. This step cooks out the raw flour taste.
- Create the Creamy Cheese Sauce: Gradually whisk in 4 cups of whole milk and ½ cup of heavy cream into the roux. Keep whisking to ensure there are no lumps. Bring the mixture to a gentle simmer over medium heat, continuing to whisk occasionally, until it thickens to a consistency that coats the back of a spoon – this usually takes about 5-7 minutes.
- Season and Melt the Cheese: Remove the pot from the heat. Stir in 1 teaspoon of dry mustard powder, ½ teaspoon of salt, ¼ teaspoon of black pepper, and that tiny pinch of nutmeg. Now, the best part! Add your grated cheeses (2 cups sharp cheddar, 1 cup Gruyere, 1 cup Monterey Jack) in batches, stirring until each batch is fully melted and incorporated before adding the next. This ensures a super smooth and lump-free cheese sauce. Taste and adjust seasonings if needed. If using, stir in a dash of Worcestershire sauce or hot sauce here.
- Combine Pasta and Sauce: Add the drained, slightly undercooked pasta directly into the pot with the cheese sauce. Stir gently but thoroughly until every piece of pasta is beautifully coated in that luscious cheesy goodness.
- Assemble in the Baking Dish: Pour the macaroni and cheese mixture into your prepared baking dish, spreading it out evenly.
- Prepare the Garlic Herb Crust: In a medium bowl, combine 2 cups of Panko breadcrumbs, 3 cloves of minced fresh garlic, 2 tablespoons of finely chopped fresh parsley, 1 tablespoon of finely chopped fresh thyme, 1 teaspoon of finely chopped fresh oregano, ½ cup of grated Parmesan cheese, and 4 tablespoons of melted unsalted butter. Toss everything together until the breadcrumbs are evenly moistened and fragrant.
- Top it Off: Sprinkle the garlic herb crust mixture evenly over the entire surface of the mac and cheese in the baking dish. Don’t press it down too much; we want it airy for maximum crispiness.
- Bake to Perfection: Transfer the baking dish to your preheated oven. Bake for 25-30 minutes, or until the mac and cheese is bubbly around the edges and the garlic herb crust is beautifully golden brown and irresistibly crisp.
- Rest and Serve: Once out of the oven, let your glorious Baked Mac And Cheese With Garlic Herb Crust rest for about 5-10 minutes. This allows the sauce to set slightly, making for easier serving. Then, scoop it up and enjoy!
Tips & Suggestions
Achieving the perfect Baked Mac And Cheese With Garlic Herb Crust isn’t hard, but a few simple tips can elevate your dish from good to absolutely unforgettable. Here are some of my go-to suggestions:
- Don’t Overcook the Pasta (Seriously!): I cannot stress this enough. Since your pasta will continue cooking in the hot cheese sauce in the oven, you want it to be firm – a minute or two less than al dente. If it’s too soft when you mix it with the sauce, it will turn mushy during baking, and nobody wants that!
- Grate Your Own Cheese: This is a game-changer. Pre-shredded cheeses often contain cellulose or potato starch to prevent clumping, which can give your cheese sauce a slightly grainy or less smooth texture. Taking the extra few minutes to grate your own fresh cheese will reward you with an incredibly silky, decadent sauce.
- Slow and Steady Wins the Roux Race: When making your roux (the butter and flour base), cook it for at least 1-2 minutes, stirring constantly. This step is crucial for cooking out the raw flour taste. However, for a white cheese sauce, you don’t want it to brown much, just a pale, golden color.
- Whisk in Milk Gradually: When adding the milk and cream to your roux, do it slowly, whisking continuously. This prevents lumps and ensures a smooth, creamy béchamel every time. Start with a small amount to create a paste, then gradually add more liquid.
- The Sauce Will Thicken: Keep in mind that your cheese sauce will thicken further as it bakes in the oven. Aim for a consistency that’s slightly thinner than you might expect right after mixing in the cheese. If it seems too thick before baking, you can always whisk in a splash more warm milk.
- Even Crust Distribution: When sprinkling the garlic herb crust over the mac and cheese, try to distribute it as evenly as possible. This ensures every bite gets a delightful crunch and prevents some areas from burning while others remain pale.
- For Extra Flavor Depth: Don’t underestimate the power of a little Worcestershire sauce (about a teaspoon or two) stirred into your cheese sauce. It adds a wonderful umami richness without making the dish taste like Worcestershire. A pinch of cayenne pepper or a dash of your favorite hot sauce can also provide a subtle, warming kick.
- Make It a Meal: This Baked Mac And Cheese With Garlic Herb Crust is rich and satisfying on its own, but it pairs beautifully with something fresh to balance it out. A simple green salad with a vinaigrette or some roasted asparagus or broccoli makes for a perfect side.
- Customizing Your Herbs: Feel free to experiment with the herbs in your crust! While I love parsley, thyme, and oregano, rosemary can also be lovely, especially if you enjoy its stronger flavor. Just make sure to chop them finely so they integrate well with the breadcrumbs.
Storage
Leftover Baked Mac And Cheese With Garlic Herb Crust is a treat, though the crust might lose some of its initial crispness. Here’s how I usually handle storing and reheating this delicious dish:
- Cool Completely: Before storing, always let your mac and cheese cool down to room temperature. This helps prevent condensation, which can make your leftovers watery and soggy, and helps maintain food safety.
- Refrigeration:
- How to Store: Transfer any leftovers to an airtight container. This prevents it from drying out and absorbing odors from other foods in your fridge.
- Shelf Life: Stored properly, Baked Mac And Cheese With Garlic Herb Crust will keep beautifully in the refrigerator for 3-4 days.
- Reheating in the Oven (My Preferred Method): For the best results, especially to revive some of that crust crispiness, reheat in the oven. Preheat your oven to 300-325°F (150-160°C). Place the mac and cheese in an oven-safe dish, adding a splash of milk (about a tablespoon per serving) to help rehydrate the sauce. Cover loosely with foil and bake for 15-20 minutes, or until heated through. For a crispier topping, remove the foil for the last 5 minutes.
- Reheating in the Microwave: While convenient, the microwave won’t restore the crispness of the garlic herb crust. Place a serving in a microwave-safe dish, add a splash of milk, and cover loosely. Heat in 1-minute intervals, stirring occasionally, until heated through. Be mindful not to overheat, as it can dry out the pasta.
- Freezing (For Longer Storage):
- Baked Mac and Cheese: You can absolutely freeze baked mac and cheese! Let it cool completely. Wrap it tightly in plastic wrap, then a layer of aluminum foil, or transfer it to a freezer-safe, airtight container.
- Unbaked Mac and Cheese: I often find that freezing unbaked mac and cheese yields a slightly better texture upon reheating. Prepare the mac and cheese mixture and place it in a freezer-safe baking dish. Prepare the garlic herb crust separately and store it in an airtight bag. Wrap the dish tightly in plastic wrap and then foil.
- Shelf Life: Baked or unbaked, it will keep well in the freezer for up to 2-3 months.
- Reheating from Frozen (Unbaked): Thaw overnight in the refrigerator. Sprinkle with the fresh garlic herb crust (mix it up just before baking), then bake according to the original recipe instructions, adding an extra 10-15 minutes to the baking time, or until bubbly and golden.
- Reheating from Frozen (Baked): Thaw overnight in the refrigerator. Reheat in the oven as described above, adding a splash of milk and ensuring it’s covered for most of the baking time to prevent drying out. You can uncover it at the end to try and crisp up the crust, though it won’t be as good as fresh.
- Crust Considerations: It’s important to manage expectations – the garlic herb crust will lose some of its crunchiness once refrigerated or frozen. While oven reheating can help revive some crispness, it won’t be quite the same as when it’s fresh out of the oven. But don’t worry, the cheesy goodness underneath is still incredibly delicious!
Final Thoughts
And there you have it! I truly believe that my Baked Mac And Cheese With Garlic Herb Crust is more than just a meal; it’s an experience. This isn’t your average mac and cheese; it’s an elevated classic that brings together everything you love about creamy, dreamy pasta and adds an irresistible twist. The magic truly lies in that golden, savory garlic herb crust, providing a delightful crunch that perfectly contrasts with the rich, gooey cheese sauce beneath. It transforms a simple comfort food into something truly special and memorable.
Whether you’re looking for the ultimate family dinner, a show-stopping dish for guests, or just a hearty treat for yourself, this Baked Mac And Cheese With Garlic Herb Crust delivers on all fronts. It’s comforting, incredibly flavorful, and undeniably impressive. I hope you give it a try and discover for yourself why this recipe will quickly become a cherished favorite in your kitchen!
Ultimate Baked Mac And Cheese with Garlic Herb Crust

Indulge in the ultimate comfort food with this creamy Baked Mac And Cheese topped with a crispy garlic herb crust. Perfect for family dinners or potlucks, this dish elevates a classic favorite to new heights.
- Prep Time: 15 mins
- Cook Time: 30 mins
- Total Time: 45 minutes
- Yield: 8 servings 1x
- Category: Dinner
- Method: Baking
- Cuisine: American
Ingredients
- 2 cups elbow macaroni
- 2 cups sharp cheddar cheese, grated
- 1 cup Gruyere cheese, grated
- 1 cup Monterey Jack cheese, grated
- 4 cups whole milk
- ½ cup heavy cream
- 6 tablespoons unsalted butter
- 6 tablespoons all-purpose flour
- 1 teaspoon dry mustard powder
- ½ teaspoon salt
- ¼ teaspoon black pepper
- a tiny pinch of nutmeg
- 2 cups Panko breadcrumbs
- 3 cloves fresh garlic, minced
- 2 tablespoons fresh parsley, finely chopped
- 1 tablespoon fresh thyme, finely chopped
- 1 teaspoon fresh oregano, finely chopped
- ½ cup grated Parmesan cheese
- 4 tablespoons melted unsalted butter
- a dash of Worcestershire sauce (optional)
- a splash of hot sauce or a pinch of cayenne pepper (optional)
Instructions
- Preheat your oven to 375°F (190°C). Grease a 9×13-inch baking dish and set it aside.
- Bring a large pot of generously salted water to a rolling boil. Add the elbow macaroni and cook according to package directions, but aim for slightly less than al dente. Drain the pasta well and set it aside.
- In a large, heavy-bottomed pot or Dutch oven, melt 6 tablespoons of unsalted butter over medium heat. Whisk in 6 tablespoons of all-purpose flour and cook for about 1-2 minutes until a pale, golden paste forms.
- Gradually whisk in 4 cups of whole milk and ½ cup of heavy cream into the roux. Bring to a gentle simmer, whisking occasionally, until it thickens to a consistency that coats the back of a spoon, about 5-7 minutes.
- Remove the pot from the heat. Stir in 1 teaspoon of dry mustard powder, ½ teaspoon of salt, ¼ teaspoon of black pepper, and a tiny pinch of nutmeg. Add the grated cheeses in batches, stirring until melted and incorporated.
- Add the drained, slightly undercooked pasta into the pot with the cheese sauce. Stir gently until every piece is coated.
- Pour the macaroni and cheese mixture into the prepared baking dish, spreading it out evenly.
- In a medium bowl, combine 2 cups of Panko breadcrumbs, 3 cloves of minced garlic, 2 tablespoons of parsley, 1 tablespoon of thyme, 1 teaspoon of oregano, ½ cup of grated Parmesan cheese, and 4 tablespoons of melted butter. Toss until the breadcrumbs are evenly moistened.
- Sprinkle the garlic herb crust mixture evenly over the mac and cheese. Don't press it down too much.
- Bake for 25-30 minutes, or until bubbly around the edges and the crust is golden brown.
- Let the dish rest for about 5-10 minutes before serving.
Nutrition
- Serving Size: 1 bowl
- Calories: 600
- Sugar: 5 g
- Sodium: 800 mg
- Fat: 30 g
- Saturated Fat: 15 g
- Unsaturated Fat: 10 g
- Trans Fat: 0 g
- Carbohydrates: 60 g
- Fiber: 2 g
- Protein: 25 g
- Cholesterol: 70 mg
Keywords: For the best texture, avoid pre-shredded cheese and grate your own. Adjust seasonings to taste, and consider adding Worcestershire sauce or hot sauce for extra flavor.


Leave a Comment