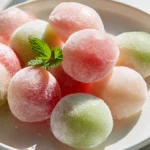
Watermelon Mochi
Oh, where do I even begin with this delightful creation? If you’re looking for a dessert that’s truly out of the ordinary, refreshing, and incredibly fun to eat, then you’ve found your next obsession. I absolutely adore how this recipe takes the beloved chewy texture of traditional mochi and infuses it with the vibrant, juicy essence of summer watermelon. It’s not just a dessert; it’s an experience – a perfect harmony of sweet, fruity notes with that irresistibly soft, bouncy chewiness that only mochi can deliver.
You’re going to love how incredibly satisfying and surprisingly simple it is to bring this unique treat to life in your own kitchen. Imagine biting into a delicate, often beautifully colored mochi shell that bursts with the fresh taste of watermelon, perhaps even surrounding a light, creamy filling. It’s the ultimate cool, chewy pick-me-up, especially fantastic for a warm afternoon or as a playful, eye-catching addition to any gathering. Get ready to fall head over heels for the magic of homemade Watermelon Mochi!

Ingredient Notes
Hello, fellow dessert lovers! Making Watermelon Mochi from scratch is a delightful experience, and getting the right ingredients is key to achieving that perfect chewy, fruity bite. Here’s what you’ll need and some thoughts on substitutions:
- Glutinous Rice Flour (Mochiko): This is the absolute star of our mochi! Also known as sweet rice flour, it’s what gives mochi its signature soft, chewy, and stretchy texture. Don’t confuse it with regular rice flour, as they are very different in how they behave. There’s no direct substitution for mochiko if you want to make authentic mochi.
- Granulated Sugar: We’ll use this to sweeten both the mochi dough and the cream filling. It balances the natural sweetness of the watermelon and adds a pleasant flavor. You could experiment with a touch less sugar if your watermelon is exceptionally sweet, or use a natural alternative like maple syrup or honey, though this might slightly alter the dough’s consistency.
- Fresh Watermelon Juice: This is where the magic happens for our watermelon flavor and natural pink hue! You’ll need ripe, juicy watermelon. Simply blend chunks of watermelon and strain the pulp to get a smooth, vibrant juice. This juice will be incorporated directly into both the red and green mochi doughs.
- Water: A little extra liquid might be needed to achieve the perfect dough consistency, especially if your watermelon juice isn’t overly watery.
- Red Food Coloring (Gel or Liquid): To truly bring out that vibrant red “flesh” of our watermelon mochi, a little red food coloring is highly recommended. You can adjust the amount to your desired shade. For a natural alternative, a tiny pinch of beet powder could work, but be mindful of any earthy flavor it might impart.
- Green Food Coloring (Gel or Liquid): Essential for creating that distinct green “rind” layer! Just like the red, adjust to your preference for a light or dark green. Matcha powder can provide a green color naturally, but its strong flavor would clash with our watermelon theme.
- Cornstarch or Potato Starch: This is your best friend for handling sticky mochi dough. You’ll use it generously for dusting your work surface, hands, and the finished mochi to prevent sticking. There aren’t really any good substitutions here, as their fine texture is perfect for this purpose.
- For the Cream Filling:
- Heavy Cream: To create a light, airy, and delicious filling. Make sure it’s very cold for optimal whipping.
- Powdered Sugar (Confectioners’ Sugar): It dissolves beautifully into the cream, ensuring a smooth, sweet filling without grittiness.
- Vanilla Extract (Optional): A tiny splash can enhance the overall sweetness and provide a lovely aroma without overpowering the watermelon.
- Mini Chocolate Chips: These are crucial for creating those adorable “watermelon seeds” inside our mochi. They add a delightful visual touch and a tiny burst of chocolate. You could also use black sesame seeds for a more subtle seed effect.
- Vegetable Oil (Optional): A tiny bit on your hands or spatula can help when kneading and handling the warm, sticky mochi dough.
Step-by-Step Instructions
Get ready to create some beautiful Watermelon Mochi! I find the process incredibly satisfying, and the end result is always a showstopper. Let’s dive in:
1. Prepare Your Watermelon Juice
- First, cut about a quarter of a medium watermelon into chunks. Blend them in a food processor or blender until smooth.
- Strain the blended watermelon through a fine-mesh sieve, pressing down on the solids, to extract about 1.5-2 cups of pure watermelon juice. Set aside.
2. Make the Red Mochi Dough (The “Flesh”)
- In a microwave-safe bowl, combine 1 cup of glutinous rice flour and 1/4 cup of granulated sugar. Whisk them together until well combined.
- Gradually pour in 1 cup of the fresh watermelon juice, stirring constantly to prevent lumps. Add a few drops of red food coloring and mix until you achieve a vibrant pink-red color.
- Cover the bowl loosely with plastic wrap, leaving a small vent. Microwave on high for 1 minute.
- Carefully remove, stir the dough vigorously with a wet spatula, then cover and microwave for another 1 minute. Repeat this process 2-3 more times, or until the dough is translucent, thick, and sticky, with no raw flour taste (total microwave time 4-5 minutes). Be careful, it will be very hot!
- Once cooked, transfer the hot mochi dough onto a generously cornstarch-dusted surface (a large cutting board works well). Let it cool for a few minutes until it’s cool enough to handle, but still warm and pliable.
- With cornstarch-dusted hands, gently knead the red mochi for 2-3 minutes. This helps make it smooth and elastic. Cover it with plastic wrap to prevent drying out and set aside.
3. Make the Green Mochi Dough (The “Rind”)
- In a separate small microwave-safe bowl, combine 1/4 cup of glutinous rice flour and 1 tablespoon of granulated sugar.
- Gradually add 1/4 cup of the fresh watermelon juice. Add a few drops of green food coloring and mix until you have a nice rind-green color.
- Cover and microwave this smaller batch of dough, following the same 1-minute intervals as the red mochi, stirring between each, until it’s fully cooked (total 2-3 minutes).
- Transfer the green mochi to a separate cornstarch-dusted surface and gently knead for a minute or two, then cover with plastic wrap.
4. Prepare the Cream Filling
- In a cold bowl, pour 1 cup of very cold heavy cream. Add 2 tablespoons of powdered sugar and, if using, 1/2 teaspoon of vanilla extract.
- Whip with an electric mixer (or by hand) on medium-high speed until stiff peaks form. Be careful not to over-whip. Keep refrigerated until ready to use.
5. Assemble Your Watermelon Mochi
- Dust your hands and work surface very generously with cornstarch.
- Divide the red mochi dough into 8-10 equal portions (depending on your desired mochi size). Roll each portion into a ball, then flatten it into a disc, about 3-4 inches in diameter.
- Take a portion of the green mochi dough. Roll it out very thinly on a cornstarch-dusted surface and cut it into 8-10 slightly larger, thin discs, about 4-5 inches in diameter.
- Place a spoonful of the whipped cream filling in the center of a red mochi disc. Sprinkle a few mini chocolate chips over the cream.
- Carefully bring the edges of the red mochi disc up and around the filling, pinching them together tightly at the top to seal completely. Gently shape it into a smooth ball.
- Now, carefully pick up one of your thin green mochi discs. Gently stretch and wrap it around the sealed red mochi ball, covering about two-thirds to three-quarters of the red mochi. Press it gently to adhere and blend the seam, leaving a portion of the red “flesh” exposed at the top, like a cut slice of watermelon.
- Place the finished Watermelon Mochi on a small piece of parchment paper or into a mini cupcake liner. Repeat with the remaining mochi and filling.
Tips & Suggestions
Making mochi, especially one as visually specific as our Watermelon Mochi, can be a delightful challenge. Here are some of my top tips to help you succeed and make them extra special:
- Don’t Skimp on the Starch!: Mochi dough, especially when warm, is incredibly sticky. Dust your hands, your work surface, rolling pin, and any tools you’re using very generously with cornstarch or potato starch. You can always brush off excess starch from the finished mochi.
- Work While Warm (But Not Scalding): The mochi dough is most pliable and easiest to work with when it’s still warm. If it cools too much, it becomes harder to stretch and shape. However, make sure it’s cool enough not to burn your hands!
- Achieving the Watermelon Look:
- Color Intensity: Don’t be shy with the food coloring if you want vibrant results! Remember, the color can sometimes fade slightly upon cooling.
- Green Rind Technique: For the green rind, I find it easiest to roll the green mochi very thinly. When wrapping it around the red mochi, try to make a nice clean edge where the red flesh meets the green rind. You can gently score thin lines on the green mochi with a toothpick or the back of a knife to mimic the watermelon’s striped pattern.
- “Seeds”: Mini chocolate chips are perfect for seeds. Place them inside the filling so they peek out when you take a bite, rather than embedding them on the surface of the mochi, which can sometimes look less natural.
- Quality Watermelon Matters: Since the watermelon flavor is central to this mochi, use the freshest, ripest, and sweetest watermelon you can find. It will make a noticeable difference in the taste of your juice.
- Microwave vs. Steaming: While I’ve given microwave instructions for speed, you can also steam the mochi dough. Place the bowl over simmering water, cover, and steam for about 15-20 minutes, stirring every 5 minutes, until translucent. Steaming often yields a slightly chewier, smoother texture.
- Handling Sticky Dough: If your hands are getting too sticky even with starch, lightly oiling them with a neutral vegetable oil can also help. Just a tiny amount!
- Filling Variations: While whipped cream is delightful, feel free to experiment! A watermelon-flavored custard, a small piece of fresh watermelon (blotted dry to prevent sogginess), or even a scoop of watermelon sorbet (for immediate consumption!) could be wonderful additions.
Storage
Mochi, especially those filled with fresh cream, are best enjoyed as fresh as possible. The texture and flavor are at their peak shortly after assembly. However, if you have leftovers, here’s how to handle them:
- Refrigeration is Key for Cream-Filled Mochi: Because our Watermelon Mochi has a dairy-based filling, it absolutely needs to be stored in the refrigerator.
- Airtight Container: Place your mochi in a single layer within an airtight container. This helps prevent them from drying out or absorbing odors from other foods in your fridge.
- Dealing with Mochi Hardening: A common characteristic of mochi is that it tends to harden and lose its chewiness when refrigerated. The glutinous rice flour starch recrystallizes at cold temperatures.
- Shelf Life: When stored properly in the refrigerator, your Watermelon Mochi with cream filling will be best enjoyed within 1-2 days. Beyond that, the mochi will likely become quite firm, and the filling might lose its fresh quality.
- Bringing Back Softness (Limited Success): You can try letting the mochi sit at room temperature for 10-15 minutes before serving to slightly soften it up, but it won’t fully return to its freshly made texture. Reheating is not recommended for cream-filled mochi as it will melt the filling and alter the mochi’s texture negatively.

Final Thoughts
And there you have it! I hope you’re as excited as I am about creating this truly unique and delightful treat. Watermelon Mochi isn’t just another dessert; it’s a vibrant celebration of summer, perfectly capturing the refreshing essence of watermelon within that beloved, irresistibly chewy mochi texture. The striking color alone makes it a visual delight, and the delicate, sweet flavor is simply divine, offering a refreshing escape with every bite.
Making Watermelon Mochi is a joyful experience, resulting in a surprisingly easy-to-achieve confection that’s guaranteed to charm everyone who tries it. It’s the perfect way to bring a taste of sunshine to any occasion, whether you’re serving it at a gathering, enjoying it as a personal treat, or simply looking to brighten your day. I truly believe this recipe is an absolute must-try for anyone eager to infuse their dessert repertoire with a fresh, fun, and utterly delicious twist. Go on, give Watermelon Mochi a try – I promise you’ll discover a new favorite!
Watermelon Mochi: Refreshing, Sweet & Easy Japanese Dessert
This Watermelon Mochi is a delightful and refreshing dessert that combines the chewy texture of traditional mochi with the vibrant flavor of summer watermelon. It’s a fun and visually appealing treat perfect for any gathering or warm afternoon.
- Prep Time: 30 mins
- Cook Time: 10 mins
- Total Time: 40 minutes
- Yield: 8-10 servings 1x
- Category: Dessert
- Method: Microwave
- Cuisine: Japanese
Ingredients
- 1 cup Glutinous Rice Flour (Mochiko)
- 1/4 cup Granulated Sugar
- 1 cup Fresh Watermelon Juice
- Water (as needed)
- Red Food Coloring (Gel or Liquid)
- Green Food Coloring (Gel or Liquid)
- Cornstarch or Potato Starch (for dusting)
- 1 cup Heavy Cream (for filling)
- 2 tablespoons Powdered Sugar (Confectioners' Sugar)
- 1/2 teaspoon Vanilla Extract (Optional)
- Mini Chocolate Chips (for filling)
- Vegetable Oil (Optional)
Instructions
- Prepare Your Watermelon Juice: Cut about a quarter of a medium watermelon into chunks. Blend them in a food processor or blender until smooth. Strain the blended watermelon through a fine-mesh sieve, pressing down on the solids, to extract about 1.5-2 cups of pure watermelon juice. Set aside.
- Make the Red Mochi Dough (The 'Flesh'): In a microwave-safe bowl, combine 1 cup of glutinous rice flour and 1/4 cup of granulated sugar. Whisk them together until well combined. Gradually pour in 1 cup of the fresh watermelon juice, stirring constantly to prevent lumps. Add a few drops of red food coloring and mix until you achieve a vibrant pink-red color. Cover the bowl loosely with plastic wrap, leaving a small vent. Microwave on high for 1 minute. Carefully remove, stir the dough vigorously with a wet spatula, then cover and microwave for another 1 minute. Repeat this process 2-3 more times, or until the dough is translucent, thick, and sticky, with no raw flour taste (total microwave time 4-5 minutes). Be careful, it will be very hot! Once cooked, transfer the hot mochi dough onto a generously cornstarch-dusted surface. Let it cool for a few minutes until it's cool enough to handle, but still warm and pliable. With cornstarch-dusted hands, gently knead the red mochi for 2-3 minutes. This helps make it smooth and elastic. Cover it with plastic wrap to prevent drying out and set aside.
- Make the Green Mochi Dough (The 'Rind'): In a separate small microwave-safe bowl, combine 1/4 cup of glutinous rice flour and 1 tablespoon of granulated sugar. Gradually add 1/4 cup of the fresh watermelon juice. Add a few drops of green food coloring and mix until you have a nice rind-green color. Cover and microwave this smaller batch of dough, following the same 1-minute intervals as the red mochi, stirring between each, until it's fully cooked (total 2-3 minutes). Transfer the green mochi to a separate cornstarch-dusted surface and gently knead for a minute or two, then cover with plastic wrap.
- Prepare the Cream Filling: In a cold bowl, pour 1 cup of very cold heavy cream. Add 2 tablespoons of powdered sugar and, if using, 1/2 teaspoon of vanilla extract. Whip with an electric mixer (or by hand) on medium-high speed until stiff peaks form. Be careful not to over-whip. Keep refrigerated until ready to use.
- Assemble Your Watermelon Mochi: Dust your hands and work surface very generously with cornstarch. Divide the red mochi dough into 8-10 equal portions (depending on your desired mochi size). Roll each portion into a ball, then flatten it into a disc, about 3-4 inches in diameter. Take a portion of the green mochi dough. Roll it out very thinly on a cornstarch-dusted surface and cut it into 8-10 slightly larger, thin discs, about 4-5 inches in diameter. Place a spoonful of the whipped cream filling in the center of a red mochi disc. Sprinkle a few mini chocolate chips over the cream. Carefully bring the edges of the red mochi disc up and around the filling, pinching them together tightly at the top to seal completely. Gently shape it into a smooth ball. Now, carefully pick up one of your thin green mochi discs. Gently stretch and wrap it around the sealed red mochi ball, covering about two-thirds to three-quarters of the red mochi. Press it gently to adhere and blend the seam, leaving a portion of the red 'flesh' exposed at the top, like a cut slice of watermelon. Place the finished Watermelon Mochi on a small piece of parchment paper or into a mini cupcake liner. Repeat with the remaining mochi and filling.
Nutrition
- Serving Size: 1 piece
- Calories: 150
- Sugar: 10 g
- Sodium: 5 mg
- Fat: 7 g
- Saturated Fat: 4 g
- Unsaturated Fat: 2 g
- Trans Fat: 0 g
- Carbohydrates: 20 g
- Fiber: 1 g
- Protein: 2 g
- Cholesterol: 20 mg
Keywords: Don't skimp on the starch to prevent sticking. Work while the mochi is warm for easier handling. Use the freshest watermelon for the best flavor. You can also steam the mochi dough instead of microwaving for a chewier texture.


Leave a Comment